(un)Regular Tech Adventures: Blender, Wireguard, Android
This week is quite varied. Some artistic work, some networking, some app dev.
1. Blender Cel Shading
Inspired by this below
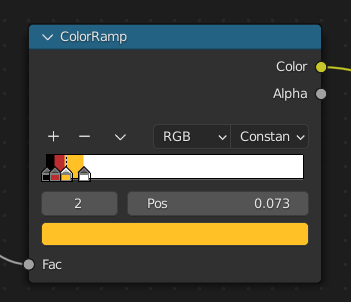
Generally Blender Cel Shading is done through nodes and ColourRamps.
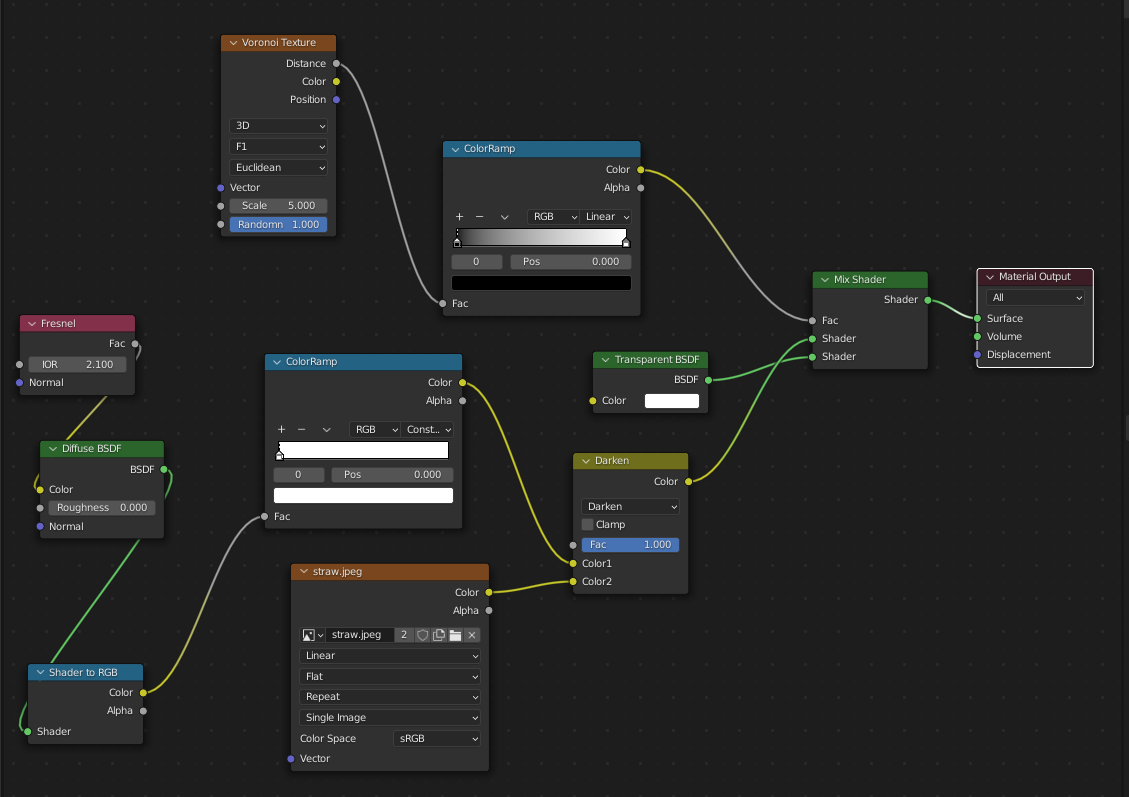
There are many tutorials online for Cel Shading, but the nodes would generally look similar, like below.


The main idea is to add shading colours on the colour ramp. This means you can do something like this

Sometimes there’s a texture on the surface. We can use a MixRGB node to combine the cell Shading and the image texture.
[
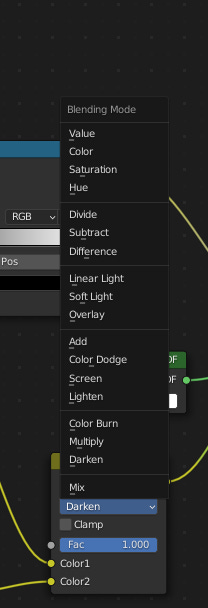
You Can Change the Way the MixRGB node combines the shader to get different effects.
2. Wireguard Configuration
I’ve recently did some further experimentation and networking on wireguard.
I was interested in forwarding a Local Area Network over the internet, and secure it with Wireguard.
2.1 Revision
- Running the
docker-compose.ymlbelow would work - Port 51820 would need to be exposed
- Change the number of PEERS before running it. Peer refers to the number of clients connecting to the wireguard server
- The connnection file for each peer would be in
/opt/wireguard-server/config/peer1/peer1.conf,/opt/wireguard-server/config/peer2/peer2.confetc.
version: '3.7'
services:
  wireguard:
    image: linuxserver/wireguard
    container_name: wireguard
    cap_add:
      - NET_ADMIN
      - SYS_MODULE
    environment:
      - PUID=1000
      - PGID=1000
      - TZ=Africa/Nairobi #set correct timezone
      - SERVERPORT=51820 #oFor Art Stuffptional
      - PEERS=1 #optional
      - PEERDNS=auto #optional
      - ALLOWEDIPS=0.0.0.0/0 #Peer addresses allowed
      - INTERNAL_SUBNET=10.13.13.0/24 #Subnet used in VPN tunnel
      - SERVERURL=192.168.201.13 #Wireguard VPN server address
    volumes:
      - /opt/wireguard-server/config:/config
      - /usr/src:/usr/src # location of kernel headers
      - /lib/modules:/lib/modules
    ports:
      - 51820:51820/udp
    sysctls:
      - net.ipv4.conf.all.src_valid_mark=1
    restart: always
2.2 Forwarding
There are a few ways forwarding can be done.
2.2.1 Server LAN -> Clients
If you run the docker-compose file, the server’s configuration file will be automatically generated.
That configuration will forward everything on its LAN and WAN network by default.
It looks something like this (with the fields filled up)
[Interface]
Address =
ListenPort =
PrivateKey =
PostUp = iptables -A FORWARD -i %i -j ACCEPT; iptables -A FORWARD -o %i -j ACCEPT; iptables -t nat -A POSTROUTING -o eth+ -j MASQUERADE
PostDown = iptables -D FORWARD -i %i -j ACCEPT; iptables -D FORWARD -o %i -j ACCEPT; iptables -t nat -D POSTROUTING -o eth+ -j MASQUERADE

[Peer]
# peer1
PublicKey =
PresharedKey =
AllowedIPs =

[Peer]
# peer2
PublicKey =
PresharedKey =
AllowedIPs =
2.2.2 Clients LAN -> Server -> Other Clients
Firstly you would need to modify the peer’s config file
A Sample Peer File is shown below.
Replace <network-interface> with the relevant network interface you want to forward across in the PostUp and PostDown. (eg. wlan0)
[Interface]
Address =
PrivateKey =
ListenPort =
DNS =
PostUp = iptables -A FORWARD -i <network-interface> -j ACCEPT; iptables -t nat -A POSTROUTING -o <network-interface> -j MASQUERADE
PostDown = iptables -D FORWARD -i <network-interface>-j ACCEPT; iptables -t nat -D POSTROUTING -o <network-interface> -j MASQUERADE


[Peer]
PublicKey =
PresharedKey =
Endpoint =
AllowedIPs = 0.0.0.0/0
Next, you would need to modify the server’s config file (wg0.conf).
You would need to allow the server to forward desired subnets from that peer
...
[Peer]
# peer1
PublicKey =
PresharedKey =
AllowedIPs = 10.13.13.2/32, 192.168.0.0/24, ... <insert your subnets here>
...
2.3 Networking
Some interesting things I found out about Experimenting with routers
A router is basically a device that
A router acts like a network device on the WAN. This means it can get an IP address on the public network. This may not be true all the time though, sometimes they put a NAT
As such, theoretically, you can do this
  | WAN (Public IP 10.10.10.1, or through a NAT)
Router
  | LAN (Subnet 192.168.1.0/24)
  |
  | WAN (192.168.1.30)
Router
  | LAN (Subnet 192.168.40.0/24)
  |
  - - - - - - - - - - - -
  |                     |
Device               Device
192.168.40.100   192.168.40.101
Most wireguard servers work like this. The server can access the Local Area Network through its ethernet port
   WAN
    |
  Router
    | LAN
    |
Server [Eg. RPi]
But what if you have another Router with built in Wireguard support? You can just replace the server like this. Configuring the VPN Router
  Router
    | LAN (Subnet 192.168.8.0/24)
    |
    | WAN (192.168.8.100)
Router with VPN
In fact, if the Router with VPN has Internet (Eg. a Modem) , you can do something like this to Supply Internet to the Internal Router
           Router
             ||
         WAN || LAN (Subnet 192.168.8.0/24)
(Internet) ^ ||
         LAN || WAN (192.168.8.100)
             ||
       Router with VPN
Switches
Switches on the other hand are just providing the router additional ethernet ports. IP Addresses are still assigned from the Router/other DHCP Server connected to it
  | WAN (Public IP 10.10.10.1, or through a NAT)
Router
  | LAN (Subnet 192.168.1.0/24)
  |
Switch
  |
  - - - - - - - - - - - -
  |                     |
Device               Device
192.168.1.100   192.168.1.101
3. Android BLE - Interfacing with a custom peripheral
Last week, I experimented with the Arduino Nano 33 BLE. This week I was experimenting with Android BLE code. The idea was for the Android device to communicate to the Arduino through BLE.
Here are the main things to set up for Android code to connect to a BLE peripheral & interface with its characteristics.
3.1 Add Permissions to the Manifest
You’ll need to allow the app to connect to bluetooth devices. To do so, you need to add the related permission in the AndroidManifest.xml
I think you only really need BLUETOOTH_CONNECT for connecting to an already paired device
    <!-- Request legacy Bluetooth permissions on older devices. -->
    <uses-permission android:name="android.permission.BLUETOOTH"
        android:maxSdkVersion="30" />
    <uses-permission android:name="android.permission.BLUETOOTH_ADMIN"
        android:maxSdkVersion="30" />
    <!-- Needed only if your app looks for Bluetooth devices.
         If your app doesn't use Bluetooth scan results to derive physical
         location information, you can strongly assert that your app
         doesn't derive physical location. -->
    <uses-permission android:name="android.permission.BLUETOOTH_SCAN" />
    <!-- Needed only if your app makes the device discoverable to Bluetooth
         devices. -->
    <uses-permission android:name="android.permission.BLUETOOTH_ADVERTISE" />
    <!-- Needed only if your app communicates with already-paired Bluetooth
         devices. -->
    <uses-permission android:name="android.permission.BLUETOOTH_CONNECT" />
    <!-- Needed only if your app uses Bluetooth scan results to derive physical location. -->
    <uses-permission android:name="android.permission.ACCESS_FINE_LOCATION" />
3.2 Sample BLE code
I created 2 classes to handle sample BLE code
- BluetoothLeService handles the Gatt Service
- BLECLient starts BluetoothLeService in the background as a service, and interfaces with it to handle the device.
Generally most examples also use a BluetoothLeService, and start it within their activity. I tried to strip all that example code down here
- BLEClient.java hosted with ❤ by GitHub
- BluetoothLeService.java hosted with ❤ by GitHub
- run.java hosted with ❤ by GitHub
3.3 Add the Service to the manifest
You would need to add the Service to the AndroidManifest to allow it to run
        <activity
            android:name=".OtherActivity"
            android:exported="false"
            android:label="@string/title_activity_other"
            android:parentActivityName=".MainActivity"
            />
        <service android:name=".BluetoothLeService" android:enabled="true"/>
    </application>
3.4 Run
Compiling the app and running it should work. For me I got spotty results on connection, but restarting the app should be fine.
Some other useful resources include these
- https://developer.android.com/guide/topics/connectivity/bluetooth/connect-gatt-server#java
- https://developer.android.com/guide/topics/connectivity/bluetooth/transfer-ble-data
- https://stackoverflow.com/questions/21537976/cannot-bind-to-service-in-android
Others
Alright thats it from me this week.
Next week I’ll prob be experimenting more with Blender Add Ons and fun stuff like that.
See you next time!