(un)Regular Tech Adventures: AWS IoT Tunneling, Arduino BLE
Hi, I’m a tinkerer just sharing my findings with the wider world. This week I did some tunneling, some BLE.
AWS IoT Tunnneling
I have been working on solving the problem of streaming video from the phone’s cameras to an EC2 Instance, and I thought this could be one way to do so.
The idea was for the phone to host an SSH server, the EC2 to connect to it and view the phone’s RTSP Stream.
So recently I was experimenting with IoT Tunneling as a way of establishing the connection between the phone and the EC2. Documentation out there for this is a bit spotty, so hopefully this may be useful.
Setup
The process goes something like this
- Create a new Tunnel
- Generate Source Access Token & Destination Token
- Connect to Tunnel
- Source Access device runs
localproxybinary - Destination device runs
localproxybinary
- Source Access device runs
- Token expires after 1 use/connection
- Repeat Step 2
Configuration on IoT Dashboard
Go to AWS IoT > Manage > Remote actions > Tunnel
Create a new tunnel by following the instructions there.
x86 installGo to Manage
Create a new tunnel
You can follow the compilation guides on the official localproxy Repo. Personally, I had trouble compiling the binary (code side issue?) , but this could just be due to my set up.
What I did instead was download binaries, which are available on here or here.
A common issue when running the binary is that the computer does not have the required libssl1.1 library. You can fix it by just installing the related package at https://faq.mytaxexpress.com/index.php?action=faq&cat=1&id=308&artlang=en
On a debian x86 system, it would be something like this
wget https://www.mytaxexpress.com/download/libssl1.1_1.1.1f-1ubuntu2.17_amd64.deb
sudo dpkg -i libssl1.1_1.1.1f-1ubuntu2.17_amd64.deb
wget https://github.com/aws-samples/aws-iot-securetunneling-localproxy/releases/download/v3.0.2/localproxy
chmod +x localproxy
ARM Setup
I compiled a binary using the official guide (I did it on an Nvidia Orin). I didn’t meet any big issues here, libraries install well (though protobuf takes a while), the code compiles without any errors, and the resulting binary is usable.
For Termux, I set up proot distro (it was easier to configure), installed libssl1.1 got the proxy working
pkg install proot-distro
proot-distro install debian
proot-distro login debian

wget http://ports.ubuntu.com/pool/main/o/openssl/libssl1.1_1.1.1f-1ubuntu2_arm64.deb
dpkg -i libssl1.1_1.1.1f-1ubuntu2_arm64.deb

# Then download and run the binary, which should work
When using it, make sure to enable wake lock, such that it doesn’t disconnect
Usage
# Checks for any issues
./localproxytest

# To run on receiving end. Tunnel can be accessed on port 5555
./localproxy -r ap-southeast-1 -s 5555 -t <source_access_token>

# To run on destination (with the server), Tunnels out port 8000
./localproxy -r ap-southeast-1 -d localhost:8000 -t <destination_token>
Results
Networking wise it is quite decent. There was not much difficulty maintaining a stable connection. I had trouble getting anything other than SSH to work, but as SSH Tunneling allows you to access other network services anyway, this is a minor issue.
A big benefit of this is the security. You can lock down tunnels with rotating access tokens to prevent unauthorised access. So far, this is the only one I have seen for tcp services (not just http).
Cost is an issue ($1 per tunnel, tunnel expires every 12h or less), and it can quickly scale. It is quite annoying to keep rotating access tokens and tunnels, but it’s due to security reasons (as it should be, a dangling Token could lead to RCE).
Another potential issue is that each tunnel can only support 1 source access connection (1 device access the tunnel). This means that you cannot, for instance, host a webportal for multiple devices to connect to it.
However, it’s 800kbps or so bandwidth makes it unusable for anything more than simple use cases/ IoT device sysadmin (which was the original goal anyway). I tested Tunneling RTSP over and it caused choppy video with 1min latency, unusable for my use case
Overall its a useful tool for doing what it is intended for, and probably nothing much more.
Related Resources
Arduino Nano 33 BLE Bluetooth
Recently I also experimented with the Arduino Nano 33 BLE. I wanted to quickly start using BLE.
Setting it up is quite easy, just install the Arduino IDE, select the Serial Port with the board, and the Arduino IDE will automatically install the related toolkit. I wanted to test Arduino BLE as a peripheral, so I installed the ArduinoBLE library through the library manager.
After some experimenting, I got some sample code to send and receive string data. Thanks to the advice here.
The general idea is to
- Create a service. 1 device can have multiple service
- This code creates 2 services, ledService, and dataService
- UUID is unique for each service
- Add characteristics to each service. Characteristics are like permissions, they allow you to read, or write certain data.
- Characteristics can Notify, which sends a notification to the connected device of the updated data (though the amount of data sent is probably limited).
- In this case, ledService has 2 characteristics, led (to set state of LED), and button (to view state of button)
- dataService has 2 characteristics to input and output a string respectively.
Here is the code (built on ButtonLED)
/*
  Button LED

  This example creates a Bluetooth® Low Energy peripheral with service that contains a
  characteristic to control an LED and another characteristic that
  represents the state of the button.

  The circuit:
  - Arduino MKR WiFi 1010, Arduino Uno WiFi Rev2 board, Arduino Nano 33 IoT,
    Arduino Nano 33 BLE, or Arduino Nano 33 BLE Sense board.
  - Button connected to pin 4

  You can use a generic Bluetooth® Low Energy central app, like LightBlue (iOS and Android) or
  nRF Connect (Android), to interact with the services and characteristics
  created in this sketch.

  This example code is in the public domain.
*/

#include <ArduinoBLE.h>

const int ledPin = LED_BUILTIN; // set ledPin to on-board LED
const int buttonPin = 4; // set buttonPin to digital pin 4

// Service 1
BLEService ledService("19B10010-E8F2-537E-4F6C-D104768A1214"); // create service
BLEByteCharacteristic ledCharacteristic("19B10011-E8F2-537E-4F6C-D104768A1214", BLERead | BLEWrite);
BLEByteCharacteristic buttonCharacteristic("19B10012-E8F2-537E-4F6C-D104768A1214", BLERead | BLENotify);

// Service 2
BLEService dataService("DA7A"); // create service
BLECharacteristic inputCharacteristic("DA7A", BLERead | BLEWrite, "AAAAAAAAAAAAAAAAAAAAAAAAAAAAAAAAAAAAAAAAAAAAAAAAAAAAAAAAAAAAAAAAAAAAAAAAAAAAAAAAAAAAAAAAAAAAAAAAAAAAAAAAAAAAAAAAAAAAAAAAAAAAA"); // String
BLECharacteristic outputCharacteristic("DA7A", BLERead | BLENotify, "AAAAAAAAAAAAAAAAAAAAAAAAAAAAAAAAAAAAAAAAAAAAAAAAAAAAAAAAAAAAAAAAAAAAAAAAAAAAAAAAAAAAAAAAAAAAAAAAAAAAAAAAAAAAAAAAAAAAAAAAAAAAA");

void setup() {
  Serial.begin(9600);
  while (!Serial);

  pinMode(ledPin, OUTPUT); // use the LED as an output
  pinMode(buttonPin, INPUT); // use button pin as an input

  // begin initialization
  if (!BLE.begin()) {
    Serial.println("starting Bluetooth® Low Energy module failed!");

    while (1);
  }

  // set the local name peripheral advertises
  BLE.setLocalName("ButtonLED");

  // set the UUID for the service this peripheral advertises:
  BLE.setAdvertisedService(ledService);
  ledService.addCharacteristic(ledCharacteristic);
  ledService.addCharacteristic(buttonCharacteristic);
  BLE.addService(ledService);
  ledCharacteristic.writeValue(0);
  buttonCharacteristic.writeValue(0);

  dataService.addCharacteristic(inputCharacteristic);
  dataService.addCharacteristic(outputCharacteristic);
  BLE.addService(dataService);
  outputCharacteristic.setValue("hello");

  // start advertising
  BLE.advertise();

  Serial.println("Bluetooth® device active, waiting for connections...");
}

void loop() {
  // poll for Bluetooth® Low Energy events
  BLE.poll();

  // read the current button pin state
  char buttonValue = digitalRead(buttonPin);

  // has the value changed since the last read
  bool buttonChanged = (buttonCharacteristic.value() != buttonValue);

  if (buttonChanged) {
    // button state changed, update characteristics
    ledCharacteristic.writeValue(buttonValue);
    buttonCharacteristic.writeValue(buttonValue);
  }

  if (ledCharacteristic.written() || buttonChanged) {
    // update LED, either central has written to characteristic or button state has changed
    if (ledCharacteristic.value()) {
      Serial.println("LED on");
      digitalWrite(ledPin, HIGH);
    } else {
      Serial.println("LED off");
      digitalWrite(ledPin, LOW);
    }
  }

  if (inputCharacteristic.written()){
    outputCharacteristic.setValue((char*)inputCharacteristic.value());
  }
}
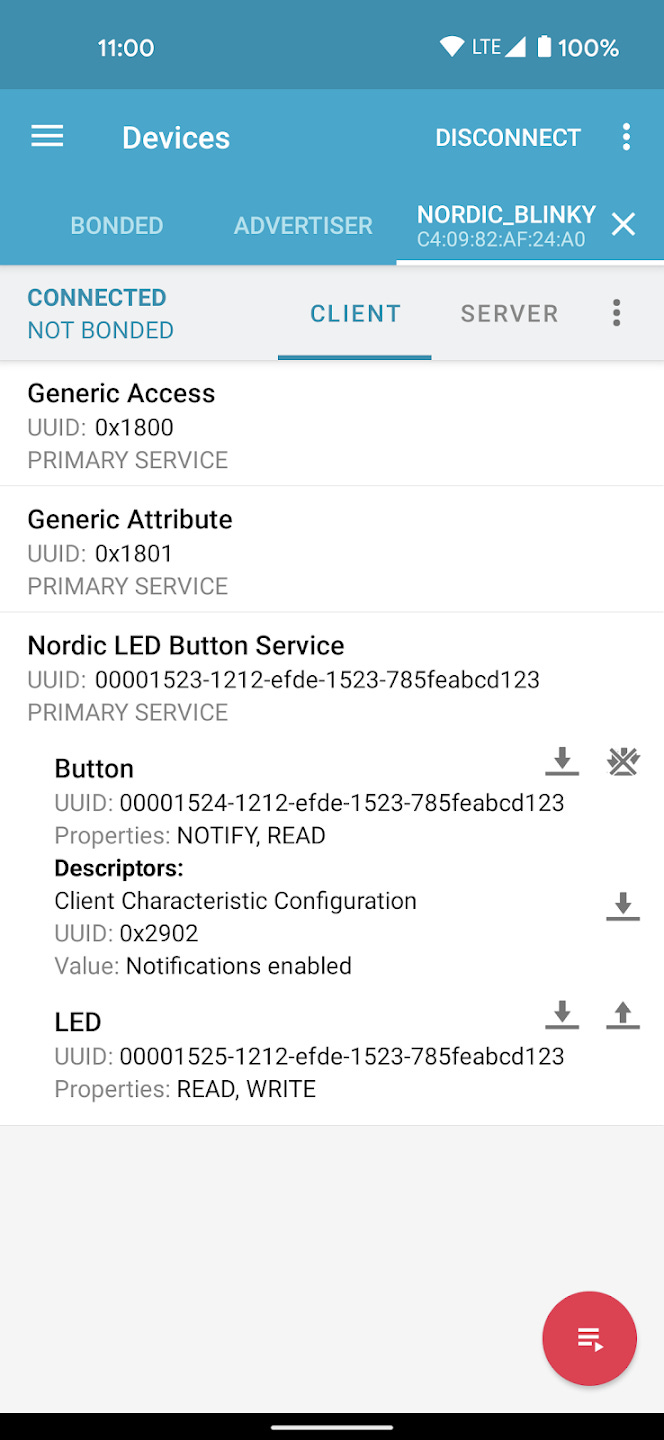
Testing the BLE is relatively easy. Just use the Nordic Semiconductors nRF Connect App, connect to a device, and the related characteristics should show up.
Others
I finally got my Class 3A Driving License! Was about time since it has been 1 year since I enrolled (though I spent 4 months of it being in NS).
I believe Termux is one of the most powerful apps on Android. It basically converts your phone into a powerful Linux Machine. You can easily run scripts/ do testing that may be more complicated to test when coding a regular android app (Eg. Python, SSH)
For a well established service, AWS has a lot of services which are not very well documented. I feel quite a fair bit of services (the less popular ones) do not have guides anywhere other than AWS themselves (which I feel have quite a fair bit of missing gaps). Furthermore, their sample code may also not be guaranteed to work easily.
I’ve recently tested VirtualBox port forwarding on it’s NAT again.
- Its quite easy to do so, just go to network settings, configure a network adaptor to NAT, go to more settings, and follow the GUI.
- It forwards a server within the VM to out of the VM, not really the other way round. Just something good to know
Furthermore, I tried setting up Wireguard VPN using docker-compose, which worked relatively well.
- I followed this guide here, which mainly involved creating a docker-compose file, and running it.
- You’ll need a public IP to make best use of it.
- Change the number of
PEERSbefore running it. Peer refers to the number of clients connecting to the wireguard server - The connnection file for each peer would be in
/opt/wireguard-server/config/peer1/peer1.confetc.
version: '3.7'
services:
  wireguard:
    image: linuxserver/wireguard
    container_name: wireguard
    cap_add:
      - NET_ADMIN
      - SYS_MODULE
    environment:
      - PUID=1000
      - PGID=1000
      - TZ=Africa/Nairobi #set correct timezone
      - SERVERPORT=51820 #optional
      - PEERS=1 #optional
      - PEERDNS=auto #optional
      - ALLOWEDIPS=0.0.0.0/0 #Peer addresses allowed
      - INTERNAL_SUBNET=10.13.13.0/24 #Subnet used in VPN tunnel
      - SERVERURL=192.168.201.13 #Wireguard VPN server address
    volumes:
      - /opt/wireguard-server/config:/config
      - /usr/src:/usr/src # location of kernel headers
      - /lib/modules:/lib/modules
    ports:
      - 51820:51820/udp
    sysctls:
      - net.ipv4.conf.all.src_valid_mark=1
    restart: always
I’ll want to do more regular writeups, so maybe the next issue will be next week?
And that’s it for this week. See you around!